FAQs
Signs & Banners
Aluminum Dye Sub Panels
Elevate your compositions and boost sales with our high-quality Aluminum Dye Sub Panels. Our prints are produced on 0.045-inch white gloss aluminum panels using the advanced dye-sublimation process, ensuring unparalleled photo vibrancy and striking visual impact. These aluminum metal prints are designed to catch the eye, making them perfect for photographers, artists, and anyone looking to showcase their work with a modern edge.
Available Sizes Our Aluminum Dye Sub Panels come in a range of sizes to suit your specific display needs. Whether you're creating a small accent piece or a large focal point, we have the perfect size option for you.
Optional Accessories For an even more impressive display, consider our optional stand-off accessory. Sold separately, this accessory adds a professional touch to your prints, making them stand out even more.
Specifications
- Thickness: Our panels have a thickness of 3mm (approximately 1/8 inch), giving them a sturdy and durable quality without being overly heavy.
- Bleed Requirements: To ensure the best possible print quality, please include a 0.5-inch bleed on all sides of your artwork. Do not add crop marks to your design.
By adhering to these guidelines, you can ensure your artwork is perfectly suited for our Aluminum Dye Sub Panels, resulting in prints that truly make an impact.
Aluminum Floor Graphic is a rugged 20mil aluminum foil material and is designed to naturally conform to the texture of rough or smooth surfaces. The high-friction / slip-resistant surface improves the stability of pedestrian traffic in the area it is applied to. It's designed to withstand harsh weather conditions in both hot and cold weather conditions. It is Printed directly on the material using UV cured inks and the material is rated for outdoor use, this material would last long outdoors. Harsh conditions and /or extreme traffic may wear down the slip resistance and require the graphics to the replaced earlier for safety precautions. Indoor applications and locations with lighter pedestrian traffic can exceed life expectancy. This material surpasses anti-slip safety standards, both when wet or dry. Bleed: ensure you have 0.5" on all sides of your artwork, do not add crops.
What is Aluminum Heavy Duty?
Aluminum Heavy Duty is a high-quality, rust-proof aluminum material, 0.08 inches thick, designed for maximum outdoor durability. It's perfect for withstanding the elements, ensuring your signage remains pristine over time.
What sizes and shapes are available?
Our Aluminum Heavy Duty signs come in various sizes and can be customized with round corners, straight corners, or contour cutting to suit your specific needs.
Can I mount the signs easily?
Yes! To meet all your mounting requirements, we offer optional 3/8" drill holes or standoff hardware. These options are available in a variety of placement positions, providing you with greater versatility in installation, whether outdoors or indoors.
Where are these signs most commonly used?
These durable signs are ideally suited for outdoor use but are equally functional indoors. They are commonly used for parking and traffic signs, factory and warehouse notifications, directional signage, and more.
What is the recommended thickness?
Our Aluminum Heavy Duty signs have a thickness of 0.080 inches, offering a robust solution for your signage needs.
What about the artwork bleed?
For optimal printing results, please ensure your artwork includes a 0.5-inch bleed on all sides. Do not add crop marks to your design. This allows for precise cutting and ensures that your design extends to the edges of the sign.
What are Aluminum Sandwich Boards made of?
Aluminum Sandwich Boards are constructed with two .012" aluminum sheets surrounding a polyethylene core, creating a durable board with a total thickness of 1/8" (3mm). They are printed using UV inks for longevity and color vibrancy.
What colors are available?
Our boards come in two pre-painted options: White and Brushed Silver, providing versatility for various design preferences.
Can they be attached easily?
Yes, we offer drill hole options for effortless attachment to a variety of surfaces such as posts, fences, walls, and more, ensuring a quick and simple installation process.
Are these boards suitable for outdoor use?
Absolutely. Aluminum Sandwich Boards are designed for both indoor and outdoor applications, making them a versatile choice for numerous settings.
What are their common uses?
These boards are widely used for real estate signage, customer/handicap notices, directional signs, and many other purposes due to their durability and visibility.
What should I consider for the artwork bleed?
For the best results, please ensure your artwork has a .5" bleed on all sides. Do not add crop marks to your design.
How thick are the boards?
The boards have a thickness of 3mm (1/8"), offering a robust yet lightweight signage solution.
What are Backlit Posters?
Backlit Posters are made from a 9mil semi-rigid material featuring a matte finish, designed for creating eye-catching, illuminated graphics. Their superior light diffusion capabilities make them ideal for vibrant backlit displays.
What applications are suitable for Backlit Posters?
These posters are perfect for a variety of applications, including Exhibition Panels, Point of Purchase (POP) Displays, Movie Theater Posters, Bus Stop/Transportation Signage, and more. They are designed to make your message shine brightly and attract attention.
Can Backlit Posters be used outdoors?
Yes, Backlit Posters can be utilized outdoors, provided they are housed within a lightbox. For outdoor use, the lightbox should be equipped with UV protectant sheets, such as styrene or acrylic, to shield the posters from the elements and ensure longevity.
What is required for the artwork bleed?
For optimal printing quality, please ensure your artwork includes a bleed of 0.25 inches on all sides. This results in a total bleed of 0.5 inches, ensuring that the final printed piece looks polished and professional without any important elements being cut off at the edges.
What material and size are available for the Aluminum Retractable Banner Stands?
Our Aluminum Retractable Banner Stands come with 10mil Premium Vinyl Indoor Banners, perfect for Point Of Purchase (POP) displays that effectively showcase your products and services. The banners are sized at 33" x 80" for full visibility.
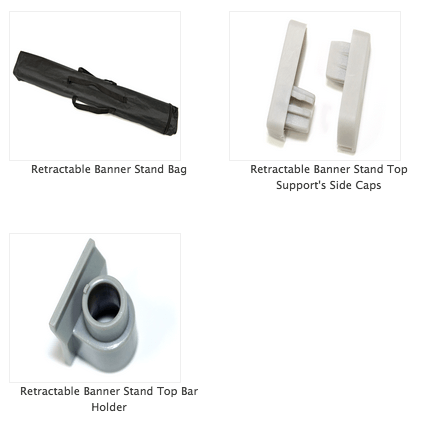
How are the banner stands packaged and set up?
Each retractable banner stand is compactly packed in a small pouch for convenience and can be set up in a few easy steps, making it perfect for quick and efficient display.
Is there a specific artwork size requirement?
Yes, we require a bleed for the banner stand product. Your artwork should be exactly 34" x 81" to account for a 0.5" bleed on all sides. This ensures that after cutting, your banner will perfectly fit the 33" x 80" stand without needing grommets.
Do I need to use grommets for the banner?
No, this product does not require grommets. The design of the banner and the stand ensures a seamless display without the need for grommets.
Where can I find the template for designing my banner?
We strongly recommend using our template to design your banner. This ensures that your artwork is within the safe zone and meets the size requirements. You can find the template in the Grand4mat templates section on our website.
Where can I purchase parts for the banner stand?
Replacement parts for the banner stand are available for purchase in our online "Marketplace" under the main category "Banner Stands and Parts." This ensures that you can easily maintain and update your banner stand as needed.
For a professional and impactful display, our Aluminum Retractable Banner Stands offer ease of use, durability, and the perfect showcase for your services and products.
What sets the Deluxe Banner Stands apart? The Deluxe Banner Stands offer a premium alternative to our standard retractable stands, featuring a larger, more robust base enhanced with chrome accents for a distinctively stylish appearance.
What material options are available for the Deluxe Banner Stands? Each Deluxe Banner Stand is available with 10 mil indoor vinyl, ensuring durability and high-quality display. You have the option to choose between Single-Sided or Double-Sided retractable hardware, catering to your specific display needs.
Are the Deluxe Banner Stands easy to transport? Yes, the Deluxe Banner Stands are designed for ease of transportation. They are collapsible and portable, making them perfect for events and presentations. A convenient carrying case is included with each stand for effortless mobility.
What are the printing specifications for artwork? For optimal printing quality, your artwork should be prepared with a 0.5" bleed on all sides. This means the artwork should be exactly 34" x 81" to accommodate being trimmed down to the finished size of 33" x 80". Please ensure no important design elements are placed within the bleed area to avoid being cut off.
Can I choose between Single-Sided and Double-Sided displays? Yes, the Deluxe Banner Stands are available with either Single-Sided or Double-Sided retractable hardware, allowing you to select the best option for your visibility and display needs.
For any further inquiries or to discuss your specific requirements, please do not hesitate to contact us.
Yes, templates can be found under the "Template" tab on the Real Estate Post product page.
Overview: The Double-Sided Deluxe Retractable Banner Stand offers an exceptional display solution featuring two vibrant, full-color images. These images are presented back-to-back on high-quality 10mil indoor vinyl, creating a dynamic and engaging visual experience. The stand is supported by a robust, open-faced base, incorporating a silver pole and an aluminum foundation for stability and durability. Designed for versatility, this retractable banner stand is easily collapsible, making it conveniently portable. It also includes a carrying case, ensuring safe storage and transport.
Material Thickness: The banners are printed on 10mil indoor vinyl, providing a durable and high-quality display medium suitable for indoor environments.
Bleed Requirements: To achieve the best results for your artwork, please include a 0.5-inch bleed on all sides. Avoid adding crop marks to your design to ensure a seamless print process.
Resolution Guidelines: For crisp and clear imagery, we recommend a resolution range between 150 dpi and 300 dpi at the actual size of your banner. This ensures your images are sharp and vibrant, enhancing the overall impact of your display.
For any further inquiries or assistance with your Double-Sided Deluxe Retractable Banner Stand, please do not hesitate to contact us.
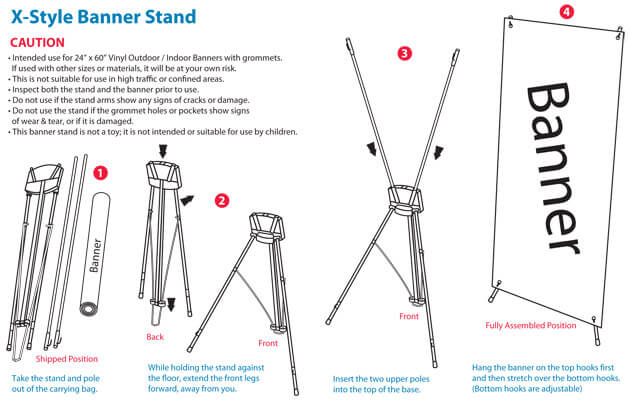
1. What are Economy X-Style Collapsible Banner Stands?
- Economy X-Style Collapsible Banner Stands are versatile and user-friendly display solutions. They are designed for ease of setup and come with various banner material options.
2. What banner material options are available?
- You can choose from three banner material options:
- 13 oz Scrim Vinyl (Outdoor): These banners are durable and waterproof, making them suitable for outdoor use, including POP displays.
- 10 mil Premium Vinyl (Indoor): These banners offer near photo quality and are ideal for indoor settings, such as trade shows and POP displays.
- 9 oz Premium Polyester Fabric: Printed with superior quality dye sublimation equipment, these banners offer vibrant and long-lasting colors, perfect for fabric printing.
3. What are the dimensions of the banner?
- The standard banner size is 24" x 60". However, we require a bleed for this banner stand product, so your artwork should be exactly 25" x 61". This allows us to cut it down to the desired size of 24" x 60". The banners also come with grommets in each corner for easy hanging.
4. How do I set up the banner stand?
- Setting up the Economy X-Style Collapsible Banner Stand is a breeze. You can have it ready in seconds, making it a convenient choice for your display needs.
5. Do I need to consider bleed and cropping for my artwork?
- Yes, for the best results, ensure that your artwork includes a 0.5" bleed on all sides. Your final artwork should be precisely 25" x 61" to allow for cutting down to the standard 24" x 60" size. The grommets in the corners are included to facilitate easy installation.
The Telescopic Backdrop Banner Stand is a versatile and portable solution for displaying brand messaging, event backdrops, trade show signage, and more. It offers a quick and easy setup, making it suitable for both indoor and outdoor use.
You can use the Telescopic Backdrop Banner Stand for a wide range of applications, including AD Design Billboards, Building Wraps, Trade Show Signage, Film Festival Backdrops, and many more creative purposes.
The telescopic poles of this product are adjustable horizontally from 5 to 10 feet and vertically from 3.5 to 8 feet, providing flexibility to accommodate various display needs.

Our Blockout Vinyl is the ideal choice when you demand top-tier banner quality. Its smooth surface ensures exceptional print detail, even when viewed up close. Blockout Vinyl lives up to its name by being completely opaque, preventing sunlight from passing through and maintaining full opacity. It boasts superior durability compared to our 13oz Outdoor Banner and remains crease-free, even when stored in a tube.
Key Features:
- Exceptional Print Detail: Achieve stunning print clarity for your designs.
- Total Opacity: Blocks out sunlight and ensures complete opacity.
- Durability: Heavier and more durable than our 13oz Outdoor Banner.
- Low Curl: Remains smooth when unrolled, even after storage.
- Versatile Usage: Ideal for banners, flags, signage, trade shows, and events.
- Easy Ordering: No bleed or crop requirements; design to the exact size you need.
- Safety Margin: Allow for a 2" safety margin away from the cut edge.
Recommended Uses:
- Banners
- Flags
- Signage
- Trade Shows
- Events
Group shipping options are available for this product and can be conveniently accessed alongside our other indoor banner products.
For additional information or inquiries, please feel free to contact us. Your satisfaction is our priority.
Purpose: Bumper Stickers have evolved beyond just adorning car bumpers. They serve as a powerful medium to convey your message or promote your cause. These versatile stickers can be creatively applied to any smooth, clean surface, whether indoors or outdoors. Our Bumper Stickers are meticulously printed on high-quality white vinyl with a permanent adhesive backing, firmly attached to an unscored release liner. Their exceptional durability ensures that they are intended for long-term use and are not designed for easy removal. Attempted removal may result in uneven peeling and an undesired outcome. We advise against applying this product to items you intend to remove it from in the future.
Enhanced Durability: For extended outdoor durability, Bumper Stickers can be ordered with Gloss UV lamination.
Bleed Requirement: To ensure a seamless finish, it's essential to include a .5" margin on all sides of your artwork. Please refrain from adding crops.
Acrylic is renowned for its exceptional qualities, including its crystal-clear appearance, minimal sensitivity to UV light, and strong resistance to weather elements. It provides the luminous and translucent look of glass, yet it is significantly lighter and more robust. Acrylic is user-friendly in terms of shaping, offering high resistance to impacts, outstanding clarity, and excellent durability against weather conditions.
Thickness: 1/4 inch
Bleed: Please make sure to include a 0.5-inch bleed around all edges of your artwork, and avoid adding crop marks.
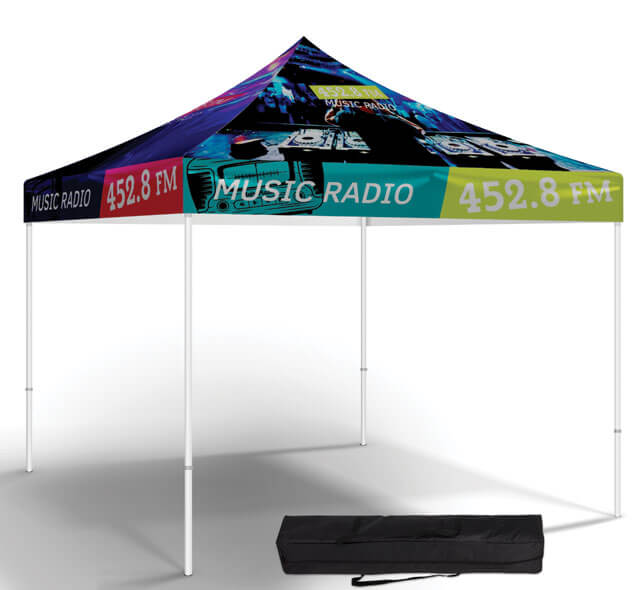
Event Tents are your go-to choice for making a lasting impression at festivals, conventions, trade shows, and beyond. Crafted with precision, these tents are a canvas for your brand's success. Here's why Event Tents are the ideal choice:
High-Quality Printing: Our Event Tents are adorned with vibrant graphics, thanks to cutting-edge UV Ink Technology. The result? Crisp, eye-catching visuals that demand attention.
Weather-Resistant: Constructed from 11oz water-repellent fabric, our Event Tents stand strong against the elements. Rain or shine, your message remains unscathed.
Versatile Design: With 4 fabric panels at your disposal, you have the freedom to showcase up to 4 unique designs. Make every side count, and captivate your audience from all angles.
Seamless Assembly: Setting up your brand's stage is a breeze with our 10' x 10' aluminum pop-up canopy tent. Effortlessly assemble your Event Tent and make a grand entrance.
Elevate your marketing game with Event Tents. Stand out, get noticed, and leave a lasting impression on your target audience. It's time to take your brand to new heights.
Feel free to let me know if you'd like any further adjustments or if you have any specific details to add.

Canvas Banners
Our Canvas Banners are a lightweight and versatile choice for your printing needs. Here's what you need to know:
Material: We use high-quality 17mil canvas material that ensures vibrant colors in CMYK.
Gallery Wrap Ready: These banners are gallery wrap capable, making them perfect for mounting and framing. They can also be conveniently rolled into a square tube for safe shipping.
Customization: You can choose from various options, including pole pockets, grommets, and sewn hems. Additionally, there's an option for white or black thread hemming.
Artwork Guidelines: To ensure the best results, we recommend no bleed or crops. Make your artwork exactly the size you are ordering. Keep important text/artwork at least 2 inches inward from the edge to prevent any elements from being cut off or hemmed over.
Polyester Banners
Our Premium Polyester banners are a fantastic choice for a wide range of applications. Here's what you need to know:
Material: We print these banners on high-quality 9oz Premium Polyester using top-notch dye sublimation equipment, guaranteeing long-lasting and vibrant colors.
Versatile Uses: Polyester banners are ideal for trade shows, soft signage, retail, and interior decoration applications. They are lightweight, wrinkle-resistant, and can be folded for easy shipping.
Customization: Just like our Canvas Banners, you can choose from options like pole pockets, grommets, and sewn hems. We also offer the choice of white or black thread hemming.
Recommended Uses: Consider using these banners for wall decor, P.O.P. displays, and more.
Artwork Guidelines: Make sure your artwork has a 0.5" margin on all sides for a total of 1" to allow for bleed.
We hope this information helps you make the most of our Fabric Banners. If you have any further questions or need assistance, please don't hesitate to reach out to us.
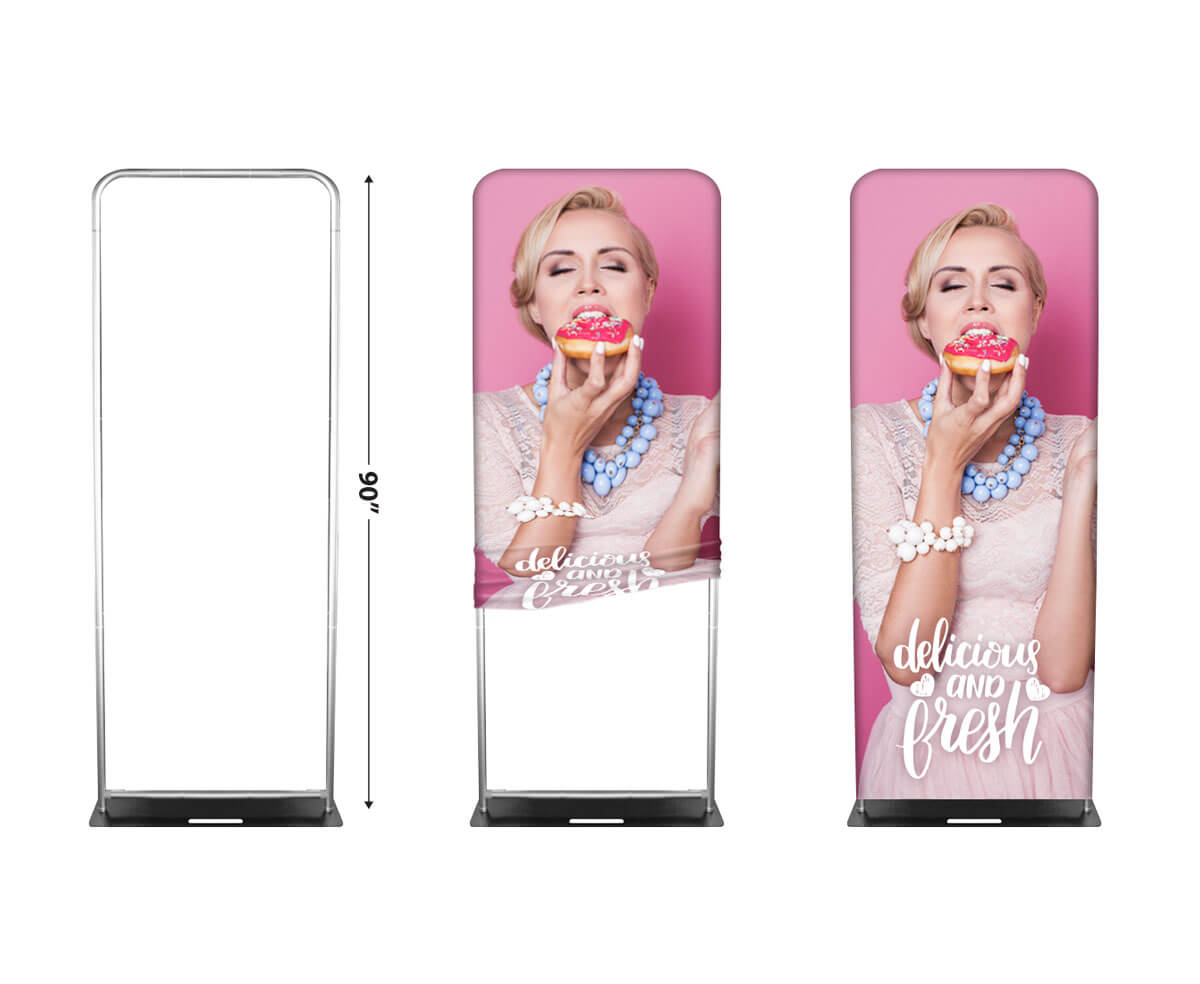
What are Fabric Tube Displays?
Fabric Tube Displays are a visually stunning way to showcase your brand. These displays feature high-quality graphics printed individually using dye sublimation on 9oz Premium Polyester fabric.
How do I set up a Fabric Tube Display?
Setting up a Fabric Tube Display is a breeze:
Connect the Stand's Poles: Simply push down on the locking mechanism to connect and fasten the stand's poles. Once the poles are connected and the locking mechanism pops out, your display is secure.
Stabilize the Display: Screw the ends of the poles into the stand's base to ensure stability.
Add the Fabric: Slip the fabric over the frame to complete the display.
Is it easy to transport Fabric Tube Displays?
Absolutely! Fabric Tube Displays come equipped with a portable carrying case. This case allows you to store the stand's parts conveniently, making travel and setup a hassle-free experience.
Enhance your brand's presence with Fabric Tube Displays - the ultimate blend of style and convenience.
Our flags are crafted with precision and care, ensuring the highest quality and durability. Here's what you need to know about our flags:
Quality Printing: Our flags are printed on lightweight 3oz Polyester using state-of-the-art sublimation equipment. This printing method ensures vibrant and long-lasting colors, making our flags stand out from the rest.
High Visibility: Our flags are designed to be easily seen from a long distance. Whether you're using them for events, promotions, or displays, they guarantee high visibility and make a lasting impression.
Easy Assembly: Setting up our flags is a breeze. We provide a choice of indoor or outdoor installation accessories to suit your needs.
Indoor Installation: Choose the X-Stand/Cross base for indoor installations. It offers stability and elegance, making your flags a perfect fit for indoor settings.
Outdoor Installation: Opt for the Ground-Stake/Spike base for outdoor installations. This option ensures your flags stay securely in place, even in outdoor conditions.
Material Specifications:
- Our Floor Graphics are crafted from 4mil flexible vinyl with a removable acrylic adhesive.
- To enhance durability and safety, a 6mil clear overlaminate is applied, resulting in a total thickness of 10mil.
Application Details:
- These graphics are suitable for short-term interior applications.
- The base vinyl adheres effectively to most surfaces and can be easily removed without leaving residue.
Surface Preparation:
- For tile, laminate, or other smooth floor types, thorough cleaning is essential prior to application.
- Ensure that painted floors have strong paint adhesion for successful application.
- Please note that the base vinyl is not recommended for use on concrete, asphalt, carpet, or any exterior surface.
Protective Overlaminate:
- The 6mil overlaminate is a clear, polished vinyl film with a slight texture.
- It serves a dual purpose by providing a protective overlay and slip-resistance.
- Classified under UL 410 for floor graphics applications, it can withstand common floor cleaning chemicals and methods.
Removal Timeframe:
- Under normal exposure conditions, our Floor Graphics can be easily removed within six months of application.
Artwork Bleed:
- To ensure the best results, make sure your artwork has a 0.5" margin on all sides, totaling 1" in extra space.
We hope this revised FAQ provides you with clear and concise information about our Floor Graphics. If you have any further questions or need assistance, please feel free to contact us.
What are Gator Board Signs?
Our Gator Board Signs are made from 3/16" thick material and are printed using UV inks. These signs are designed to be both sturdy and lightweight, making them an excellent choice for various applications.
Why Choose Gator Board Signs?
Durability: Gator Board Signs are exceptionally strong and durable, outperforming foam core signs.
Versatility: These signs are suitable for both indoor and outdoor use, making them a versatile signage option.
Common Uses: Gator Board Signs are ideal for a wide range of purposes, including exhibits, point-of-purchase (POP) displays, temporary retail signage, presentations, trade show signage, restaurant menus, and much more.
Artwork Preparation:
To ensure the best results for your Gator Board Signs, please follow these guidelines:
Bleed: Make sure to include a 0.5" bleed on all sides of your artwork. This ensures that your design extends beyond the final cut size.
No Crop Marks: Please do not add crop marks to your artwork.
What are Glossy 30 mil Heavy Duty Magnets? Glossy 30 mil heavy duty magnets are versatile magnetic sheets with a wide range of applications. They are primarily designed for car door signage, offering a durable and attractive solution.
Do I Need to Test the Magnets on My Vehicle? Yes, it is highly recommended to test a sample of our car door magnets on the specific vehicle you intend to use them on. This is especially important because some vehicles have aluminum doors, and standard magnets may not adhere properly to them.
What Other Uses Do These Magnets Have? These magnets can also serve as temporary signage for various purposes, including construction sites and rapidly changing work environments. They are printed using the same UV ink technology as our outdoor banners and coroplast yard signs, ensuring their durability for long-lasting outdoor use.
Are These Magnets Suitable for Small Text or Borders? No, these magnets are not intended for use with small text or borders. Due to their thickness and intended use as signage, they are best suited for larger, bold designs. For optimal results, ensure that your artwork has a .5" bleed on all sides and do not add crop marks.
We hope these FAQs provide you with the information you need. If you have any further questions or require assistance, please don't hesitate to contact us.
About High Tack Adhesive Vinyl:
High Tack Adhesive Vinyl is a versatile sticker material suitable for creative applications on smooth, clean surfaces. It can be used both indoors and outdoors.
Material and Durability:
Our High Tack adhesive vinyl stickers are printed on white 4mil vinyl with a permanent adhesive backing. They are attached to an unscored release liner, ensuring durability.
Removal and Longevity:
High Tack Adhesive Vinyl stickers are designed to be very durable and are not meant to be removed after application. Attempting removal may result in uneven peeling, leaving behind unwanted residue. We do not recommend using this product on items you plan to remove the sticker from later.
Artwork Requirements:
To ensure the best results, make sure your artwork has a .5" margin on all sides. There is no need to include crop marks in your design.
We hope this information provides you with a clear understanding of our High Tack Adhesive Vinyl (4mil) product. If you have any further questions, please feel free to contact us.
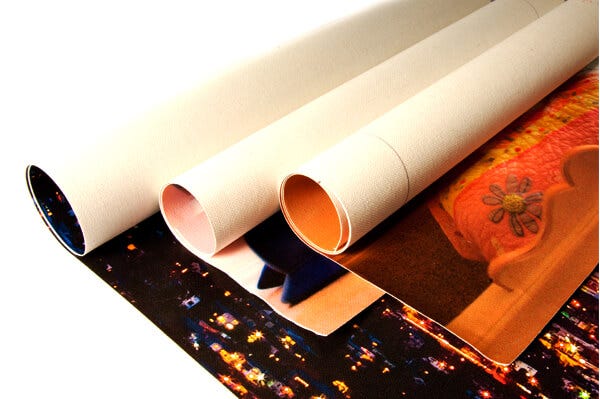
Mounted Canvas (17mil)
Our 17mil Mounted Canvas is printed on high-quality canvas material using vibrant CMYK printing. It is gallery wrapped on 3/4" thick frames for all sizes to provide a professional and elegant presentation. To ensure safe shipping and prevent damage, we ship no more than one canvas per box.
Bleed Requirement: For optimal results, please provide a 2-inch bleed on each side of your artwork. This allows for proper trimming and ensures your design looks stunning on the canvas.
We hope this information helps you understand our 17mil Mounted Canvas product better. If you have any further inquiries or need assistance, please feel free to reach out to us.
8mil Photo Gloss Posters (59" x 120")
- Material: This poster is printed on 8mil photo gloss material, offering high-quality photo printing.
- Purpose: It is designed for Pigment / Dye / QuickDry printing, providing a glossy finish. However, please note that it's somewhat delicate and is not scuff-resistant or waterproof.
12pt C2S Board Posters (59" x 120")
- Material: These posters consist of two 6pt coated sheets laminated together, with a black adhesive middle layer, resulting in a completely opaque product.
- Purpose: They are ideal for applications where opacity is essential, and the final product has a thickness of 12pt.
Bleed Requirement: To ensure the best outcome, make sure your artwork has a 0.5" margin on all sides, totaling 1" in extra space.
We hope this information helps you understand our poster materials better. If you have any further inquiries, please do not hesitate to contact us.
Product Description:
- Our See-Through Window Vinyl is a versatile solution for creating see-through graphics for windows.
- It consists of a 6mil white flexible vinyl front with a clear removable acrylic adhesive back.
- For added protection against UV radiation, moisture, and abrasion, we offer an optional 2mil optically clear laminate.
- The perforated window film allows for approximately 30% open area with a hole size of 0.060 inches (1.5 mm).
- This product is recommended for use on flat vehicle windows or retail store windows.
Application:
- The product should be applied to the exterior glass surface, which must be clean to ensure proper adhesion.
- We recommend avoiding solvent or ammonia-based glass cleaners for cleaning.
Regulations:
- Users of this product are responsible for complying with any applicable vehicle code regulations.
Artwork Requirements:
- To ensure the best results, please ensure your artwork has a 0.5" bleed on all sides, resulting in a 1" total bleed.
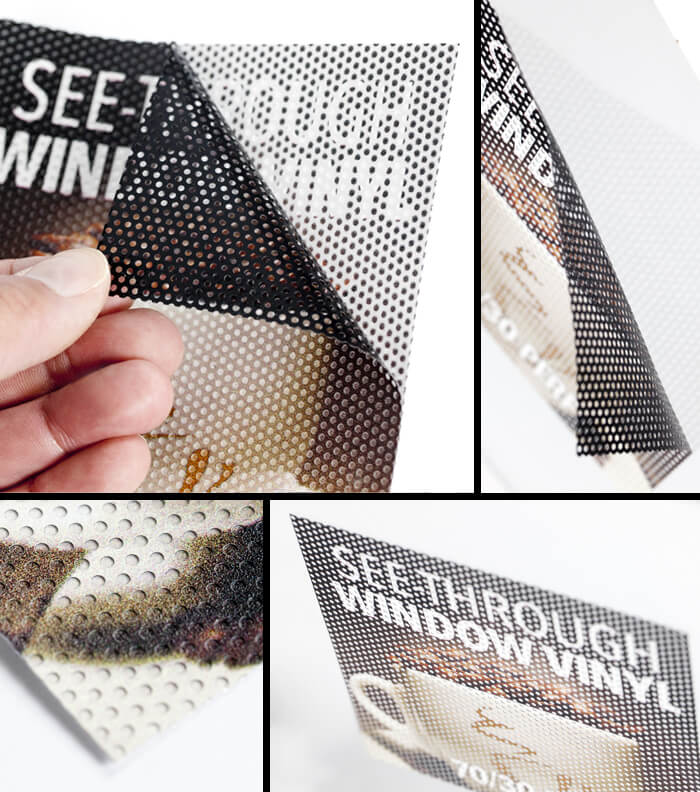
We hope these FAQs provide you with a clear understanding of our See-Through Window Vinyl. If you have any further questions or require assistance, please don't hesitate to contact us.
Q1: What is an A-Frame Stand with Coroplast?Our A-Frame Stand with Coroplast is a simple yet effective solution for advertising on the streetside. It's designed to hold 24" x 18" Coroplast Signs, which can be easily attached to the frame using the included clips.
Q2: How do I assemble the A-Frame Stand?Assembling the metal sidewalk A-Frame is a breeze. Just follow the easy instructions provided to set it up quickly and securely.
Q3: Can I enhance my message with additional signs?Absolutely! You can amplify the impact of your message by adding 24" x 6" 4mm White Coroplast Rider Signs. These can be purchased separately from our Signs category.
Q4: How do I attach Rider Signs to the A-Frame Stand?Attaching Rider Signs to the A-Frame is a straightforward process. Simply use the attached metal clamp to secure the Rider Signs to the top of the A-Frame with minimal effort.
We hope this information helps you make the most of our Sidewalk Signs - A-Frame Stand. If you have any further inquiries or require assistance, please don't hesitate to contact us.
What are Quik Sign® frames? Quik Sign® frames are designed to hold two 24"W x 18"H signs and come with 4mm Coroplast. They feature the Quick-Change™ feature for effortless installation. These frames are constructed from durable plastic, making them suitable for outdoor use. Quik Sign® frames can also be paired with 24"W Rider Signs, making them an excellent choice for real estate signage.
Bleed Information: To ensure the best results for your artwork, please make sure to have a 0.5" bleed on all sides. There is no need to add crops.
What types of Table Covers are available?
Our Table Covers category features two main types: Table Runners and Table Throws. Each option is crafted using high-quality dye sublimation equipment to ensure the most durable, vibrant color retention possible on fabric.
What material are the Table Covers made of?
Our premium Table Covers are made from a 9oz polyester fabric that is notable for its vibrant color, durability, and resistance to wrinkles. This material is also machine washable, ensuring easy care and maintenance.
Can I customize the Table Covers?
Yes, absolutely! Our Table Covers can be fully customized across the entire surface, allowing for a unique and professional look for any table display, trade show booth, or special event.
What is the print quality like on the Table Covers?
We utilize superior dye sublimation equipment for printing, which is recognized for achieving the longest lasting color on fabric. This method ensures your Table Covers will have vibrant, premium quality colors.
What should I know about preparing my artwork for print?
When preparing your artwork, please ensure a 0.5" bleed on all sides, contributing to a total of 1" around your design. It is crucial to keep all important artwork elements at least 1" away from the edge to prevent them from being cut off or hemmed over. Please do not include crop marks in your design.
Are the Table Covers easy to care for?
Yes, they are designed for convenience. Our Table Covers are 100% polyester, making them wrinkle-resistant and machine washable for easy care.
There is no need to include fonts with your files. Please make sure all fonts are outlined before uploading your files. For Photoshop users, we request that you provide a flattened file only.
Should I add crop marks to my artwork for trimming guidance?
At Grand4mat, our upload and design tool is perfectly equipped to handle all the specifics required for accurately trimming your order. To ensure the best possible outcome for your final product, we kindly request that you do not include crop marks, color bars, registration marks, or any additional indicators that are not intended to appear on the final printed piece. This helps us deliver the cleanest and most precise results for your order.
Q1: What makes the Signicade® Deluxe Sidewalk Signs special?Our Signicade® Deluxe Sidewalk Signs are equipped with a patented Quick-Change™ feature, allowing you to easily slide your signs in and out. Additionally, they feature Stay Tabs™ that ensure your signs stay securely in place.
Q2: What do I get with each Signicade® Deluxe Sidewalk Sign?Each Signicade® Deluxe Sidewalk Sign includes two 24"W x 36"H 4mm Coroplast Signs, providing you with everything you need for effective signage.
Q3: Are these signs suitable for outdoor use?Absolutely. The Signicade® Deluxe Sidewalk Signs are crafted from durable plastic, making them the perfect choice for displaying your signage outdoors.
Q4: Can I add extra stability to the stand?Yes, you have the option to fill the stand with sand, which adds even more stability to ensure your signs stay in place.
Q5: What are the ideal use cases for Signicade® Deluxe Sidewalk Signs?These signs are ideal for a variety of purposes, including storefront advertising, parking signs, real estate listings, and election campaign signage.
We hope this information helps you understand the benefits of our Signicade® Deluxe Sidewalk Signs. If you have any more questions or need further assistance, please don't hesitate to reach out to us.
What is Signicade® MDX?
Signicade® MDX is a versatile medium-sized version of our Deluxe Sidewalk Sign. Designed to make your signage stand out, it comes with an 18"W x 24"H 4mm Coroplast insert that can be easily changed whenever needed.
What makes Signicade® MDX special?
- Quick-Change™ Feature: Changing your signs has never been easier. The Quick-Change™ feature allows you to effortlessly slide your signs in and out of the Signicade® MDX.
- Stay Tabs™ for Security: Rest assured that your signs will stay securely in place with our Stay Tabs™, preventing unexpected mishaps.
- Durable Outdoor Display: Built to withstand outdoor conditions, Signicade® MDX is constructed from durable plastic, ensuring your signage remains visible and intact.
- Stability Options: For added stability, you have the option to fill the stand with sand, keeping your Signicade® MDX firmly in place.
Where is Signicade® MDX available?
Signicade® MDX is available in a classic white color, making it suitable for various purposes, including yard signs, parking signs, real estate signage, and election campaigns.
Artwork Requirements:
To ensure the best results, please follow these guidelines:
- Bleed: Make sure your artwork has a 0.5" bleed on all sides.
- No Crops: Do not add crops to your artwork, as they are not needed.
For any additional questions or assistance, feel free to contact us.
SIGNS - COROPLAST (mm)
Thickness: 4mm
Purpose: This material is typically used for Yard or Parking signs, such as Real Estate signs, Election signs, Reserved For signs, and more. Depending on its use, the material must be oriented appropriately to ensure that the flutes (corrugated structure) are vertical, especially when utilizing an H-stake with the sign. H-stakes work best in soft ground environments like dirt, soil, grass, etc. Please note that this product may exhibit a linear effect once printed, owing to its corrugated flute structure. The ink used is UV Cured, ensuring it is thoroughly dried.
Bleed: Make sure to include a .5" margin on all sides of your artwork, and there is no need to add crop marks.
Coroplast Signs (10mm Thickness)
Overview:
- Thickness: 10mm
- Purpose: Typically used for yard or parking signs (e.g., Real Estate, Election, Reserved, etc.). The 10mm thickness sets this sign apart, making it 6mm thicker than our standard 4mm Coroplast Sign. This extra thickness enhances durability, making it an ideal choice for areas with harsh weather conditions. Coroplast is highly resistant to oils, solvents, and water, ensuring the sign's longevity even in adverse conditions.
Surface Appearance:
- Please note that the corrugated flute structure results in a subtle linear effect (faint lines) on the product's surface.
Artwork Specifications:
- Bleed: Make sure to include a 0.5" margin on all sides of your artwork. Do not add crops.
Optional Heavy-Duty H-Stakes:
- We offer heavy-duty large steel H-stakes as an option for this product. These stakes are black in color, measure 8-1/2" wide by 36" tall, and are constructed of sturdy 5/16" steel.
- If you choose to use H-stakes, please ensure that your Coroplast order has vertical flutes.
- H-stakes are best suited for soft ground surfaces such as dirt, soil, grass, etc.
We hope this information is helpful. If you have any further questions or need assistance, please don't hesitate to reach out to us.
What is Rich Black and How Can I Achieve It?
Rich Black refers to a nuanced ink blend that combines solid black ink (100% K) with additional cyan (C), magenta (M), and yellow (Y) inks. This mixture produces a black that is significantly deeper and more intense than using black ink alone. When black is printed solely as 100% K, it often appears less saturated and lacks depth.
On Screen vs. After Print:
- 100% K on Screen: Appears as a standard black.
- 100% K After Print: May look lighter than expected, lacking depth.
Recommended Rich Black Formula:
For a deep, dark, and luscious black, we recommend the following color formula:
- Cyan (C): 60
- Magenta (M): 40
- Yellow (Y): 40
- Black (K): 100

This formula is designed to enhance the black's intensity, providing a visually striking finish.
Special Consideration for Dye-Sublimation Products:
For products printed using dye-sublimation processes—such as 9oz Premium Polyester Banners, Flags, Table Covers, and Fabric Tube Displays—we suggest a different approach to achieve the richest black:
- Cyan (C): 100
- Magenta (M): 100
- Yellow (Y): 100
- Black (K): 100
This maximizes the depth of black across various materials, ensuring a consistent and vibrant appearance.
By following these guidelines, you can enhance the quality and visual impact of your printed materials, achieving a rich black that stands out.
How can I ensure my grayscale image remains true to its color when included in a CMYK document?
A: When integrating grayscale images into CMYK documents, it's important to be mindful of potential color shifts that can occur during the final print process. These shifts often manifest as green or yellow tints, altering the intended appearance of your grayscale image.
To maintain the integrity of your grayscale image in a CMYK document, perform the following steps:
Check the CMYK Values: After converting your grayscale image to CMYK, examine the color values. If you detect any colors other than black (K), your image is susceptible to color variations.
Utilize the Channel Mixer: To ensure your grayscale image only contains black (K) and no other colors, make use of the Channel Mixer tool in Photoshop. Access this feature by selecting the adjustment layer option, then choose "Monochrome". This will allow you to adjust the mix until only black is used in your grayscale image, eliminating the risk of color shifts.
What settings should I use to create my PDF in Adobe Illustrator?
When creating PDFs in Adobe Illustrator, it's important to select the appropriate settings to ensure your document prints as intended. The process varies slightly depending on the version of Illustrator you are using due to differences in the "Save PDF" dialog presets.
For users of Illustrator CS: Please be aware that using the default PDF presets may not save your document at the intended size if your artwork extends beyond the document edges. This is because the preset includes all objects within the document bounds, even those not visible, potentially adding unwanted white space to your PDF. This could result in a PDF that does not match the desired size, affecting the print outcome. It's crucial to manually check your PDF for correct size and to remove any excess white space before submission.
For Illustrator CS2 and later versions: We recommend using the "High Quality Print" preset for optimal results. This setting is designed to ensure your PDF is saved with high fidelity to the original design, suitable for professional printing.
Please note, given the variety of document types and specific design elements, it's impossible to cover every potential issue in this FAQ. We strongly advise thoroughly reviewing your PDF for any size discrepancies or unnecessary white space prior to uploading to guarantee the best possible print quality.
The radius of our rounded corner magnets is 1 inch. For assistance in setting up your rounded corner magnets, we invite you to visit the templates page on our website. There, you'll find a dedicated section at the bottom specifically for rounded corner magnet templates, designed to help you get started with ease.
What is the composition of your PVC material?
Our PVC signs are crafted from a premium, bright white rigid plastic. This material is known for its smooth finish, lightweight yet robust durability, and resistance to various weather conditions. It's an ideal choice for both indoor and outdoor applications.
What are the visual and print quality characteristics?
The PVC material features a low-glare, matte finish that enhances readability under different lighting conditions. Coupled with high-quality printing, these signs deliver crisp, vivid visuals from afar and maintain their sharpness upon closer inspection. This makes them suitable for a wide range of applications where visual impact and detail are key.
What thickness do you offer for PVC signs?
Our PVC signs come in a standard thickness of 3mm (approximately 1/8 inch), balancing rigidity and lightweight properties for versatile use.
How should I prepare my artwork for printing?
To ensure the best possible outcome for your printed sign, please add a bleed of 0.5 inches on all sides of your artwork. This extra margin helps in the cutting process, ensuring that no important design elements are lost. There is no need to add crop marks to your file.
By adhering to these guidelines, your PVC signs will be produced to the highest standards, ensuring durability, visual quality, and suitability for both indoor and outdoor use.
What are Styrene Signs? Styrene Signs are crafted using a 0.015" thick, matte white material that offers semi-rigidity, making it ideal for both indoor use and temporary outdoor display. Its flexibility is a key feature, allowing for application on curved surfaces and convenient rolling for storage or transport. This substrate is perfect for a variety of applications including Point of Purchase (POP) signage, informational and directional signage, store display inserts, tradeshow graphics, and more.
What is the thickness of Styrene Signs? The material used for Styrene Signs is 0.015 inches thick, ensuring a balance between durability and flexibility for varied signage needs.
How should I prepare my artwork for printing on Styrene Signs? When preparing your artwork for printing, please ensure a bleed of 0.5 inches on all sides. It’s important not to include crop marks in your submission. This preparation helps in achieving the best possible finish for your signs, ensuring that the edges are clean and your design is fully displayed.
How to Set Up Your Canvas Banner Order
To ensure the highest quality for your Canvas banner, please prepare your artwork according to the following guidelines:
Image Quality: Your files should have a resolution of 200 - 250 DPI (Dots Per Inch) and be set to CMYK color mode to best match your color expectations.
Bleed: No bleed is required for Canvas banner production. However, you should consider your specific mounting or framing requirements when preparing your file.
Artwork Preparation Tips
When creating or reviewing your artwork for a Canvas banner, please keep the following in mind:
Avoid Borders: To prevent any visual unevenness due to the stretching that can occur during the mounting or framing process, it's best not to use borders in your design.
Damage During Mounting/Framing: Please note that we cannot reprint orders that have been damaged during mounting or framing by third parties. Plan your artwork carefully to avoid such issues.
Finished Size: Your artwork should be the exact finished size you require. If you need additional area for mounting or framing, please include this in your design dimensions.
Mounting Hardware: Given the variety of mounting applications, we do not provide mounting hardware with our Canvas banner prints. Ensure you have the correct hardware for your specific display needs.
Yes, window clings are designed to be reusable. To ensure their longevity, it's important to keep them clean. For optimal preservation, we advise storing them on their original backing when not in use. This practice helps maintain their condition, allowing for multiple uses.
For the optimal creation of your backdrop banners, we request that your design file adhere to the following specifications:
- Dimensions: Please ensure that your file is exactly 95 inches wide by 96 inches tall.
- Resolution: The image should have a resolution of 150 DPI at full scale to ensure high-quality output.
- File Preparation: Avoid adding bleed or crop marks to your file to facilitate a seamless production process.
By following these guidelines, we can guarantee the best possible reproduction of your backdrop banners.
Absolutely. Individual hardware items are available for purchase in our Marketplace, specifically within the "Banner Stands and Parts" section.
Absolutely. Our Telescopic Backdrop Banner Stand is designed for versatility and can accommodate banners ranging from 5 feet by 3.5 feet to as large as 10 feet by 8 feet. Please ensure your banner includes 4-inch pole pockets at both the top and bottom for proper installation.
Tabletop Displays - Retractable FAQ
Q: What are Tabletop Retractable Banner Displays?
A: Tabletop Retractable Banner Displays are a dynamic promotional tool designed to maximize visibility with minimal setup effort. They feature a 10mil Premium Indoor Vinyl Banner, making them perfect for enhancing brand visibility on the go. These displays are available in various sizes to suit tabletop settings at trade shows, university orientations, and other indoor events.
Q: What sizes are available for the Tabletop Retractable Banner Displays?
A: We offer a selection of sizes to fit various tabletop setups:
- Small: 8.25" x 12"
- Medium: 11" x 17"
- Large: 15.75" x 32"
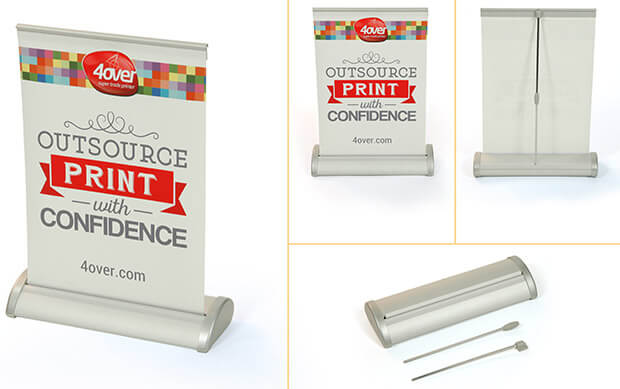
Each size is equipped with a 10mil Premium Vinyl Indoor Banner, ensuring high-quality display in any indoor setting.
Q: Where can Tabletop Retractable Banner Displays be used?
A: These versatile displays are ideal for any indoor event where quick setup and high impact are desired. They are particularly effective at trade shows, university orientations, indoor festivals, and business conferences. Their retractable design allows for easy transportation and quick setup, making them a convenient choice for events on the go.
Q: How do I set up my Tabletop Retractable Banner Display?
A: Setting up your display is straightforward and requires no tools. Simply extend the banner from the retractable stand and lock it in place. The process is designed for quick and easy setup to ensure maximum efficiency at events.
Q: What material is used for the banners?
A: The banners are made from 10mil Premium Indoor Vinyl, ensuring durability and a high-quality finish for your graphics. This material is chosen for its excellent print quality and resistance to wear, making it ideal for repeated use at various events.

For any further questions or to place an order, please contact our customer service team. We're here to help you make the most out of your promotional efforts with our high-quality Tabletop Retractable Banner Displays.
Wall Graphics (8mil)
Product Overview:
Our 8mil Wall Graphic is crafted from a premium low-tack adhesive vinyl to ensure a smooth application and removal process without leaving any adhesive residue. This product is specifically designed for use on smooth, non-textured surfaces including walls, desks, and glass, making it an ideal choice for both decorative and functional applications. Its unique composition allows for easy removal and reapplication multiple times, providing versatility and longevity.
Key Features:
- Material: High-quality low-tack adhesive vinyl.
- Application: Ideal for smooth, non-textured surfaces such as walls, desks, and glass.
- Removability: Easily removed and re-applied without leaving residue.
- Customization: Offers the ability to create custom cut-out shapes for a personalized touch.
- Printed Surface: Comes with one printed side accompanied by a paper backing for easy application.
- Artwork Preparation: Your artwork should be prepared exactly to the size you are ordering, with no bleed or crops required.
This product combines durability, reusability, and ease of use, making it perfectly suited for a wide range of applications from home decor to office branding.
What are Window Clings?
Window Clings are high-quality prints on glossy material suitable for both indoor and outdoor display. They are perfect for Point-of-Purchase (POP) signage on glass or any very smooth, clean surface.
How should Window Clings be applied?
For optimal adherence, apply Window Clings to surfaces that are near room temperature. Avoid applying in conditions of extreme heat or cold, which can prevent the product from clinging properly.
Shipping and Handling:
Most sizes of Window Clings are shipped rolled. For larger quantities, different shipping options may be available.
Types of Window Clings:
- White Window Clings: These are 7mil thick and come with a paper backing that is removed before application. The cling feature is only on the back side of the print.
- Clear Window Clings: These are 8mil thick and also come with a paper backing for removal before application. The material clings on the front side of the print. For enhanced color vibrancy and opacity, white ink can be used as an overprint option.
Design Considerations:
- Bleed Requirements: Please include a .25" bleed on all sides of your artwork, without adding crop marks.
- File Setup for Clear Window Clings: If the Cling is intended to be viewed from outside the window, select “Mounted From Inside” during product configuration. Additionally, ensure your artwork is reversed before submission.
Note: Detailed instructions and visual aids for preparing your artwork are provided below.

Our pole pockets are designed to accommodate poles of various diameters for easy installation and secure display. For optimal compatibility:
- 2-inch Pole Pockets: These pockets have an approximate circumference of 1 inch, making them suitable for poles with a diameter of up to 1 inch.
- 4-inch Pole Pockets: These pockets have an approximate circumference of 2 inches, allowing them to accommodate poles with a diameter of up to 2.5 inches.
Please ensure you select the appropriate pole pocket size to match the diameter of your poles for a perfect fit.
Do I Need to Include Bleed in My Files?
Bleed Requirements for Various Products:
- Coroplast, PVC, Foamcore, Car Magnets, Banner Stands, and Large Posters:
A bleed of 0.5 inches on all sides is mandatory. For example, if your order size is 24x18 inches, the file size should be 25x19 inches to accommodate the bleed. - Loose Outdoor Banners, Indoor Banners, and Canvas Banners:
Please do not include any bleed or crop marks. Design your file to the exact size ordered (or proportional). For orders with hems, ensure a 2-inch safe zone on all sides. Note that up to 1/8 inch to 2 inches per side may be lost due to banner finishing. - Mounted Canvas:
Using our templates is strongly advised for mounted canvas to ensure proper bleed. A 2-inch bleed per side is required. - Flags:
We highly recommend using our templates for flags. A 0.5-inch bleed on all sides is required. Additionally, maintain a 2-inch safe zone on all sides, including the pole pocket area. - Table Covers (Table Runners and Table Throws):
We advise using our provided templates. A 0.5-inch bleed on all sides is necessary. Please leave a 1-inch safe zone on all sides. Table Covers feature 1" sewn hems using white thread on all sides. - Polyester Banners:
A 0.5-inch bleed on all sides is required. For a 24x18 inch order, the file size must be 25x19 inches to include bleed. It's best to avoid borders in your artwork due to potential material stretching during the heat transfer process, which could lead to uneven borders.
Additional Information:
For detailed product descriptions, click on the individual product names provided on our website.
By adhering to these guidelines, you ensure your product is produced with the highest quality and accuracy.
What file types are supported by Grandmat?
Grandmat primarily recommends using PDF files for optimal compatibility and performance. Additionally, we support JPG and TIFF formats to accommodate a variety of document and image types.
A-Frame Signs are versatile, freestanding displays designed for both indoor and outdoor advertising. They are named for their "A" shape, which provides stability and allows for easy placement in various locations. Setting up an A-Frame Sign is straightforward: simply unfold the frame, secure it in place, and insert your signage material into the designated slots or attach it to the frame surface.
File Requirements for A-Frame Signs
To ensure the highest quality display for your A-Frame Signs, we require artwork files to be submitted in either PDF, EPS, or high-resolution PNG/JPG formats. Files should be designed to the specific dimensions of your sign, with a minimum resolution of 300 dpi to guarantee crisp, clear images and text.
Shipping Information for A-Frame Signs
A-Frame Signs are carefully packaged and shipped unassembled to minimize shipping costs and the risk of damage. Assembly upon receipt is simple and does not require any special tools. Instructions are included to guide you through the assembly process.
Weight and Dimensions of A-Frames
The weight and dimensions of our A-Frames vary depending on the model chosen. Generally, our A-Frames range in weight from 10 to 25 pounds, making them easy to transport and set up. Dimensions also vary, with standard sizes including 24"x36" and 18"x24". Custom sizes are available upon request to accommodate your specific needs.
Color Options for A-Frame Stands
Our standard A-Frame Stands are available in black or white to offer versatility and match various design preferences. These neutral colors ensure that your signage stands out, drawing attention to your message. Custom color options may be available upon request; please contact us for more information.
Our A-Frame Signs are carefully packaged and shipped in a single box for your convenience. Each package includes a 24" x 18" double-sided 4mm white Coroplast sign and two clips for easy assembly and display.
The A-Frames measure 33 inches in height, 29 inches in width, and 2 inches in depth. Each frame, when inclusive of a 24" x 18" sign, weighs 12 pounds.
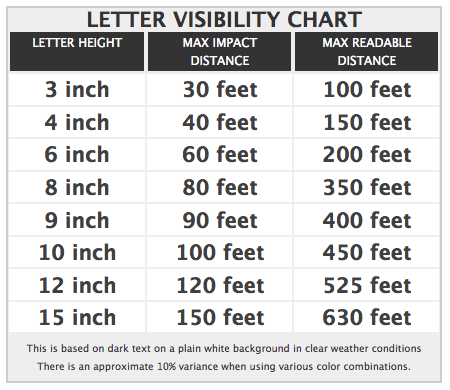
The ideal text size for your banner or yard sign largely depends on two key factors: the overall size of the final product and the distance from which it will be viewed. To ensure your message is clearly visible and impactful from the intended viewing distance, we recommend consulting our Scale & Resolution Example Chart alongside our Letter Visibility Chart. These resources provide valuable guidelines to help you choose the most effective text size for your specific needs.

Scaling your artwork is a strategic step to maintain file sizes that are both manageable and optimized for quality printing. Below are streamlined guidelines to help you determine when and how to scale your artwork effectively:
General Considerations
- Necessity of Scaling: Scaling is not mandatory for every project. It becomes relevant when file size management or compatibility with printing specifications is a concern.
Vector Artwork
- Printing Large Formats: Although Grand4Mat can print outdoor banners up to 150ft by 16ft, most design software caps artboard sizes at 228 inches. Due to the limitations of Adobe Acrobat and other PDF software, which can only handle files up to 200 inches, scaling down your vector artwork for submission is advisable to avoid loss of content.
Raster Artwork
- Pixel-Based Calculations: Raster images are defined by pixels, with the file's resolution converting pixels to inches. The formula used is: pixels / dpi = inches. Given the maximum limit of 30,000 pixels for raster files, scaling down or adjusting the dpi is recommended for images exceeding this pixel count.
Resolution & Scaling Guidelines
Grand4Mat utilizes an automated system that adjusts file sizes according to the ordered dimensions. However, resolution depends on the chosen substrate and ink, influencing how you should scale your artwork. Below are basic scaling recommendations for various products:
- Outdoor Banners: Aim for full scale at around 100dpi, with half and quarter scales at 200dpi and 300dpi, respectively. Note that banners over 15 feet will print at less than 100dpi.
- Flags: Full scale should be around 150dpi.
- Canvas and Foamcore: Opt for full scale at approximately 250dpi.
- Coroplast and Adhesive Vinyl: Full scale is best at around 200dpi.
- PVC: Maintain full scale at approximately 250dpi.
- Indoor Banners, Car Magnets, Floor Graphics, and Large Posters: Full scale should be around 300dpi.
- Table Runners: Full scale at approximately 200dpi is suitable.
- Adhesive Vinyl for Banners: Full scale at 100dpi is preferred, with a recommendation for vector artwork.
For detailed scaling instructions across different mediums, visiting the comprehensive scale chart provided by Grand4Mat is recommended.
This streamlined guide aims to offer a clear and professional overview on when and how to scale your artwork for optimal printing results.
Q: Can I include borders on my banners and yard signs?
A: While we understand the appeal of incorporating borders into your design for banners and yard signs, we advise against it. The reason is that the dimensions of substrates can vary slightly between batches, making it challenging to achieve precise cuts. Consequently, if a design includes a border, there's a risk that the border widths may not be uniform once produced.
At Grand4mat, we aim to ensure the highest quality for your orders. Therefore, we strongly recommend designing your files without borders to avoid potential inconsistencies. In cases where a border is essential to your design, we suggest a minimum thickness of 2 inches to minimize the risk of uneven borders. However, please be aware that Grand4mat reserves the right not to reprint orders due to variations in border widths.
Our A-Frame Stands are designed in a classic black color.
To ensure the highest quality for your Fabric Tube Displays, please adhere to the following file submission requirements:
File Format: All designs must be submitted in PDF format. This ensures that your design is locked in and will appear as intended when printed.
Bleed Requirements: Each design must include a 1-inch bleed on all sides. The bleed is necessary for cutting and ensures that no important parts of your design are lost during the trimming process.
For example, if your finished display size is 24 inches by 90 inches, your submitted file should measure 26 inches by 92 inches, accounting for the bleed.
This preparation ensures your display will be produced with precision and to your satisfaction.
Absolutely. Our fabric tube displays are designed with interchangeability in mind. If you require only the fabric component, simply select the “None (Fabric Only)” option during your order process. We will then provide you with a printed and sewn fabric replacement that fits your existing frame.
Absolutely. Each Fabric Tube Display is accompanied by a carrying case for your convenience.
What is Overprint, and How Can It Affect My File?
Overprint is a print production technique where colors are intentionally overlapped for various reasons. While it can be beneficial for achieving specific design effects, overprint can lead to unintended outcomes if not managed correctly. It is essential to disable overprint settings for all objects within your files before submission.

For example, if a logo is set to overprint, its colors may blend with the background colors, creating unexpected results. This issue often arises when objects are mistakenly configured to overprint. To avoid any potential issues, we recommend thoroughly reviewing logos and other critical artwork for overprint settings prior to submitting your files.
How Can I Ensure My Blues Do Not Appear Purple?
To maintain the true blue hue in your designs, it's crucial to balance the Cyan and Magenta values correctly. Blue and purple are closely situated within the CMYK color spectrum, making it easy for blues to unintentionally shift towards purple. To prevent this, adhere to the following guidelines:
- Maintain a Minimum 30% Difference: Ensure there is at least a 30% difference between your Cyan and Magenta values. This difference is key to avoiding purple tones in your blue colors.
- Example of True Blue Color: For a vibrant blue, a recommended setting would be 100% Cyan (C), 70% Magenta (M), 0% Yellow (Y), and 0% Black (K). This configuration adheres to the 30% difference rule, effectively keeping your blues from veering into purple territory.

By following these guidelines, you'll achieve a true blue color in your designs, steering clear of any unwanted purple tones.
What Color Mode Should My Files Be In?
To ensure the highest fidelity in color reproduction for your projects, it is crucial to use the correct color mode from the start to the finish of your design process. We strongly recommend that all files be submitted in CMYK color mode.
Why CMYK?
CMYK (Cyan, Magenta, Yellow, and Key/Black) is the color mode used by printers to produce the full spectrum of colors. When files are submitted in RGB (Red, Green, Blue) – the color mode typically used by computer screens and digital cameras – there is a significant risk of color shifts during the printing process. This discrepancy can result in the final printed colors not matching your original design intentions, potentially leading to dissatisfaction with the completed job.
What About RGB, PMS, and Pantone Colors?
- RGB: While common in digital designs due to its wide color gamut, RGB is not suitable for print projects due to the risk of unpredictable color shifts.
- PMS (Pantone Matching System) and Pantone Colors: These color systems are specialized and not recommended for standard printing processes handled by us. They are typically used for specific branding purposes or when a very specific color match is required that CMYK cannot achieve.

Best Practices
For the best results and to avoid any issues with color accuracy:
- Always design in CMYK color mode from the very beginning of your project.
- Avoid switching between color modes during the design process.
By adhering to these guidelines, you can help ensure that your printed materials match your vision as closely as possible.
While your artwork may be correctly set up with the required bleed, the issue often arises during the process of saving your work as a PDF. The PDF export will default to the dimensions specified in your document setup, which may not include the bleed. To ensure your bleed is properly recognized in the final output, it's crucial to adjust your artboard (Document Setup) to include the bleed dimensions in addition to the actual finished size you desire. For example, if you're ordering a 24"x18" Coroplast sign, your document setup and artwork should both reflect dimensions of 25"x19" to accommodate the bleed. This step guarantees that your artwork meets our specifications and avoids the need for file revisions.
Setting Up Your Event Tent File
To ensure the highest quality for your event tent, please follow these guidelines for setting up your file:
Margin for Text and Graphics: Keep all text and graphics at least 0.5 inches away from the edge of the cutline. This precaution is necessary to ensure that important elements of your design are not compromised during the finishing process.
Bleed Requirements: Include a 0.5-inch bleed on all sides of your artwork. The bleed is crucial for a seamless extension of your design beyond the cutline, allowing for a precise trim.
Crop Marks: Do not add crop marks to your file. Our team at 4over will handle the precision cutting of your panels without them.
Sewing and Assembly: 4over takes pride in the craftsmanship of our products. We will professionally hand sew the panels together, ensuring a durable and high-quality finish for your event tent.
By adhering to these setup instructions, you can rest assured that your event tent will be produced with professional care and attention to detail.
Absolutely. You are given the flexibility to upload as many as four distinct designs to personalize each side or panel. Should you decide to feature the same design across all four panels, it is necessary to upload the specific image separately for each side or panel.
The tent's frame is designed for easy pop-up assembly, and it can be set up in less than 10 minutes. For optimal setup, we recommend the involvement of at least two people. Detailed instructions can be found in the provided link. Simply click to enlarge for a step-by-step guide.
Our Event Tents are carefully packaged and shipped in two separate boxes to ensure safe delivery and ease of handling:
Hardware Box: This box includes all the necessary hardware for your Event Tent. It has a weight of 40 lbs and its dimensions are 63 inches in length, 10.5 inches in width, and 10 inches in height.
Printed Material Box: This box contains the custom-printed tent material. It weighs 12 lbs and measures 25 inches in length, 19 inches in width, and 2.25 inches in height.
Please handle with care to ensure the integrity of the components upon arrival.
To maintain your Event Tent in optimal condition, we advise the following cleaning and care process:
- Use a soft, moist cotton cloth for cleaning.
- Apply a mild dishwashing liquid for any stains or dirt.
- Rinse with lukewarm water to remove soap residue.
- Avoid using harsh abrasives or petroleum-based cleaners as they can damage the tent fabric.
- Ensure to clean and thoroughly dry each side of the tent before storing it away.
This routine helps in preserving the quality and extending the lifespan of your Event Tent.
Can I print a file that contains transparency without any issues?
Unfortunately, files containing any level of transparency may encounter issues during the printing process. To ensure the highest quality print output, it's crucial to flatten all elements within your file before submitting it to Grand4mat. This includes converting all fonts to outlines and ensuring your file is saved in CMYK color mode. Flattening transparency is considered an essential part of the file preparation process, which Grand4mat does not review for you. If you're unsure about how to flatten transparencies in your file, or if you need guidance on identifying transparency issues, please reach out to Grand4mat for assistance before placing your order.
Can I submit multiple pieces of artwork for a single order with Grand4Mat?
For each order, regardless of the quantity, Grand4Mat accepts only one piece of artwork. This ensures that we maintain a streamlined process and deliver consistent quality across your entire order.
Yes, you can. The fabric is designed to be detachable from the frame, allowing for easy removal and interchangeability.
Backlit Posters refer to a specialized type of poster designed to be illuminated from behind for striking visual impact. These posters are printed on a 9mil semi-rigid material that has the unique ability to diffuse light evenly across the display. The material's base film, combined with a quick-drying matte finish, is engineered to enhance light distribution, ensuring that the graphics appear vibrant and lively when backlit. This makes backlit posters ideal for various applications, including advertising displays, movie posters, and informational signage, where catching the viewer's attention, both day and night, is crucial.
Currently, our Backlit Posters do not come with mounting hardware.
Backlit posters are designed to display their full vibrancy and color accuracy when illuminated from behind. The printing process for these posters accounts for the backlighting by applying a darker print. This ensures that once the poster is lit within a lightbox, the illumination brings out the true colors and details as intended, offering a visually stunning display.
Question: How can I ensure my double-sided directional sign with arrows is designed correctly?
Answer: Designing a double-sided directional sign requires careful attention to the orientation of the arrows to ensure they point in the correct direction on both sides. To achieve this, the arrows must be positioned in opposite directions in your design file. This might seem a bit complex, but it's essential for the arrows to guide accurately when the sign is viewed from either side. For a visual guide on how to set up your arrows correctly, please refer to the example illustration below.
By following this setup, you can ensure your sign effectively communicates the direction on both sides.
Choosing Your Canvas Wrap Style
When ordering a Mounted Canvas, you have two distinct wrap styles to choose from:
- Gallery Wrapped Canvas: This option extends your artwork around the edges of the stretcher bars, allowing the image to be seen on both the face and the sides of the frame for a seamless look.
- Museum Wrapped Canvas: Your photo is featured on the front of the frame, while the edges are finished with a solid color that complements your artwork. It's recommended to choose an edge color that matches the art to ensure a cohesive appearance.
File Preparation Guidelines
For optimal print quality, ensure your files adhere to the following specifications:
- Resolution: 200 - 250 DPI
- Color Mode: CMYK
Your artwork is printed and then gallery wrapped using 3/4" stretcher bars to create a finished Mounted Canvas.
Template Use
To facilitate the gallery wrapping process and ensure precision, we advise using our templates. These templates are designed to help you visualize the width of the gallery wrap accurately. You can download the appropriate template from our template page.
Artwork Creation Rules
Please consider the following guidelines when creating or reviewing your artwork for Mounted Canvas printing:
- Avoid Borders: To prevent uneven stretching during the mounting or framing process, it's advisable not to use borders in your design.
- Gallery Wrap Only: We exclusively offer the gallery wrap option for all Mounted Canvas products, ensuring a modern and elegant finish.
- Mounting Hardware: Due to the variety of mounting preferences and applications, we do not provide mounting hardware with Mounted Canvas prints. This allows you to choose the best mounting solution that fits your specific needs.
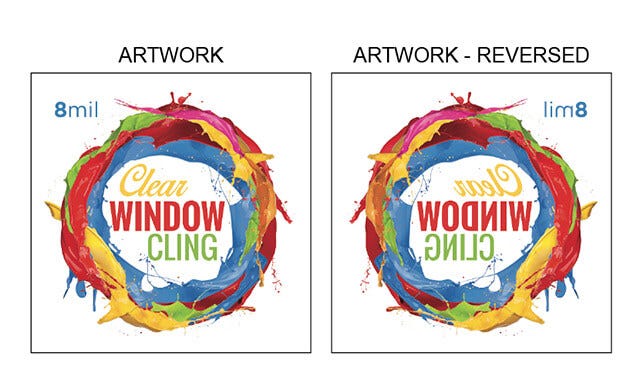
Creating Clear Window Clings with white ink allows for both opaque and transparent areas in your design, resulting in vibrant and crisp visuals. Follow these guidelines for a successful print:
- Utilizing White Ink: White ink can be applied as an overprint to achieve opaque graphics in selected areas while maintaining transparency in others. This technique enhances the vibrancy and clarity of your design.
- Creating White Mask Files: A White Mask file, separate from your main artwork, is essential for specifying where white ink should be applied. Use black in this file to indicate areas for white ink. This file must match the size of your artwork file to ensure proper alignment.
- File Requirements: White Masks must be vector-based and saved as either EPS or PDF format, utilizing 100% K (black) to define white ink areas. This precise color specification is crucial for accurate printing.
- Designing with White Ink: In your design:
- Opaque Areas: Apply a White Mask behind any color in your Artwork Layer to create opaque (solid) colors.
- Transparent Colors: Colors printed without a White Mask on the Clear Window Cling material will appear somewhat transparent due to the substrate's clear nature.
- White Areas: Parts of your design covered by a White Mask but without color will be printed in white.
- Color Specifications for White Mask: Ensure the black used in your White Mask file is set to 0% Cyan (C), 0% Magenta (M), 0% Yellow (Y), and 100% Black (K) to be correctly identified during preflight checks.
- Additional Resources: For more detailed information, please refer to question #8 on our Roll Labels FAQ page.
- Installation Preferences: If your Clear Window Cling is designed to be viewed from outside a window, choose "Mounted From Inside" during the product configuration. Remember to reverse your artwork before submission to ensure correct orientation when viewed from outside.
By adhering to these guidelines, you can effectively create Clear Window Clings with white ink that stand out for their clarity and color vibrancy.
Yes, your design can include transparent areas. However, please note that since white ink is not utilized in the printing process, designs with significant transparent (or white) sections may reveal the lightbox's pattern through your Backlit Poster. For the best visual result, consider minimizing large transparent areas in your design.
Absolutely, this product is suitable for application on harder surfaces including concrete, brick, and epoxy. To ensure optimal results, it is advised to use a hard rubber roller to evenly apply the product over the surface following its application.
Absolutely! For custom shapes, you can submit your request through the estimating feature available on our website.
Does the bit depth per channel of my file matter?
Yes, it does. We require all files to have a bit depth of 8 bits per channel. This standard ensures compatibility and optimal quality across our processes.
- Prepare the Surface: Begin by cleaning the window or application surface thoroughly. Ensure it's completely dry before proceeding.
- Prepare the Solution: Fill a spray bottle with a mixture of soapy water. We recommend a ratio of 1% soap to 99% water. This will be used to wet the application area.
- Wet the Application Area: Spray the soapy water solution generously over the entire area where the cling will be applied. This helps in adjusting the cling during application.
- Remove Backing Carefully: Slowly peel off the backing from the cling. Be cautious to prevent the cling from folding onto itself, which can create air bubbles or wrinkles.
- Apply the Cling: With the backing removed, align the cling with the application surface. The side that was previously attached to the backing should face the surface. Gently place the cling on the wet surface.
- Smooth Out Air Bubbles: Using a squeegee or a credit card, start from the center and move outwards to squeeze out excess water and eliminate any air bubbles. For easier adjustment and to prevent damage to the cling, you can spray more soapy water onto the back of the cling as you work.
This method ensures a smooth, bubble-free application of your window cling, enhancing visibility and adhesion.
Aluminum floor graphics are created using a direct printing method where UV cured inks are applied onto the aluminum panel's surface. This process ensures the graphics are durable and can withstand outdoor conditions for an extended period.
Yes, Aluminum Floor Graphics are recyclable. To ensure optimal adhesion, we recommend employing a hard rubber roller to firmly press the material onto the surface post-application. This product is suitable for use on relatively smooth and hard surfaces, including concrete, brick, and epoxy-coated surfaces.
1. What Are Telescopic Backdrop Banner Stands, Including the Banner? Telescopic Backdrop Banner Stands are versatile display solutions that include a customizable banner. These stands feature adjustable poles that can expand or contract to fit various banner sizes, making them ideal for events, trade shows, and promotional activities. They are designed for easy assembly and portability.
2. How Do I Set Up My Telescopic Backdrop Banner Stand? Setting up your Telescopic Backdrop Banner Stand is straightforward:
- Begin by extending the telescopic poles to your desired height and width.
- Secure the poles in place using the provided locking mechanisms.
- Attach the banner to the frame by clipping or sliding it onto the poles.
- Adjust the tension to ensure the banner is taut and displays well. Detailed instructions are included with your stand for a hassle-free setup.
3. What Are the File Requirements for Backdrop Banners? For the best quality backdrop banners, we require files to be in CMYK color mode, with a resolution of at least 150 dpi. Accepted file formats include PDF, EPS, TIFF, or JPEG. Please ensure all text is outlined and images are embedded before submission to prevent any issues with printing.
4. How Are Backdrop Banner Stands Shipped? Our Backdrop Banner Stands are shipped disassembled in a durable carrying case to ensure easy transportation and protection. The banner is securely packed to prevent any damage during transit. Shipping options and times may vary based on your location and selected delivery service.
5. What Sizes Are Available for Telescopic Backdrop Banner Stands, Both Assembled and Disassembled? Our Telescopic Backdrop Banner Stands come in a range of sizes to suit various needs and spaces. When assembled, the stands can extend to various widths and heights depending on the model. Disassembled, the stands compactly fit into a carrying case, with dimensions depending on the stand's model and size. Please refer to our product specifications for detailed measurements.
6. Can I Order Just the Hardware Separately? Yes, you have the option to purchase the hardware separately. This flexibility allows you to use existing banners with your new stand or replace parts as needed. Please visit our hardware section or contact our sales team for more information.
7. Is It Possible to Use a Smaller or Larger Banner with the Telescopic Backdrop Banner Stand? Yes, the Telescopic Backdrop Banner Stand is designed to accommodate banners of different sizes. The telescopic poles can be adjusted to fit the width and height of your banner, providing a versatile display solution. However, for optimal presentation and to ensure the integrity of the stand, we recommend using banners within the specified size range for your stand model.
For any additional questions or specific inquiries, please do not hesitate to contact our customer service team.
Telescopic Backdrop Banner Stands are versatile, adjustable stands designed for displaying banners at events, presentations, or in promotional settings. These stands allow for customization in size, with the ability to extend horizontally from 5 to 10 feet and vertically from 3.5 to 8 feet. Included with each stand is a 95" x 96" (approximately 8 feet by 8 feet) banner made from durable 13oz scrim vinyl. The banner features 4-inch pole pockets at both the top and bottom for easy installation. Additionally, while the stand comes equipped with a banner, the hardware itself can be purchased separately. This option is available under the "Banner Stands and Parts" category in the Marketplace, accommodating other banners that have 4-inch pole pockets at their top and bottom, providing flexibility for various display needs.
To ensure the utmost care and protection during shipment, the components of our Backdrop Banner Stands are dispatched separately. The stand is securely packaged within a durable Canvas Carry Bag, designed for both protection and ease of transportation. Meanwhile, the banner itself is carefully rolled and placed within a square tube box to maintain its quality and prevent any creases or damage. This method of shipping guarantees that both elements of your Backdrop Banner Stand arrive in pristine condition, ready for easy assembly and display.
Yes, Gator Board Signs are suitable for outdoor applications. They are designed to withstand medium-term exposure to the elements, making them a versatile option for both indoor and outdoor signage.
Gator Boards are available in two classic colors: White and Black.
Signicade® Sidewalk Signs are durable, A-frame stands constructed from plastic, designed for both indoor and outdoor display purposes. These stands are compatible with 4mm White Coroplast panels, offering the flexibility to showcase your custom graphics or messages. Customers can choose between one-sided or double-sided print options for their signs.
We offer three distinct models to cater to different size requirements:
- Signicade® Deluxe: Supports a sign size of 24" x 36".
- Signicade® MDX: Designed for a sign size of 18" x 24".
- Quick Sign®: Accommodates a sign size of 24" x 18".
These versatile signs are ideal for businesses looking to attract pedestrian or roadside attention with portable, easy-to-update signage solutions.
For optimal printing quality on Signicade® Sidewalk Signs, please ensure your artwork includes a 0.5" bleed on all sides. It is important not to include crop marks in your file. This preparation helps us ensure your design is accurately represented on the final product.
Assembled Dimensions: Our Telescopic Backdrop Banner Stands offer flexible sizing options to best suit your display needs. Horizontally, they can be adjusted between 5 to 10 feet, and vertically, they can be adjusted from 3.5 to 8 feet, allowing for a custom fit in a variety of spaces.
Disassembled Dimensions: For convenience and ease of transport, each Backdrop Banner Stand can be neatly disassembled and stored in a provided carry bag. The dimensions of the carry bag are 40 inches in length, 9 inches in width, and 3 inches in depth, ensuring your banner stand is compact and portable.
Top of Form
A-Frame Signs are versatile, freestanding displays designed in the shape of the letter "A." Ideal for both indoor and outdoor use, these signs provide a convenient and effective way to showcase messages or advertisements. Each A-Frame includes a 24" x 18" double-sided sign made from 4mm thick white Coroplast, ensuring durability and visibility. For additional messaging, a 24" x 6" double-sided Rider Sign, also crafted from 4mm thick white Coroplast, is available for purchase separately. This Rider Sign can be effortlessly installed at the top of the A-Frame for enhanced visibility. Explore our Signs category to find these and more options to meet your advertising needs.
A-Frame signs are versatile, freestanding signage solutions ideal for businesses to display messages prominently at ground level. These signs are designed to capture the attention of passersby, making them perfect for advertising specials, directions, or any important information directly in front of your establishment.
Design Guidelines for A-Frame Signs
When preparing your design for an A-Frame sign, please adhere to the following guidelines to ensure the best quality and accuracy of your printed sign:
- File Setup: Do not include bleed or crop marks in your design file. This ensures a clean and precise look for your sign.
- Size Requirements: Design your file to match the exact size you've ordered. For a standard A-Frame sign, the recommended size is 24 inches by 18 inches. This dimension ensures your message is visible and impactful without any unnecessary adjustments.
- Resolution: To guarantee a clear and sharp print, set your design file to 200 dpi (dots per inch) at full scale. This resolution strikes the perfect balance between file size and image quality, ensuring your sign is both attractive and professional.
By following these guidelines, you can create an effective A-Frame sign that stands out and communicates your message clearly to your audience.
What Are Fabric Tube Displays? Fabric Tube Displays are innovative advertising mediums consisting of stretchable fabric graphics that slide over a tubular metal frame, creating a sleek and eye-catching display. These displays are designed for ease of setup and can be used at trade shows, retail spaces, and various events to promote your brand or message effectively.
File Requirements for Fabric Tube Displays To ensure the highest quality display, we require graphic files to be submitted in either PDF, AI, or EPS format with a minimum resolution of 150 DPI. Please ensure that all text is outlined and colors are specified in CMYK. For detailed guidelines, refer to our submission specifications.
Interchangeability of Fabric Tube Displays Yes, the graphics on our Fabric Tube Displays are interchangeable. You can easily swap out the fabric graphic for different events or campaigns, making them a versatile option for ongoing marketing efforts.
Carrying Case Inclusion Every Fabric Tube Display comes with a durable carrying case for convenience and protection. The case is designed to accommodate the frame and the fabric graphic, making transportation and storage hassle-free.
Weight and Dimensions The weight and dimensions of our Fabric Tube Displays vary based on the model and size selected. Please refer to our product specifications page for detailed information on the dimensions and weight of each available option.
Installation of Your Fabric Tube Display Installing your Fabric Tube Display is straightforward:
- Assemble the tubular frame by connecting the pieces according to the instructions provided.
- Once the frame is assembled, stretch the fabric graphic over the frame starting from one end and working your way to the other end.
- Ensure the fabric is evenly distributed and fully covers the frame for a smooth finish.
For more detailed instructions, please refer to the setup guide included with your display.
Aluminum Dye Sub Panels are a modern printing medium where images are infused onto 0.045" thick white gloss aluminum panels using the dye-sublimation process. This innovative technique brings photos to life with stunning vibrancy and detail, creating an impactful visual display. These panels come in various sizes to suit different display needs and can be optionally enhanced with stand-off accessories, sold separately, for a more striking presentation.
To set up your Aluminum Dye Sublimation file correctly, please follow these guidelines:
- Ensure your artwork includes a bleed of 0.25 inches on all sides. This extra space around your design is crucial for cutting and finishing processes, ensuring no important elements are trimmed off.
- Do not include crop marks in your file. Crop marks are not needed for the dye sublimation process and could interfere with the final product.
By adhering to these specifications, you'll ensure your design is properly prepared for the aluminum dye sublimation printing process.
Our Aluminum Dye Sub Panels are designed with versatility in mind. Each panel features a dual-sided composition: one side is finished with a high-gloss white coating, while the opposite side retains the natural appearance of raw aluminum. At present, we exclusively offer our printing services on the white gloss surface. This setup ensures optimal color vibrancy and image clarity for your custom designs.
Fabric Tube Displays are a standout promotional tool, crafted with high-quality graphics that are individually printed onto 9oz Premium Polyester fabric using the dye sublimation technique. This process ensures vibrant, enduring color quality. The displays are meticulously sewn together, presenting a double-sided visual appeal that is hard to overlook.
To assemble, simply connect the stand's poles by pressing down on the locking mechanism until it clicks securely into place. This indicates that the poles are firmly connected. Next, attach the ends of the poles into the base of the stand to guarantee its stability. To finalize the setup, gently stretch the fabric over the frame, creating a seamless display.
Each Fabric Tube Display is accompanied by a portable carrying case, designed for convenient storage of the stand components. This makes transportation and setup both easy and efficient, ensuring your display is ready to make a lasting impression wherever it goes.
For the 24" x 90" Display:
- Dimensions of Stand: 24 inches (width) x 90 inches (height)
- Carrying Case Dimensions: 34.5 inches (length) x 10.5 inches (width) x 2.5 inches (depth)
- Weight (including fabric): 14 pounds
For the 36" x 90" Display:
- Dimensions of Stand: 36 inches (width) x 90 inches (height)
- Carrying Case Dimensions: 38.5 inches (length) x 11.5 inches (width) x 2.5 inches (depth)
- Weight (including fabric): 18 pounds
These specifications ensure that our Fabric Tube Displays are both portable and easy to set up, making them an ideal choice for your display needs.
How to Install Your Fabric Tube Display
- Assemble the Stand: Begin by connecting the poles of the stand. Press down on the locking mechanism to lock each pole in place. You'll know the poles are securely connected when the locking mechanism clicks.
- Secure the Poles: Attach the ends of the assembled poles into the stand's base. Screw them in firmly to ensure the structure is stable and secure.
- Attach the Fabric: Finally, drape the fabric over the frame, smoothing it out to ensure a snug and even fit. This completes your fabric tube display setup.
For additional assistance or inquiries, please contact our support team.
What are Event Tents?
Event Tents are portable, customizable shelters used at outdoor and indoor events for promotional, informational, or social gatherings. They serve as an excellent tool for branding and can be tailored to feature specific designs or logos.
How do I set up my Event Tent?
Setting up your Event Tent involves a straightforward process:
- Unpack the tent components from its case.
- Extend the frame to its full width and height.
- Secure the canopy fabric over the frame.
- Adjust the legs to ensure stability and proper tension of the fabric. Step-by-step instructions are included with your purchase, and no special tools are required.
Can I use different artwork for each side/panel of the Event Tent?
Absolutely! You have the option to customize each side/panel with different artwork. This flexibility allows you to tailor your Event Tent's appearance for maximum impact and brand visibility.
Is the tent difficult to set up?
No, Event Tents are designed for ease of assembly. Most can be set up within minutes by one or two people without the need for specialized tools. The process is intuitive, and guidance is provided to ensure a hassle-free setup.
What are the shipping weight and dimensions of an Event Tent?
The shipping weight and dimensions vary depending on the model and size of the Event Tent. Please refer to the specific product details for accurate measurements and weight information.
How can I maintain my Event Tent?
Maintaining your Event Tent is key to ensuring its longevity:
- Clean the fabric regularly with mild soap and water.
- Ensure the tent is dry before storing to prevent mold and mildew.
- Inspect and maintain the frame and joints for smooth operation.
- Store in a cool, dry place when not in use.
Can I remove the printed fabric from the frame?
Yes, the printed fabric can be easily removed from the frame. This feature allows for cleaning, maintenance, or swapping out for different events. It's designed to be user-friendly, ensuring you can update or maintain your tent with minimal effort.
For further assistance or inquiries, please contact our support team.
Absolutely. Our Aluminum Heavy Duty Signs are designed to withstand both indoor and outdoor environments, ensuring durability and longevity regardless of the location
Our Aluminum Dye Sub Panels are available in a wide range of sizes to suit your needs. You can choose from the following sizes:
- 4" x 4"
- 8" x 10"
- 12" x 12"
- 16" x 20"
- 20" x 24"
- 24" x 36"
- 30" x 40"
- 36" x 48"
- 45" x 35"
We offer a variety of dimensions, from small to large, ensuring that you can find the perfect size for your specific requirements. If you have any questions or need further assistance, please don't hesitate to reach out to our dedicated support team. Your satisfaction is our priority.
Currently, Aluminum Dye Sub Panels are exclusively manufactured in California.
Aluminum Heavy Duty Signs are robust and durable signage solutions crafted from 0.08” thick rust-proof aluminium. These signs are designed to withstand the rigours of outdoor use while also serving effectively indoors. They find versatile applications, including but not limited to:
- Parking Signs: Clearly mark designated parking areas.
- Traffic Signs: Ensure road safety with clear and long-lasting traffic signage.
- Factory and Warehouse Notifications: Communicate important information within industrial settings.
- Directional Signage: Provide clear guidance for navigation in various environments.
These signs are known for their exceptional outdoor durability, making them a reliable choice for a wide range of signage needs.
To ensure the best results for your Aluminum Heavy Duty project, please follow these guidelines:
Bleed Area: Make sure your artwork includes a 0.5-inch bleed on all sides. This ensures that your design extends beyond the final cut size, preventing any unwanted white edges.
Crop Marks: Do not add crop marks to your file. Our professional printing process will handle the precise cutting of your artwork.
By adhering to these guidelines, you can achieve a flawless result for your Aluminum Heavy Duty project. If you have any further questions or need assistance, feel free to reach out to our support team.
We hope this helps you prepare your file for an exceptional Aluminum heavy-duty product.
The surface of our Aluminum Heavy Duty Signs is white on both sides, ensuring a clean and professional appearance for any application.
Event Tents serve as an outstanding large-scale promotional tool ideal for gaining visibility at festivals, conventions, trade shows, and various other events. Utilizing state-of-the-art UV ink technology, these tents are printed on white, 11oz, water-repellent fabric, ensuring both durability and high-quality visual appeal. Each tent comprises four fabric panels, offering the flexibility to showcase up to four distinct designs—one on each side. The panels are meticulously sewn together and mounted on a sturdy 10’ x 10’ aluminum pop-up canopy frame. It's important to note that the tent fabric is available exclusively in white, emphasizing a clean and professional backdrop for your custom designs.
1. What are Backlit Posters? Backlit Posters are high-quality prints designed to be illuminated from behind using a light source. This backlighting enhances the colors and details of the poster, making the image vivid and eye-catching. They are commonly used for movie posters, advertisements, and display panels.
2. How do I set up my Backlit Poster file? When preparing your Backlit Poster file for printing, ensure it is in a high-resolution format (preferably 300 dpi or higher) to guarantee the best quality print. Use CMYK color mode for color accuracy. Leave a margin around the edges if your design doesn't bleed to the edge. It's also essential to consider the light source when designing, as areas with lighter colors will appear more luminous.
3. Will the poster come with hardware? The inclusion of hardware for mounting or displaying your Backlit Poster varies by provider. Some may offer the necessary hardware or frames, while others might sell it separately. Check with your supplier to confirm what is included with your purchase.
4. Can I use my Backlit Poster outdoors? Whether a Backlit Poster can be used outdoors depends on the material and construction of the poster and the display unit. Many are designed for indoor use, but there are outdoor-rated options that feature weather-resistant materials and enclosures. Verify the specifications with your supplier.
5. Why is my Backlit Poster printed dark? Backlit Posters are printed darker intentionally to compensate for the brightness of the backlighting. When lit from behind, the dark tones ensure that the image has depth and contrast, preventing it from looking washed out.
6. Can some parts of my design be transparent? Yes, parts of your design can be transparent to take full advantage of the backlighting effect. Transparency in your design allows the light to pass through selectively, highlighting specific elements and creating a dynamic visual impact.
For the best results with your Backlit Poster, it's crucial to work closely with your printing service to understand their file requirements, the materials they use, and the suitable applications for their products.
To ensure your Backlit Poster prints flawlessly, please follow these simple file preparation guidelines:
Resolution: Your file should have a resolution of 200 dots per inch (dpi) when sized to the actual dimensions at which it will be printed. This ensures sharp, clear images without pixelation.
Bleed Requirements: Include a bleed of 0.25 inches on each side of your artwork. This means your design should extend 0.25 inches beyond the final print size on all sides, adding up to a total bleed of 0.5 inches. This extra margin is crucial for trimming and can prevent any important design elements from being cut off during the finishing process.
By adhering to these specifications, your Backlit Poster will be printed with the highest quality and precision, guaranteeing an impressive display.
Yes, you can use your Backlit Poster outdoors, provided it is properly protected. To ensure durability and maintain the quality of the display, it should be housed within a lightbox that is equipped with UV protectant sheets, such as styrene or acrylic. These materials help shield the poster from the elements and prevent fading caused by sunlight exposure, ensuring your poster remains vibrant and visible in outdoor settings.
Acrylic signs are printed using UV-cured inks that are directly applied onto the surface. This method enhances the durability of the product, ensuring it maintains its quality and appearance for an extended period, especially in outdoor environments.
Absolutely. In the industry, Aluminum Sandwich Boards are commonly recognized under various names, including Dibond®, Aluminum Composite Material (ACM), and Aluminum Composite Panel (ACP).
Our Aluminum Sandwich Boards come in a sophisticated Brushed Silver/White combination. Depending on your preference for the print side, you can opt for either:
Brushed Silver Surface: Opting for this choice means your board will feature a sleek, brushed silver finish on the front, with a clean white back. The printing process for the brushed silver surface incorporates a 5.0 printing technique, which includes 4 colors plus white ink for enhanced vibrancy and contrast.
White Surface: Selecting the white surface for printing allows for a crisp, clear display on the front, with an elegant brushed silver finish on the back. The white boards are printed using a 4.0 technique, utilizing a four-color process to ensure high-quality, vibrant prints.
This dual-sided color option provides versatility and aesthetic appeal for your projects, ensuring a professional and polished look regardless of the chosen print side.
The thickness of our Aluminum Sandwich Board is 3mm. This product features a robust construction, consisting of two aluminum sheets, each measuring .012 inches in thickness, encasing a solid polyethylene core for enhanced durability and stability.
The edge of our Aluminum Sandwich Board is designed in a sleek black finish.
What are Aluminum Floor Graphics?
Aluminum Floor Graphics are durable, metallic graphics designed for application on floors. They are made from a sturdy aluminum-based material that adheres well to various floor surfaces, providing a slip-resistant and visually striking signage option.
What is the life expectancy of Aluminum Floor Graphics?
The lifespan of Aluminum Floor Graphics can vary based on foot traffic, environmental conditions, and surface type. However, they are designed to be highly durable and can last several years under normal conditions.
Can I use this material on hard surfaces such as concrete, brick, etc.?
Yes, Aluminum Floor Graphics are suitable for application on a wide range of hard surfaces, including concrete, brick, asphalt, and more. Their adhesive is formulated to ensure a strong bond with these materials.
Can I request a custom cut or contour cut on Aluminum Floor Graphics?
Absolutely. Aluminum Floor Graphics can be custom cut to fit specific shapes or designs. Contour cutting allows for the creation of graphics in virtually any shape, enhancing the customization options for your space.
How are Aluminum Floor Graphics printed?
These graphics are printed using high-quality, fade-resistant inks on aluminum-based material. The printing process ensures that the graphics are vibrant, durable, and capable of withstanding various environmental conditions.
What are the file requirements for Aluminum Floor Graphics?
For optimal print quality, files should be provided in vector format (e.g., .AI, .EPS) or high-resolution raster format (e.g., .JPG, .PNG) with a minimum resolution of 300 dpi. Ensure that the artwork is correctly sized and includes any necessary bleed.
How do I apply Aluminum Floor Graphics?
To apply Aluminum Floor Graphics, clean the application surface thoroughly, remove the backing to expose the adhesive, and carefully place the graphic on the floor. Use a squeegee to smooth out any air bubbles and ensure full adhesion.
How can I achieve best results when installing Aluminum Floor Graphics?
For best results, ensure the application surface is clean, dry, and free of debris. Apply the graphic slowly, working from one edge to the other, and use a squeegee to eliminate air pockets. Avoid stretching the material during installation.
Are Aluminum Floor Graphics recyclable?
While the aluminum component of the graphics is recyclable, the adhesive and laminate layers may not be. It's recommended to check with local recycling guidelines to determine the best disposal method for these materials.
For further information or specific inquiries, please contact our customer service team.
Aluminum Floor Graphics are designed using a robust 20 mil aluminum foil base, ensuring they seamlessly adapt to both rough and smooth surface textures. These graphics boast a high-friction, slip-resistant coating to enhance pedestrian safety and mobility in the area they're applied. Crafted to endure various weather conditions, from the scorching heat to freezing cold, these graphics maintain their integrity and slip resistance, surpassing anti-slip safety standards under both wet and dry conditions.
Aluminum Floor Graphics are designed with durability in mind, utilizing UV cured inks for printing directly onto the material. This ensures they are suitable for outdoor applications. However, their longevity can be affected by several factors.
- Outdoor Use: When installed outdoors, exposure to harsh weather conditions and high foot traffic can impact the lifespan of the graphics. Over time, these elements may diminish the slip-resistance feature of the graphics, potentially necessitating an earlier replacement for safety reasons.
- Indoor Use and Light Traffic Areas: In contrast, aluminum floor graphics installed indoors or in areas with lighter pedestrian traffic tend to last longer. The reduced exposure to severe weather and less wear and tear can significantly extend their useful life.
For both scenarios, the specific lifespan of aluminum floor graphics will vary based on the intensity of the conditions they are subjected to. It's crucial to monitor their condition regularly, especially in high-traffic or severe weather environments, to maintain safety and visual appeal.
At this time, we do not provide hardware or specific guidance for hanging our Aluminum Sandwich Board Signs. However, due to their lightweight nature, these signs are suitable for indoor hanging. Please note, any method of hanging the sign beyond the hardware we supply is at the discretion and responsibility of the customer.
For the submission of documents or images, we highly recommend using the PDF format for optimal compatibility and quality. However, we also accept the following file formats:
- JPEG: Ideal for photographic images.
- TIFF: Suitable for high-quality graphics.
- PSD: Adobe Photoshop format for layered images.
- EPS: Vector format for illustrations and logos.
Please ensure your files are in one of these formats before submission to ensure a smooth processing experience.
Ensure your artwork is converted from PMS and Spot Colors to CMYK format. Additionally, please outline all fonts and embed all images to ensure your design is accurately reproduced.
No, each banner is printed separately as a single-sided unit and then meticulously affixed to the aluminum base to ensure durability and quality presentation.
Q: What file format should I use for submitting my aluminum floor graphics design?
A: Please submit your design files in PDF format. Ensure that your PDF does not contain any crop marks for optimal processing.
Q: Are there any specific design placement requirements for the graphics and text?
A: Yes, to ensure the safety and integrity of your design, all text and graphics must be positioned at least 0.5 inches away from the edge of the final cutline. This margin is critical to prevent any important elements of your design from being compromised during the cutting process.
Q: What are the bleed requirements for my artwork?
A: Your artwork should include a 0.5-inch bleed on all sides. This extra space is necessary to accommodate any slight shifting that may occur during production, ensuring that the final product does not have any unprinted edges.
For best results, please adhere to these guidelines when preparing your file for submission.
To ensure your aluminum floor graphics adhere properly and display at their best, follow these straightforward steps:
- Prepare the Surface: Begin by thoroughly sweeping the area where you intend to apply the graphic. It's essential to remove all dirt, debris, and moisture. For oily surfaces, a power wash with a commercial degreaser may be necessary to ensure a clean application surface.
- Application Process:
- Carefully peel off the release liner from the back of the floor graphic.
- Position the graphic flat on the prepared surface.
- Use a roller to press down and smooth out the graphic, ensuring it fully adheres to the surface without any bubbles or edges lifting.
- Adhesive Quality: The high-performance pressure-sensitive adhesive on our aluminum floor graphics is designed for superior holding strength. This ensures that your graphic is ready for immediate use after application.
- Temperature Considerations:
- The application can be performed at temperatures of 33℉ (0℃) or above. However, the surface temperature is critical; materials like stone and metal may be colder than the air temperature.
- Always conduct a test application if temperatures are close to freezing to ensure optimal adhesion.
- For optimal results, we recommend applying the floor graphic in temperatures of 50℉ (10℃) or above.
By following these guidelines, you can ensure your aluminum floor graphics are applied smoothly and last as intended.
For optimal installation of Aluminum Floor Graphics, follow these guidelines:
- Surface Preparation: Ensure the surface is clean, dry, and free from dust and debris. The graphics can be applied to a variety of harder surfaces, including concrete, brick, and epoxy-coated floors.
- Application: Carefully position the graphic on the intended surface. Once in place, apply pressure to adhere it to the surface.
- Use a Hard Rubber Roller: For maximum bonding, use a hard rubber roller to firmly roll over the surface of the graphic. This helps in ensuring that the graphic is evenly adhered to the surface without any air bubbles or wrinkles.
By following these steps, you can ensure a durable and effective application of your Aluminum Floor Graphics.
What are Gator Board Signs? Gator Board Signs are durable, rigid display boards made from a tough, dense inner core and a smooth exterior surface. They are ideal for indoor signage, presentations, and displays due to their strength and lightweight properties.
How do I set up Gator Board Signs? Setting up Gator Board Signs is straightforward. They can be mounted on walls using double-sided tape, Velcro, or screws for more permanent installations. For free-standing options, easels or stands specifically designed for display boards can be used.
What is the file requirement for Gator Board Signs? For the best quality print on Gator Board Signs, files should be high-resolution, ideally with a minimum of 300 DPI (dots per inch) in one of the following formats: PDF, AI, EPS, or high-quality JPG. Ensure that your design is scaled to the actual size of the sign for accuracy.
Can I use Gator Board Signs for exterior signage? Gator Board Signs are primarily recommended for indoor use. While they are durable, their composition is not suited for long-term exposure to outdoor elements. For outdoor signage, materials like aluminum or PVC boards are more appropriate due to their weather resistance.
What color Gator Boards are available? Gator Board Signs typically come in a standard white color, providing a clean, crisp background for any design. However, some suppliers may offer a range of colors, so it is worth inquiring if you have specific color requirements for your project.
Each retractable banner is accompanied by a padded black bag designed specifically for its safe and convenient storage. This ensures your banner remains protected and in excellent condition until its next use.
Our banners are crafted using high-quality 10 mil vinyl, ensuring both flexibility and durability to withstand various conditions.
For optimal clarity, ensure that your images are set between 150 to 300 dpi (dots per inch) at their actual size. Using a resolution outside this range may lead to blurriness or pixelation, affecting the quality of your image.
Gator Board Signs, also known as Gator Foam Boards, consist of a rigid core of extruded polystyrene foam that is sandwiched between two layers of wood-fiber veneer. This unique construction makes them significantly stronger and more durable than standard foam core boards, while maintaining a lightweight profile that is easy to handle and install. Ideal for a variety of applications, Gator Board Signs offer an excellent balance of durability and ease of use for both indoor and outdoor signage.
For optimal printing of Gator Board Signs, please ensure your artwork includes a 0.5" bleed on all sides. This means you should extend your design half an inch beyond the final size of the sign in every direction. It's important to note that crop marks should not be added to your file. This extra margin allows for a small amount of space to ensure the edges of your design are not cut off during the trimming process.
What are Signicade® Sidewalk Signs?
Signicade® Sidewalk Signs are portable advertising displays designed for use outdoors, typically placed on sidewalks to attract the attention of passersby. These signs are durable, weather-resistant, and ideal for promoting businesses, events, or special offers directly in front of your establishment.
How do I set up Signicade® Sidewalk Signs?
Setting up Signicade® Sidewalk Signs is straightforward:
- Unpack the sign from its packaging.
- If your model requires, insert the graphic panels into the frame slots on both sides of the sign. Some models may use adhesive graphics that can be applied directly to the sign face.
- Extend the sign's legs or base (if applicable) to ensure stability.
- Place the sign in a visible, high-traffic area on the sidewalk or near your business entrance. Make sure it does not obstruct pedestrian or vehicular traffic.
What is the file requirement for Signicade® Sidewalk Signs?
For the best quality graphics on Signicade® Sidewalk Signs, use high-resolution images or vector files. The recommended file types are:
- Vector files: AI, EPS, PDF (ensure all text is outlined)
- Raster files: JPEG, PNG, TIFF (at a minimum resolution of 300 DPI) Be sure to design your artwork to the specific dimensions of your Signicade® model's display area for a perfect fit.
What is the weight and dimension of the Signicade® Sidewalk Signs?
The weight and dimensions of Signicade® Sidewalk Signs vary by model. Common specifications include:
- Weight: Ranges from 15 to 25 pounds, making them easy to transport yet sturdy enough to withstand moderate winds.
- Dimensions: Typical sizes include 24x36 inches for the display area, with overall dimensions slightly larger to account for the sign frame. Ensure to check the specifications of your specific model for accurate measurements.
These signs are designed to be user-friendly, offering a balance of portability and durability for effective outdoor advertising.
- What are Aluminum Dye Sub Panels? Aluminum Dye Sub Panels are high-quality printing surfaces made from aluminum sheets. These panels are designed to showcase vibrant, detailed images through a process called dye sublimation, where heat transfers dye onto these metal sheets, creating long-lasting, fade-resistant prints.
- How do I set up my Aluminum Dye Sub file? To prepare your file for printing on Aluminum Dye Sub Panels, ensure it is in a high-resolution format, ideally 300 DPI or higher. Use the RGB color space for the most accurate color reproduction. Include a bleed in your design if required, and make sure all critical elements are within safe margins.
- What color are the Aluminum Dye Sub Panels? The base color of Aluminum Dye Sub Panels is typically white to ensure that printed colors are vivid and true to the original design. However, some panels may have a clear or metallic finish that allows the natural color of the aluminum to show through, affecting the final look of the image.
- Are there any finishing options available? Yes, Aluminum Dye Sub Panels come with various finishing options, including glossy, matte, and textured surfaces. These finishes can enhance the visual appeal of the printed image and offer different looks depending on the intended display environment.
- Can I use the Aluminum Dye Sub Panels outdoors? Aluminum Dye Sub Panels are durable and can withstand outdoor elements to some extent. However, for prolonged outdoor use, it's recommended to select panels specifically rated for outdoor durability or apply an additional UV protective layer to extend the lifespan of the prints.
- Are there any mounting options available? Multiple mounting options are available for Aluminum Dye Sub Panels, including standoffs, floating mounts, and frames. The choice depends on the desired aesthetic and the display location. Some panels come with pre-drilled holes or mounting hardware for easier installation.
- What sizes are offered for Aluminum Dye Sub Panels? Aluminum Dye Sub Panels are available in a wide range of sizes, from small desk-sized panels to large wall-mounted pieces. Custom sizes may also be available upon request to fit specific project needs.
- Which locations will produce Aluminum Dye Sub Panels? Many professional printing companies offer Aluminum Dye Sub Panel production. The availability may vary based on your location, so it's best to consult with local or online print service providers to find one that can meet your specific requirements.
The banner features a smooth matte finish, ensuring high-quality print results and versatile usage.
Do you offer any finishing options for your products?
Yes, we provide a range of finishing options to enhance the final appearance and functionality of your products. Our current finishing options include:
- 3/8" Drill Hole: We can add a drill hole with the placement 1 inch from each corner for easy mounting.
- Corner Options: Choose between round or straight corners to match your design preferences.
- Contour Cuts: Custom contour cuts are available for shapes that require precision cutting beyond standard shapes.
- Stand Off Hardware: We offer 5/8" x 1" stand-off hardware for an elegant display solution.
These options are designed to meet various needs and preferences, ensuring your product has the perfect finishing touch.
Yes, we offer a convenient mounting solution for your needs. We provide 5/8" x 1" Stand Off hardware, ensuring secure installation. To utilize this option, please make sure to select the "drill hole options" during your order process to accommodate the hardware installation. Your satisfaction is our priority, and we aim to make your mounting experience seamless and efficient.
We offer a wide range of sizes for our acrylic signs to accommodate various needs and preferences. Our selection starts at 4 inches by 4 inches, ideal for small notices or decorative elements, and extends up to 46 inches by 36 inches for more substantial displays or signage needs. This variety ensures that you can find the perfect size for your specific application, whether it's for business, events, or personal use.
1. What Are Aluminum Sandwich Boards?
Aluminum Sandwich Boards are durable, lightweight signs made of two aluminum sheets with a solid polyethylene core. They are versatile for both indoor and outdoor use, making them ideal for business signage, real estate signs, and more.
2. Are Aluminum Sandwich Boards Known by Any Other Names?
Yes, Aluminum Sandwich Boards are also referred to as Dibond signs, aluminum composite signs, or simply ACP (Aluminum Composite Panel) signs.
3. What Color Options Are Available for Aluminum Sandwich Boards?
Our Aluminum Sandwich Boards come in a variety of colors to match your branding or design needs. Please contact us for a detailed list of available color options.
4. What Mounting or Finishing Options Do You Offer?
We offer several mounting and finishing options for Aluminum Sandwich Boards, including pre-drilled holes, metal stands, and frame options to suit different installation needs.
5. What Is the Thickness of the Aluminum Sandwich Board?
The standard thickness of our Aluminum Sandwich Boards is 3mm, providing a perfect balance between durability and ease of handling.
6. What Is the Edge Color of the Aluminum Sandwich Board?
The edge color of the Aluminum Sandwich Board typically matches the core, which is usually black or gray, providing a sleek and professional appearance.
7. How Are the Aluminum Sandwich Boards Printed?
We use high-quality, UV-resistant inks for printing directly onto the aluminum surface, ensuring vibrant colors and long-lasting durability against the elements.
8. What Are the File Requirements for Printing on Aluminum Sandwich Boards?
For the best printing results, we require high-resolution files, preferably in PDF, EPS, AI, or JPEG format, with a minimum resolution of 300 dpi.
9. Can I Hang My Aluminum Sandwich Board Sign?
Yes, you can hang your Aluminum Sandwich Board Sign. We can provide hanging solutions like rope or chain attachments upon request, making it easy to display your sign exactly where you need it.
We recommend that the double-sided retractable stands are used indoors only. They are specifically designed for indoor environments to ensure optimal performance and durability.
No, the 8mil Opaque Window Graphics are designed to be fully opaque, providing superior coverage that ensures privacy and blocks visibility.
The adhesive is consistently applied to the rear side of the print. In the case of double-sided prints, the adhesive is located on the side designated as "back" in the file. This arrangement enables the print to be affixed to the interior of a window, ensuring it can be viewed from the outside.
Aluminum Sandwich Boards are durable signage options crafted using high-quality materials. They consist of two 0.012-inch aluminum panels that encase a polyethylene core, leading to an overall thickness of 1/8 inch (3mm). These boards are designed to be lightweight yet sturdy, making them ideal for various mounting scenarios. Available in two elegant pre-painted finishes—White and Brushed Silver—they cater to diverse aesthetic preferences.
To facilitate effortless installation, we offer the option to add drill holes, ensuring that the boards can be securely attached to posts, fences, walls, and numerous other surfaces without hassle. Our Aluminum Sandwich Boards are versatile, supporting both indoor and outdoor applications. They are commonly utilized for real estate signs, customer and handicap notices, directional signage, among other purposes. The use of UV-resistant inks ensures that the prints remain vibrant and clear, regardless of exposure to the elements.
Absolutely! To meet your customization needs, we provide a variety of mounting and finishing options. Our offerings include:
· 3/8" Drill Hole: Conveniently placed 1 inch from each corner for easy installation.
· Corner Styles: Choose between rounded or straight corners for a polished look.
· Contour Cuts: Custom shapes and designs are achievable with our precision contour cutting.
· 5/8" x 1" Stand Off Hardware: A sleek hardware option that adds a professional touch to your display.
To ensure durability and longevity, especially for outdoor use, we employ UV-cured inks for direct printing onto the Aluminum Sandwich Boards. This advanced printing technique enhances the endurance of the product when exposed to outdoor conditions. For prints on the Brushed Silver side (5.0), it is essential to provide an additional white mask file along with your primary artwork file. This white mask file is printed as a foundational layer beneath your artwork, significantly enhancing the vibrancy and visibility of the colors against the Brushed Silver background, ensuring that your designs truly stand out.
To ensure the highest quality print for your Aluminum Sandwich Boards, please follow these submission guidelines:
- File Format: Submit your designs in PDF format. This ensures that your files are compatible with our printing process and maintains the integrity of your design.
- Margins and Safety Zone: Keep all text and graphics at least 0.5 inches away from the edge of the cutline. This safety margin prevents important elements from being cut off during the trimming process.
- Bleed Requirements: Include a 0.5-inch bleed on all sides of your artwork. A bleed allows for printing to the edge of the board without any white margins appearing after trimming.
- Crop Marks: Do not add crop marks to your file. Our prepress system automatically accounts for cutlines, and adding crop marks may interfere with this process.
1. What Is a Double-Sided Retractable Banner and How Can I Set It Up? A double-sided retractable banner is a versatile display tool that features your design on both sides, offering maximum visibility. Setting it up is straightforward: simply extend the banner from its base and secure it with the support pole provided.
2. What Type of Files Should I Submit for My Design? Please submit your artwork as high-resolution PDF, EPS, or AI files. Ensure that all fonts are outlined, and images are embedded to prevent any issues during printing.
3. How Should I Prepare My Artwork for Printing? Your artwork should be set up to the exact dimensions of the banner you're ordering. Include a bleed as specified by the printing guidelines, use CMYK color mode for color accuracy, and ensure the resolution is high enough for print quality.
4. Are the Banners Printed on the Same Sheet? No, each side of the banner is printed on separate sheets. This ensures optimal print quality and visibility for both sides of the display.
5. How Should I Store the Banner Once Retracted? After retracting the banner into its base, store it in the protective case provided. This case will safeguard the banner from dust and damage, ensuring it stays in pristine condition.
6. What Material Are the Banners Printed On? Our banners are printed on high-quality, durable vinyl material, designed for sharp image reproduction and long-lasting performance.
7. What Resolution Should My Artwork Be for Best Clarity? For the best clarity, we recommend preparing your artwork at a resolution of at least 150 dpi at full size. This will ensure your images and text appear crisp and clear.
8. What Type of Finish Does the Banner Have? Our retractable banners have a matte finish, reducing glare and enhancing readability under various lighting conditions.
9. Can the Banner Be Used Outdoors? While our banners are designed for indoor use, they can be used outdoors in calm weather. However, they are not intended for prolonged outdoor exposure or extreme weather conditions.
10. What Is the Turnaround Time for a Retractable Banner? The standard turnaround time for our retractable banners is 5-7 business days after artwork approval and payment. Expedited options may be available upon request.
Our Opaque Window Graphics are composed of a premium 8mil print material. To ensure secure and straightforward mounting, we apply a 1mil adhesive film. Consequently, the total thickness of the product is 9mil.
Absolutely! You have the option to print two distinct images back-to-back. Please ensure you choose the "Double-Sided" printing option when you want your images printed on both sides.
MIL Opaque Window Graphics, when applied to standard window glass, are designed to last up to 6 months with the removable adhesive. If the graphics remain in the same location without being moved, they can last for up to 1 year. These durations are based on normal exposure conditions.
To properly set up your artwork file for Styrene Signs, please ensure that you include a 0.5-inch bleed on all sides. It's important not to include crop marks in your file. This preparation ensures your design is fully compatible with the printing process for optimal results.
The Styrene Signs are produced on a matte white material.
Absolutely. Styrene signs are versatile and can be utilized for both indoor and temporary outdoor applications. For optimal performance in outdoor settings, we suggest conducting a preliminary test prior to use.
We offer a wide range of sizes for our Styrene Signs to accommodate various needs and applications. Our sizes start as small as 6 inches by 6 inches and go up to as large as 48 inches by 120 inches. This variety ensures that you can find the perfect size for your specific requirements.
Styrene Signs are printed using UV cured inks that are directly applied onto the surface, ensuring enhanced durability and longevity for outdoor use.
To ensure your Styrene Signs maintain their quality and durability, please follow these care instructions:
Cleaning: Use a soft, damp cloth with mild soap and water to gently clean the surface of the sign. Avoid using abrasive cleaners or brushes as they can damage the sign's finish.
Outdoor Use: If your signs are displayed outdoors, place them in areas where they can avoid direct sunlight and strong winds. Regular cleaning, as mentioned above, will also help in extending the lifespan of your signs.
By adhering to these care guidelines, you can keep your Styrene Signs looking their best for as long as possible.
Yes, Grand4Mat offers the option to consolidate shipments under specific conditions to ensure efficient processing and delivery. Please review the guidelines below to understand how to qualify for group shipping:
- Product Consistency: All items in a group shipment must be of the same product type, either Coroplast Signs or Outdoor Banners.
- Order Timing: Orders must be placed simultaneously to qualify for grouping.
- Quantity Limits: Each set within a group is limited to a maximum of 50 units.
- Group Shipping Designation: At the time of ordering, you must specify that the items are intended for group shipping.
- Uniform Quantity: Every set in the group must have an identical quantity.
- Turnaround Time: All items in the group must share the same production turnaround time.
- Single Delivery Address: Items must be shipped to a single address and contact person.
Group Shipping Process:
Once all sets within a group receive final approval, the production turnaround time will commence. If any set is delayed (due to revised files, quality control reprint, etc.), the entire group's shipment will be paused until all parts are ready to proceed. It is important to note that sets within a group cannot be shipped separately.
Adding an additional day to the production turnaround time may be necessary for group shipping. For more details, please refer to our shipping policy.
Modifications to Shipping Details:
Alterations to the shipping service or address are permissible via the link provided on our website up to the point of bindery. Depending on the product type and the number of sets, group shipments will either be banded together or boxed in a consolidated package.
Group Shipping Example:
Consider a six-set group with a 5-7 day turnaround time, placed on a Monday:
- If all sets are approved by Monday's cutoff, the completion date is the following Tuesday.
- If five sets are approved on Monday and one set, after submitting new files, is approved on Wednesday before the cutoff, the turnaround time begins on Wednesday. The completion date will then be adjusted to 7 business days from Wednesday, excluding weekends.
For additional information or assistance, please refer to our shipping policy or contact our support team.
To comply with UPS shipping restrictions and to offer you the most competitive shipping rates, banners that are longer than 8 feet (96 inches) will be carefully folded for shipping. This approach helps us ensure that your banner is delivered efficiently and affordably.
Our Real Estate Post is designed with durability and aesthetics in mind, offering the following features:
- UV Protection: Ensures the post remains unaffected by the sun's rays, preventing yellowing over time.
- Crack Resistance: Crafted to withstand environmental elements without cracking.
- Dimensions: The post stands at a height of 72 inches and features a robust 4 x 4 inch vertical post with a 40-inch arm, providing ample space for displaying signage.
- Style: Includes a Gothic-style cap that adds an elegant touch to the post's appearance.
- Installation: Comes with a metal anchor for secure and straightforward installation.
This combination of features makes our Real Estate Post a reliable and stylish choice for displaying real estate signage.
The Real Estate Post package comes with a comprehensive set of hardware to ensure easy installation and a professional display of your signage. The package includes:
Main Components:
- 4" x 4" Vinyl Post
- 2" x 3.5" Vinyl Arm
- 4" Vinyl Gothic Cap
- 2" x 3.5" Vinyl End Cap
- Vinyl Rider Clip
- Metal Post Stake
Hardware and Accessories:
- Nylon Inserts
- Screw Cap Base
- Screw Cap (#8 × 3/4")
- Painted Stainless Screw (#8 x 2")
- Stainless Screw
- Stainless Eye Screw
- Stainless "S" Hook
Additional Components:
- Additional Real Estate Sign clips are included when both the Post and sign are ordered together.
This kit is designed to offer durability and versatility for displaying your Real Estate signs prominently and attractively.
Yes, when you order under the Real Estate Post category, you will receive both the Real Estate Post and a 3mm PVC hanging sign as a combined package. Please be aware that the sign and Real Estate Clips are packaged together, but the hardware for the Real Estate Post will be shipped in a separate package.
Our Real Estate Post Signs are available on high-quality 3mm White PVC, ensuring durability and a professional appearance for your signage needs.
At Grand4mat, we handle H-stake orders separately from yard sign orders to ensure the highest quality and efficiency in processing. While we aim for both stakes and signs to arrive on the same day, it's possible for deliveries to arrive on different days, especially when shipped via ground services. This is due to the separate packaging and handling requirements for each product type. We appreciate your patience and understanding in these instances.
Grand4mat orders are fulfilled from various Catdi Printing production facilities. To determine the specific location your order will ship from, and to plan your shipping method accordingly, please refer to the "Print Job Details" window. This information becomes available after you upload and finalize your artwork, during the shipping method selection process.
At Grand4mat, we understand your concerns regarding shipping charges. Please be aware that the unique and large dimensions of our products occasionally necessitate higher shipping costs. These rates are largely determined by our shipping partner, UPS, and are influenced by the size and weight constraints they impose. Unfortunately, these are external conditions beyond Grand4mat's control. We continuously strive to provide the most cost-effective shipping solutions for our customers.
Your Polyester Banner order is carefully folded and packaged for shipping in either durable bags or sturdy cartons, depending on the quantity of your order. Our Polyester Banners are designed to be wrinkle-resistant for your convenience. However, should you find any creases upon unpacking, a light ironing on a low heat setting is recommended to ensure your banners look their best prior to display.
In your hardware package, you will find S-hooks provided for hanging purposes. Nonetheless, for enhanced security and ease of installation, we strongly advise utilizing the two clips that come specifically with your Hanging Sign. These clips are designed to ensure a more reliable and straightforward setup.
Absolutely. The Real Estate Post is designed for ease of mobility, accommodating all necessary hardware components for straightforward setup and dismantling. It features an efficient design wherein the arm, quick-install ground stake, caps, and hanging hardware neatly tuck into the vertical post's body. This thoughtful design ensures compact storage and effortless transport, making it a convenient choice for real estate professionals on the move.
You can find the Real Estate Post by navigating to the "Signs & Banners" section, then selecting "Rigid Signs" followed by the "Signs" category on Catdi Printing. This streamlined path ensures you easily access our comprehensive Real Estate Post offerings.
Absolutely. For routine cleaning, simply use a soft cloth, a general-purpose cleaner, and warm water. If you encounter more persistent stains or blemishes, a cleaner containing a mild abrasive is recommended for effective removal.
In addition to the standard offerings, we provide the option to purchase an optional Rider Sign, which can be found in the Rider Sign category for separate sale.
Canvas Banners: Our canvas banners are carefully rolled and securely shipped in square tubes to ensure they arrive in pristine condition without any creases or damage.
Mounted Canvas: To guarantee the utmost protection during transit, each mounted canvas is individually boxed. We limit the shipment to one mounted canvas per box, minimizing the risk of damage while shipping.
The loop side, known for its soft, non-adhesive texture, is the part that is sewn onto the banner.
Yes, your banner will come with the Velcro hook side. It is equipped with an adhesive backing for secure attachment and will be pre-applied to the banner before shipping.
- Hook: Hook refers to a rigid plastic material with small, pointed protrusions.
- Loop: Loop, on the other hand, denotes a soft, fabric-like material with tiny, flexible fibers.
In combination, these components create a versatile and effective fastening mechanism commonly used in various applications such as clothing, accessories, and industrial equipment. The hook and loop system relies on the interlocking of these complementary elements to securely hold items together.
If you have any further questions or need additional information, please feel free to reach out to us.
When shipping oversized banners, it is a standard procedure to fold them. This practice is widely adopted by large format printing companies to optimize space during transit. Shipping carriers aim to maximize the use of cubic space within their transportation and conveyor systems, making it increasingly expensive to transport large, odd-sized packages. Our shipping team employs careful judgment in packing and shipping your oversized banners, taking these steps to secure the most cost-effective shipping rates for our customers.
We understand that receiving a banner with creases or wrinkles may be concerning, but please reassure your customers that this is a normal part of the shipping process for large items. These creases typically diminish over time once the banner is unfolded and installed. Should you need any further assistance or have additional questions, our customer service team is here to help.
When preparing your file for a real estate post sign, please ensure that you allow a margin of 0.5 inches on each side of the sign. This totals to an overall margin of 1 inch around the entire sign. Additionally, incorporate a 0.5-inch safe area within the design to accommodate grommets without interfering with the text or important design elements. This will ensure that your sign is both visually appealing and functional.
Our Velcro strips are 1 inch wide.
Our velcro is available exclusively in a clean and crisp white color.
No, you can rest assured that your artwork or image will not bleed into the velcro. The velcro is securely sewn into the backside of the banner along with the hems, ensuring a clean and professional appearance for your display.
To secure the banner effectively, we follow a simple yet sturdy process:
Looping the Webbing: We take a 1" webbing and carefully loop it through the D-ring, ensuring a strong and reliable connection.
Sewing Onto the Corner: Once the webbing is securely looped through the D-ring, we proceed to sew it onto the corner of the banner. Our expert craftsmanship ensures durability and stability in every application.
Our D-rings are sized at 1" and are made of nickel.
We offer hanging signs in two sizes to accommodate various display needs:
- 24 inches by 18 inches
- 30 inches by 24 inches
These options ensure versatility and visibility for your real estate displays.
It is recommended to apply Velcro with adhesive to clean, dry, and smooth surfaces.
We utilize 1-inch white polypropylene webbing.
Our D-rings and webbing options are specifically designed for outdoor use, offering exceptional durability. These components play a crucial role in enhancing the strength and longevity of our products, particularly at the corners.
Incorporating high-quality materials and construction, our D-rings and webbing are built to withstand the rigors of outdoor environments, ensuring that your equipment remains secure and reliable even under challenging conditions. Trust in the resilience of our products for your outdoor adventures.
The rope we use has a diameter of 3/16 inches.
We ensure that there is a minimum of 3 feet (3') of rope extending from each end of the banner.
The rope is seamlessly integrated into both the top and bottom edges of the banner during the manufacturing process. This ensures that the banner arrives ready for installation as soon as you receive it.
We utilize a white diamond-braid rope.
Direct Mail & EDDM
Every Door Direct Mail™ (EDDM) is a program offered by the United States Postal Service (USPS) designed to streamline the process of reaching a targeted audience with promotional and advertising materials. EDDM presents an efficient and cost-effective way for businesses of all sizes to connect with potential customers.
Key Benefits of EDDM:
Targeted Outreach: EDDM enables businesses to pinpoint specific households in their local area or nationwide for their marketing campaigns.
No Mailing List or Postage Permit Required: EDDM eliminates the need for businesses to invest in mailing lists or acquire postage permits, saving valuable time and resources.
Two Service Options: We offer two convenient service options to cater to your needs:
- Print Only: We handle the printing of your materials, and you take charge of the remaining steps with USPS.
- Full Service: We manage every aspect of the EDDM process, from printing to delivery. This option offers postage rates as low as 0.202¢ per piece, providing significant cost savings compared to first-class rates.
Important Note: To utilize EDDM, it's essential that your orders meet the USPS requirements for "commercial flat" specifications. We've integrated EDDM Full Service tools and templates to make compliance with these specifications straightforward and hassle-free.
Whether you're a small local business or a larger enterprise, EDDM is a powerful tool to enhance your marketing strategy, allowing you to engage with your target audience effectively and economically.
EDDM Print Only:
- EDDM Print Only offers USPS-approved sizes and options for EDDM processing.
- We handle the printing and shipping to you, similar to a standard postcard.
- Your artwork must adhere to USPS EDDM specifications and include an approved USPS EDDM indicia and return address.
- For more information, please visit the USPS website at USPS EDDM Information.
EDDM Full Service:
- EDDM Full Service simplifies the entire EDDM process for you.
- Start by selecting your print product, then use our user-friendly online route selection map to choose your desired routes.
- Upload your artwork, and we take care of the rest, including printing, bundling, EDDM processing, paperwork, and delivery to USPS.
- The USPS postage fee is included in the final price during checkout.
- Ensure that your artwork includes our indicia on one side by using our EDDM Full Service templates before uploading your design.
We hope this clarifies the difference between EDDM Print Only and EDDM Full Service. If you have any further questions or need assistance, please feel free to contact us.
To set up your artwork for the Print Only option, please follow these steps:
Download our EDDM Print Only templates from our website.
Ensure that your artwork adheres to all standard USPS EDDM requirements.
For more detailed information on USPS EDDM requirements, please visit: USPS EDDM Guidelines
Full-Service Option:
If you choose our Full Service option, where we handle the processing and delivery to USPS, please follow these guidelines:
- Download and use our EDDM Full Service templates, which include our indicia and a guide for proper return address positioning.
Indicia and Return Address Positioning:
When setting up your artwork for EDDM, keep in mind the following requirements:
Your indicia and return address must be included in the artwork.
Both the indicia and return address should be placed on one side of the print piece.
Position the indicia and return address in the top half of the artwork.
If you have 4/0 artwork (meaning printing on one side only), the indicia and address must be placed on the front.
For a visual reference and an example of the proper layout for your artwork, please refer to our Full Service template on our website.

We strive to make the EDDM setup process as straightforward as possible for you. If you have any additional questions or need further assistance, please do not hesitate to reach out to our customer support team. We are here to help you every step of the way.
1. Address or Zip Code Entry Begin by entering the desired street address or zip code for the specific area you want to target with your mail campaign. The tool will then proceed to display all USPS carrier routes within a default 1-mile radius of your selected location.
2. Radius Adjustment To refine your selection, you can expand or narrow the radius by utilizing the dropdown menu located on the right-hand side just above the map. This feature allows you to focus on the exact geographic area that aligns with your campaign's objectives.
3. Route Selection on the Map Choose your desired carrier routes by clicking directly on the corresponding routes displayed on the map. As you click on a route, it will be highlighted to indicate it is selected. Should you wish to remove a route from your selection, simply click on it again to deselect it.
4. List View Option Alternatively, you can utilize the "List View" feature located at the bottom right corner of the interface. Within this view, you will see a list of all available routes in your selected area, along with additional details such as the number of residential and business addresses in each route, as well as income demographics.
5. Route Selection in List View In the List View, you can use the checkboxes located to the left of each route to easily select or deselect specific routes based on your campaign's criteria. This intuitive feature ensures that you have full control over your route selection process.
6. Residential Only Option If your campaign targets exclusively residential addresses and you wish to exclude business addresses, there is a convenient checkbox available in the List View panel labeled "Residential Only." Simply tick this box to tailor your selection accordingly.
7. Order Summary Throughout the process, the List View panel also keeps you informed about the current total for your order. It includes postage costs based on the routes you have chosen, allowing you to stay within your budget and make informed decisions.
By following these easy steps, you can effectively utilize the EDDM Full Service Route Selection Tool to tailor your mailing campaign precisely to your target audience.
First Class Mail
- Presorted First Class Mail:
- Requires 500 pieces to qualify for Presort First Class.
- Post office delivery time is estimated to be 1 - 3 business days.
- Nonpresort First Class Mail:
- Requires 200 pieces to qualify for Nonpresort First Class.
- Post office delivery time is estimated to be 1 - 3 business days.
- Nonpresort First Class is equivalent to placing a stamp on an envelope (no discount).
USPS Marketing Mail (Standard)
- Presorted Standard:
- Requires 200 pieces to qualify for Presort Standard.
- Post office delivery time is estimated to be two weeks.
- Offers the most affordable postage rate but has the longest delivery time.
Nonprofit
- Nonprofit (Standard):
- Requires 200 pieces to qualify for nonprofit mail.
- Customers need to provide the nonprofit organization's CRID number or Authorization number.
- The return address on mail must have the nonprofit organization's name and address as it appears on file with USPS.
- Post office delivery time is estimated to be two weeks, the same as Presort Standard.
- Utilizes a customer's nonprofit account with 4over's permit number.
These mail classes offer various options to meet your mailing needs, whether you prioritize speed, cost-effectiveness, or nonprofit considerations.
- Presorted First Class: A minimum of 500 pieces is required.
- Nonpresort First Class: A minimum of 200 pieces is required.
- Presorted Standard: A minimum of 200 pieces is required.
- Nonprofit (Standard): A minimum of 200 pieces is required.
These minimum quantity requirements help streamline the Direct Mail process and ensure efficient delivery and processing.
We welcome the following file formats for mailing lists:
- .xls (Excel)
- .csv (Comma Delimited)

Our Direct Mail Service encompasses a comprehensive range of essential features to ensure your direct mail campaign's success. Here's what's included:
1. Data Processing: We process one mailing list as part of our standard service, with an option to add additional lists at a cost of $25 per list.
2. C.A.S.S. Certification (Coding Accuracy Support System): We employ C.A.S.S. Certification to enhance the accuracy of your mailing addresses, reducing the chances of delivery errors.
3. N.C.O.A (National Change of Address): We cross-check your mailing list against the National Change of Address database, ensuring that your mail reaches recipients at their current addresses.
4. De-duplication: We eliminate duplicate entries from your mailing list, ensuring that each recipient receives only one copy of your mail.
5. Pre-sorting: Our team pre-sorts your mail to optimize postage costs and expedite the mailing process.
6. Inkjet Setup and Addressing: We handle the setup and addressing of your mail using high-quality inkjet technology for a polished and professional look.
7. Post Office Delivery: Once your direct mail pieces are prepared, we ensure they are delivered to the post office, ready for mailing to your target audience.
Our Direct Mail Service is designed to streamline the entire mailing process and maximize the efficiency of your direct marketing efforts. If you have any additional questions or need further customization, please feel free to contact us for personalized assistance.
The cost of Direct Mail Service is determined by the quantity of prints in your order.
Tabbing, also known as wafer sealing or sealing, is the process of affixing adhesive tabs or wafer seals to folded mail pieces to meet the sealing requirements of the United States Postal Service (USPS).
The turnaround time for our Direct Mail Service is determined by several factors and is initiated once we receive approval for your Validated Mailing List. Please find below the details of our turnaround times:
1. Submission Deadline: If your Validated Mailing List approval is submitted before our daily cutoff time of 1 pm (PST), it will be considered the first day of turnaround.
2. Turnaround Times for Mailing Production:
- For mailing quantities ranging from 200 to 25,000: Expect a turnaround of 1 to 3 business days.
- If your mailing quantity falls within the range of 30,000 to 60,000: Plan for a turnaround of 3 to 5 business days.
- Mailing quantities between 65,000 and 100,000: Allow for a turnaround of 5 to 7 business days.
3. Responsibility after Handover to USPS: Once 4over transfers your mailing order to the United States Postal Service (USPS), USPS assumes full responsibility for the delivery to the recipients on your mailing list.
4. USPS Responsibility: Any delays, damage, or losses occurring after the handover of your order to USPS are the sole responsibility of USPS.
5. Potential Delays: Please be aware that certain factors, such as reprints, delays in proof approval or payment, and holidays, may extend the turnaround time for your direct mail project.
We aim to provide a streamlined and efficient Direct Mail Service, and we appreciate your understanding and cooperation in ensuring timely delivery to your target audience. If you have any further questions or require additional assistance, please do not hesitate to reach out to our dedicated customer support team.
To ensure proper placement and readability, please allocate the following blank spaces on your materials:
Address and Barcode: Allow a minimum of 4 inches in width and 2.5 inches in height for the address and barcode.
Indicia/Permit: Reserve a blank space of at least 1 inch in width and 1 inch in height at the top right corner for the indicia or permit.
By adhering to these space requirements, you will ensure that your indicia and address are displayed correctly and comply with our guidelines.
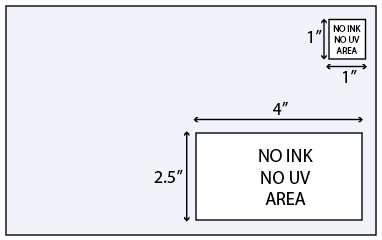
To design your artwork for Direct Mail effectively, we recommend using Catdi Printing Ads Mailing Templates, which are readily available for download. These templates are designed to simplify the process and ensure accuracy. They include essential information such as the position and dimensions of the address block and indicia, making it easy for you to create a professional and compliant design for your Direct Mail campaign.
Our standard pricing includes a maximum of five (5) lines for addressing. If you require additional lines, it may necessitate extra setup and a corresponding setup fee. For more information and specific details, please reach out to our customer experience team. We are here to assist you.
We offer Direct Mailing services for a range of products, including:
- Akuafoil
- Booklets (up to 12 pages)
- Flyers and Brochures
- Letterheads
- Postcards
- Rack Cards
- Sell Sheets
- Silk Cards
No, postage is billed separately.
You can easily access postage rates on our website. However, please note that the actual postage costs will be calculated once we have processed the mailing list you provide.
A Validated Mailing List is a crucial component of our mailing services. Here's how it works:
1. Postage Payment: After we have received your postage payment and completed the printing of your mail pieces, a Validated Mailing List will be sent to you via email.
2. Approval: You will have the opportunity to review and approve the Validated Mailing List before it is used for your mailing campaign.
3. Future Orders: The convenience doesn't stop there. You can also save the Validated Mailing List for future orders if you plan to send mail to the same set of addresses, making your future campaigns even smoother and more efficient.
Remainders will become available for shipment once production has successfully addressed all mail pieces.
PDF files are highly recommended for optimal compatibility. However, we also accept the following file types:
- JPG
We strive to accommodate various formats to make your experience as convenient as possible.
When you place your order for Direct Mail Service, the Direct Mailing Fee will be conveniently integrated into your order's sub-total. To complete your payment, these charges will be automatically applied to the credit card you have used to place the order.
This streamlined payment process ensures a hassle-free experience when utilizing our Direct Mail Service.
You have several options for handling the remainders that are not mailed:
Default Address: You can choose to have the remaining items shipped to the default address on file.
Drop Ship: Alternatively, you have the option to arrange for a drop shipment of the remaining items to a specific address of your choice.
Recycling: If you prefer not to receive the remaining items, Catdi Printing can responsibly recycle them on your behalf.
Local Delivery and Pick-up: If you are eligible, we also offer local delivery and pick-up options for your convenience.
Yes, Catdi Printing offers mailing services for nonprofit organizations that hold an active nonprofit account with the United States Postal Service (USPS).
To qualify for a nonprofit discount, you need to meet the following requirements:
A. Nonprofit CRID or Authorization Number:
- Provide your nonprofit organization's CRID number or the Authorization number issued by USPS.
B. Matching Return Address:
- Ensure that the nonprofit organization's name and address on your mail piece artwork precisely match the information on file with USPS. The return address must correspond with the organization's official records.
By adhering to these criteria, you can take advantage of the nonprofit discount offered by USPS.
No, the Direct Mail Service is exclusively available to customers who choose to utilize Catdi Printing's permit.
No, our Direct Mail Service is exclusively available for jobs printed by Catdi Printing. We are unable to handle addressing or tabbing for jobs produced by other printers.
We do not guarantee or recommend this practice. However, if you still wish to engage a different mail house for inkjet printing, we recommend the following:
- Sample Approval: Before proceeding, it is advisable to provide a sample of the product you intend to order to the alternative mailing house for their evaluation and approval.
By adhering to this precautionary measure, you can ensure that the chosen mail house can successfully accommodate your printing needs while minimizing potential risks.
Business Cards
When ordering a Foil Worx job, it's important to adhere to the following specifications to ensure the highest quality of your print product:
1. Single Foil Type Per Order: Each order can include only one type of foil. For instance, you cannot combine Gold foil on the front and Silver foil on the back in the same order.
2. Foil Mask File Requirements: Your foil job setup should mirror that of our Spot UV jobs. You must submit a separate foil mask file indicating where you want the foil applied. Use black (100% K) for areas to receive foil and white for areas without foil. Ensure the black areas are solid and do not contain any other colors.
3. Combining Foil with Spot UV: If your order includes both Foil and Spot UV, you must provide distinct mask files for each—namely, one for the Foil (foil mask) and another for the UV (spot uv mask). This may result in up to six files being required for your order.
4. Non-Overlapping Foil and UV: Ensure that Foil and UV coatings do not overlap and maintain a minimum separation of 1/16" to prevent foil from peeling off.
5. Design Considerations: Avoid using small or fine text and lines for foil elements. For optimal results, the foil coverage should be less than 50% of the entire print side. Additionally, be prepared for a possible 1/16" shift in the placement of the foil, especially when attempting to align it with other printed elements.
6. File Preparation: We recommend creating your mask files using vector-based software, such as Adobe Illustrator or CorelDRAW, to achieve the best quality.

By following these guidelines, you can ensure a smooth process and high-quality outcome for your Foil Worx projects.
Akuafoil is a unique printing technique that transforms a broad spectrum of CMYK colors into stunning multi-colored foils. It leverages a specialized foil system under the four-color process to create a variety of foil colors, offering a simple, cost-effective way to make your printed materials stand out.
To prepare for an Akuafoil print job, you need to submit both an Akuafoil mask file and your standard CMYK file. The mask file serves to delineate where the Akuafoil will be applied. This setup mirrors that of Spot UV jobs, requiring the use of 100% K (black) on the mask to indicate Akuafoil application areas and white where Akuafoil should not be applied.

As depicted, the CMYK print file is accompanied by the Akuafoil mask file. For Akuafoil effects, such as on a logo, the mask file should utilize black to signify Akuafoil application and white to denote absence of Akuafoil. It is crucial to upload these as separate files.
Important considerations for Akuafoil artwork creation include:
Alignment: Ensure the mask and CMYK print files are perfectly aligned in size and positioning.
Color Vibrancy: Akuafoil effects are more pronounced on lighter colors; darker shades may diminish the effect.
Design Specifications: Avoid using fine or small text and designs. Opt for Sans Serif fonts of at least 12 points to ensure clarity.
Silver Akuafoil: Applying Akuafoil on white areas results in a standard silver foil appearance. For optimal silver effects, incorporate a minimum of 15% K in the CMYK area.
File Format: For superior quality, it's recommended to create mask files using vector-based software like Illustrator or CorelDRAW.


These are the printed results:

Be mindful of potential "Halo" effects around knockout areas in the Akuafoil mask or CMYK file. This can manifest as a white outline around the area where the two meet. To mitigate this, you can enlarge the Akuafoil area in the mask by 1 point, allowing for overlap into the CMYK zone and reducing the halo effect. Alternatively, filling in the knockout space with a color can also lessen this effect.
14pt Metallic Pearl Paper stands out for its distinctive shimmering effect under light, achieved through the integration of Pearl fibers within the paper stock. This gives it a smooth, metallic appearance that adds a subtle luster to printed colors. When utilizing this paper stock, CMYK colors acquire a gentle shimmer, enhancing the visual appeal of your prints. However, it's important to note that extensive ink coverage or high ink densities can lessen this shimmering effect, so design choices should consider this to maintain the desired metallic shimmer.
EDGE Cards are crafted from a combination of three high-quality paper stocks, fused to form an exceptionally thick, 32-point triple-layered card that features a distinct colored core for an impressive look and feel.
- Face Stock: The outer layers are composed of a 9-point Bright White Premium stock, chosen for its uncoated surface and smooth finish, ensuring a sophisticated appearance and a pleasant tactile experience.
- Insert Stock: At the heart of each EDGE Card lies a 14-point Premium Opaque Black stock, providing a striking contrast and stability to the card, enhancing its visual and physical appeal.
This unique construction offers both durability and a premium aesthetic, making EDGE Cards an ideal choice for those seeking to make a lasting impression.
Absolutely! EDGE Cards are crafted from high-quality, uncoated paper, making them suitable for writing. To ensure the best outcome, we recommend conducting a test with your intended pen or marker.
EDGE Cards are designed for durability, ensuring years of use under standard conditions. However, their lifespan can be significantly reduced by extreme temperatures. Specifically, exposing EDGE Cards to intense heat for prolonged periods, such as inside a car under direct sunlight, can damage them. To maximize the longevity of your EDGE Cards, avoid placing them in environments that are extremely hot or cold, or in areas with high humidity or dryness.
14pt Natural Paper refers to a premium-quality paper stock characterized by its subtle, light cream hue and natural white shade, offering a sleek and smooth finish. This eco-friendly option is crafted with a focus on sustainability, incorporating at least 30% post-consumer waste content, underscoring our commitment to environmental responsibility. To experience the distinctive texture and quality of our 14pt Natural Cards firsthand, we invite you to explore them through our 4over Trade Printing Sample Kit, where samples are readily available for your review.
Our Luster Cards are crafted from premium 16pt (point) card stock, which provides a robust and durable foundation. To enhance their appeal and durability, we apply a 3mil (millimeter) gloss lamination layer on top. This additional protective layer not only adds a vibrant sheen but also increases the overall thickness of the cards to 22pt. This combination ensures that our Luster Cards are not only visually striking but also exceptionally sturdy.
Luster Cards offer water-resistant capabilities, meaning they can withstand exposure to minimal amounts of water. However, they are not fully waterproof and should not be immersed in water. Exposure to water might lead to seepage and potential damage to the cards. We recommend conducting a test with your specific use case in mind to verify if Luster Cards meet your needs for water resistance.
Suede Cards offer water resistance, not waterproofing. This distinction indicates that while the cards can withstand exposure to minor splashes or droplets of water, they are not designed to be fully immersed in water. Submerging Suede Cards in water can lead to water penetration and potential damage to the cards. We advise conducting a test for your specific use case to confirm that the cards meet the necessary requirements for their intended application.
The name "Suede" describes the uniquely soft and plush texture characteristic of these cards, rather than the specific materials employed in their creation. To attain this luxurious, suede-like appearance and tactile experience, a delicate velvet laminate is meticulously applied to each side of the card.
Suede Cards are premium print products that begin with a sturdy 16pt (point) stock foundation. To enhance their texture and durability, we meticulously coat both sides of this stock with a 1.5mil (millimeter) soft velvet laminate. This specialized lamination process not only makes the cards more resistant to scuffs and wear but also elevates their tactile experience to that of soft suede. The addition of this luxurious layer increases the total thickness of each card to 19pt, offering a substantial feel in hand.
The unique soft velvet finish transforms the visual aspect of the cards by introducing a gentle, supple quality. This effect subtly softens the hues, diminishes the sharpness of contrasts, and imparts an overall lighter and more muted visual appeal. Through this sophisticated process, Suede Cards stand out for their enhanced physical and aesthetic qualities, making them a distinguished choice for conveying elegance and professionalism.
To optimize outcomes with Raised Spot UV Cards, adhere to these guidelines for superior quality:
1. Limit UV Coverage: Ensure that the UV coverage on your cards does not exceed 30%. Surpassing this threshold may result in the cards sticking together, ultimately forming a solid block. This recommendation is crucial to maintain individual card integrity and prevent damage.
2. Vector Art for Mask Files: For the mask file, utilize vector artwork created in a vector-based software, such as Adobe Illustrator. This approach is essential for achieving precise, sharp edges on your artwork. Raster images may not provide the clarity and sharpness required for high-quality results.
3. Conditions for Higher Coverage: While a general coverage of up to 30% is recommended, you can extend this limit to 70% under specific conditions. This higher coverage is permissible for designs incorporating patterns, thin strokes, or small shapes. Such designs allow for better separation between cards, reducing the risk of sticking. However, it's crucial that any area, shape, or image embellished with raised foil or UV does not exceed the dimensions of 1 inch by 1 inch to ensure optimal quality and handling.
4. Design Reference: For visual guidance and to better understand these specifications, refer to provided examples. These examples illustrate the recommended practices for UV coverage, pattern application, and size limitations to help you achieve the best possible outcome for your Raised Spot UV Cards.
By following these modified guidelines, you can significantly enhance the quality and appearance of your Raised Spot UV Cards, ensuring they stand out while maintaining their integrity and usability.


Painted Edge Cards are a unique type of business card that features a vividly colored edge, adding an extra pop of color and a distinctive look to your cards. This distinctive feature is achieved by applying a thick layer of color to the edges of the card after it has been cut to size. Setting them up involves a few steps:
- 1. Design Your Card: Start by designing your card as usual, focusing on the front and back. Keep in mind that the edge color is an additional element, so your design should complement it.
- 2. Choose Your Edge Color: Select an edge color that either matches or contrasts with your design effectively. The edge color is applied to all sides of the card, so choose a color that enhances the overall look of your card.
- 3. Submit Your Design: Once your design is finalized, submit it along with your choice of edge color to your printing service. Ensure to mention that you're opting for Painted Edge Cards.
- 4. Review and Approve: Your printing service may provide a digital proof showing how your cards will look, including the edge color. Review this proof carefully before approving it for printing.
Yes, the design and background color of your card can influence the perception of the edge color in several ways:
- 1. Color Matching: If the edge color closely matches a color used in your card design, it can create a cohesive and unified appearance. However, slight variations in shade between the edge and the design might be more noticeable.
- 2. Contrasting Colors: Choosing an edge color that contrasts with your card's background can make the edges stand out more, adding a bold and striking effect. This can be particularly effective for making your card memorable.
- 3. Color Interactions: Different colors can interact in unexpected ways. Bright edge colors can appear more vibrant against dark backgrounds, while light edge colors might need to be more pronounced against lighter backgrounds.
- 4. Influence of Material: The material of the card can also affect how the edge color appears. Some materials may slightly absorb the edge color, potentially altering its shade.
When selecting your edge color, consider how it will complement your overall card design and how it might be perceived against your chosen background colors. It's often helpful to consult with your printing service for recommendations on color combinations that work well together.
Raised Foil Cards are premium business cards that stand out thanks to their unique, tactile texture. These cards are produced using 16pt card stock as a base. They are then laminated on both sides with a 1.5mil soft velvet laminate, which is scuff resistant. This process enhances the overall thickness of the cards to 19pt, giving them a luxurious and substantial feel.
Setting Up Your Raised Foil Cards: A Step-by-Step Guide
1. Preparing Your Files: To create Raised Foil Cards, you will need two files: your regular print file and a special Raised Foil mask file.
2. The Importance of the Raised Foil Mask File: The Raised Foil mask file is crucial as it instructs where the foil embellishment should be applied on your cards. This file should be a vector file, created in a vector-based design program like Adobe Illustrator, to ensure precision and quality.
3. Designing Your Mask File: In your mask file, use solid 100% black (C 0%, M 0%, Y 0%, K 100%) to designate the areas where you want the foil to appear. It's essential to avoid using any shadows, glows, or grayscale elements in these areas. Areas not receiving foil should be left white.
4. A Note on Knockouts: While creating your design, it's advisable to avoid using knockouts. Due to the potential for slight misalignment (up to 1/16") during the foiling process, designs that rely on precise alignment may not render as expected.
By following these guidelines, you can ensure your Raised Foil Cards are set up correctly for printing, resulting in a finished product that truly stands out.

For optimal results, we strongly advise opting for a solid color background beneath the foil mask. Including detailed designs or text under the foil mask is generally discouraged, as these elements may become partially visible through the foil, potentially affecting the intended visual impact. Additionally, we advise against the use of knockouts in the design beneath the foil mask. This caution is due to the possibility of a slight misalignment (up to 1/16 inch) during the foil application process, which could lead to unintended visual discrepancies.
To achieve the most visually appealing and high-quality finish on Raised Foil Cards, it's crucial to adhere to specific design guidelines related to foil coverage. Here's how you can ensure your Raised Foil Cards look their best:
1. Limit Foil Coverage: Keep the foil coverage to no more than 30% of the total artwork area. Exceeding this percentage can lead to a wavy appearance in the foil, detracting from the overall look and quality of the card.
2. Exceptions for Patterns and Details: An exception to the 30% coverage rule applies to designs incorporating patterns, thin strokes, or small shapes. In these cases, foil coverage can be extended up to 50% without compromising the finish. This allowance caters to the intricate details and delicate designs that benefit from a little extra shimmer.
3. Size Considerations: When planning the application of raised foil, be mindful of the size of the areas, shapes, or images you intend to highlight. For optimal results, these foiled elements should not exceed dimensions of 1 inch by 1 inch. Staying within this size range ensures that the foil accentuates your design without overwhelming it.
By following these guidelines, you can enhance the elegance and tactile experience of your Raised Foil Cards, ensuring they capture attention for all the right reasons. Whether you're designing for special occasions, branding, or personal use, these tips will help you leverage the unique appeal of raised foil to its fullest potential.
For Raised Foil Artwork, we suggest using a font size of no less than 10 points to ensure legibility and the best possible visual impact. For fonts with thicker strokes or those that are bolded, a minimum size of 12 points is recommended. This guidance helps to maintain clarity and enhance the overall appearance of your artwork.
Please see the picture below for reference.

For optimal print quality and efficient processing, we strongly encourage submitting your files in PDF format. PDFs should include embedded or outlined fonts to ensure text appears as intended. Additionally, flattening your files before submission will help expedite the handling process, potentially reducing turnaround time.
Acceptable File Formats:
While PDF is preferred, we also accept the following file types:
- JPG/JPEG
- TIF/TIFF
- EPS
Guidelines for Roll Labels:
When designing roll labels, please adhere to the following specifications to achieve the best results:
- Format: Vector files are recommended (e.g., EPS or PDF) to preserve the quality of your design.
- Resolution: Ensure your designs are at 300 DPI (dots per inch) or higher to maintain sharpness and detail.
- Color Use: For the most accurate reproduction, use black (100% K) for all elements, especially for fine lines and text smaller than 9 points. This ensures maximum readability and clarity in your printed labels.
By following these guidelines, you can help us deliver the highest quality print products in a timely manner.
For optimal results, your design files should be initiated and concluded in the CMYK color mode. This ensures the colors you choose are accurately represented in print.
- Initial Designs in CMYK: Begin your project with CMYK colors to maintain color consistency throughout the design process.

- Conversion Concerns: While it's possible to start with RGB colors, converting these to CMYK later can result in unexpected color shifts. This discrepancy arises because RGB and CMYK color spaces are designed for different mediums – RGB for digital displays and CMYK for print.

Should you submit your files in RGB, be aware of the potential for color variation. This discrepancy might lead to a finished product that does not precisely match your expectations due to the inherent differences between how colors are generated and displayed in RGB versus CMYK.
To ensure the highest satisfaction with your printed job, we strongly recommend adhering to the CMYK color mode from the start of your design process to the final submission.
For optimal printing quality, we require your artwork files to be at a resolution of 300 dots per inch (dpi). This ensures that your images are sharp, detailed, and maintain their integrity when printed.
- Current Submission: If you've submitted images at 72 dpi, these are considered low-resolution files. While they can be printed, the quality may not meet our standards or your expectations.

- Preferred Submission: We highly recommend submitting the same images at 300 dpi. This adjustment significantly enhances the print quality by providing the necessary detail and clarity for your artwork.

- Impact on Turn-Around: Submitting low-resolution files at 72 dpi may lead to two outcomes: we might proceed with printing as is, which could affect the final product's quality, or your order could be placed on hold. We'll then wait to receive new files with the correct resolution, which could delay your project's completion.
To avoid any delays and ensure the highest quality print, please check your files' resolution before submission. If you're unsure how to adjust your file's resolution to 300 dpi, our team is here to help guide you through the process.
To ensure your design extends seamlessly to the edges of the final product, please incorporate a bleed in your setup. A bleed is an extra margin of the image that extends beyond the final cut line. This area is trimmed off during the final cutting phase to achieve a polished look without any unfinished edges. Here’s how to properly set up your bleed:
General Guidance for Bleed Setup:
- 1. Ensure Bleed Extension: The bleed must extend past the cut line to prevent any unfinished edges. This is crucial for images that need to reach the very edge of the finished product.
- 2. Maintain Safe Text Margin: Keep all text and critical design elements at least 0.125 inches inside the cut line to avoid them being trimmed off.
- 3. Use Templates: We strongly recommend utilizing our provided templates to aid in correct bleed setup.
Specific Bleed Requirements:
- 1. Standard Products: A bleed of 0.125 inches is required.
- 2. Booklets and Presentation Folders: A larger bleed of 0.25 inches is necessary due to their complex nature.
- 3. Grand4mat Products: For specific requirements on large format products, refer to the G4Mat FAQs. Each substrate may have unique guidelines.
Adhering to these bleed settings ensures the integrity and quality of the final product. Always use our templates for the best results.
At Cardi Printing, we strive to ensure your prints come out exactly as you envision. To achieve this, it's crucial that your files are prepared correctly for printing, particularly when it comes to rotation. Our printing process adheres to a HEAD to HEAD method, meaning your files are printed directly as submitted.
Key Guidelines for File Setup:
- 1. Alignment: Ensure your files are oriented correctly for the HEAD to HEAD printing process. This means the final product will appear as intended when the front and back are printed facing each other.
2. Consistency: Both the front and back files should be aligned in the same direction—either vertically or horizontally. This uniformity is essential for a cohesive print.
3. Upside-Down Back Files: If your design requires the back of the print to be upside-down relative to the front, please prepare your artwork accordingly. This setup is often used for specific design effects or readability purposes when the product is flipped over.
4. Fold-Over or Greeting Cards: For products designed to be folded, such as greeting cards or fold-overs, please arrange your artwork to accommodate the fold. This ensures that the final folded product looks and functions as intended.
Important Note: If files are not set up as per these guidelines, our team will make an informed decision on the orientation based on the best judgment. However, Cardi Printing cannot be held responsible for rotation issues that arise from improperly prepared files.
By following these instructions, you can help us deliver print products that meet your expectations and quality standards.
Spot UV involves applying a glossy coating to specific areas of your printed piece, creating a flat, shiny layer exactly where you want to highlight or enhance certain elements with a high gloss finish.
Raised Spot UV follows the same principle but adds a tactile dimension. The glossy coating is applied in a way that it physically elevates from the surface of the printed material. This means that when you touch the areas with Raised Spot UV, you can feel the coating's texture and elevation, which is precisely 50 microns above the product. This method not only visually accentuates specific parts of the print but also provides a unique, tactile experience.
The key difference between Foil Worx and Raised Foil Cards lies in the texture and finish of the foil applied. Foil Worx features a flat finish foil, presenting a sleek and smooth appearance. In contrast, Raised Foil Cards boast a tactile, elevated foil finish. When you glide your fingers across a Raised Foil Card, you'll notice the distinct elevation of the foil, which stands approximately 60 microns high, adding a unique dimensional quality to the design. This raised effect not only enhances the visual appeal but also provides a sensory experience, making Raised Foil Cards especially memorable.
To enhance readability and ensure the effectiveness of your Raised Spot UV artwork, adhere to the following font size guidelines:
- 1. For general text, avoid using fonts smaller than 6pt. This minimum size ensures that your text remains legible and visually impactful.
- 2. If you opt for fonts with thicker strokes, which may include bold or heavy-weight font styles, it is advisable to use a font size of no less than 9pt. This adjustment accounts for the increased visual weight of thicker fonts, maintaining clarity and readability.
By following these recommendations, you can achieve optimal results in your Raised Spot UV designs, ensuring that all textual elements are both attractive and easily readable. 
Marketing Products
Creating a booklet can be intricate, and it's important to follow specific guidelines to ensure high-quality results. Here’s how to get started:
Getting Started:
Use Our Templates: For optimal results, start by downloading our booklet templates here. This ensures your design complies with our printing requirements.

Design Guidelines:
Page Count: Begin numbering from the cover page; the cover is page 1, the inside cover is page 2, and so forth
Dimensions & Bleed: Include a total bleed of 0.25 inches and a safety margin of 0.5 inches. For an 8.5x11 booklet, the total dimension with bleed should be 8.75x11.25 inches to facilitate proper crossover setup.
Page Format: Submit your artwork as single pages only; avoid readers or printers spreads. We accept multipage PDFs, but single page files are also acceptable.

Creating Crossovers:
Crossovers extend across two adjacent pages. For a seamless look:
Design crossovers with care, avoiding text or thin lines. Large images are recommended.
- Note: Saddle stitch binding may cause slight misalignments in crossovers.

Preparing Your Document in Layout Software (e.g., Adobe InDesign):
Setting Up the Document: Set your page size to the final cut size with a margin of 0.25 inches for safety, totaling 0.5 inches.
Bleed Settings: In the More Options section, set the bleed to 0.125 inches for a total bleed of 0.25 inches.
Exporting as PDF: When exporting, select "Use Document Bleed Settings" under the Marks and Bleeds menu to ensure the bleed settings are applied to your PDF.
Final Steps:
After submission, you’ll receive an email from our booklet proofing system, Fourte. This allows you to:
- 1. Review and adjust the page order.
- 2. Approve the layout or make necessary changes.
- 3. Preview your booklet as it will appear when printed.

Following these guidelines will help in creating a booklet that meets our printing standards, ensuring a professional finish for your project.
Perfect Binding enhances the aesthetic and durability of your booklets, offering a polished and professional appearance. This method involves adhering the pages and cover to the spine with a durable, flexible thermal adhesive.
For those looking to design Perfect Bound Booklets, we provide specific templates for both the cover and the interior pages. These templates can be easily accessed for download to ensure your design meets the required specifications.
It's important to understand that, in contrast to our standard Booklets, the page count mentioned in the product options does not account for the cover pages. For instance, a product labeled as "8.5 x 11, 52-Pages" necessitates the submission of 48 pages for the interior, in addition to a separate 4-page cover file. The cover configuration is always 4:0, highlighting that the outside is printed in full color while the inside remains blank.

Currently we do not offer samples for Perfect Bound Catalogs.
Digital Envelopes are characterized by their manufacturing process, where they are first formed into envelopes and then printed using advanced digital printing technology. This method is known for its precision and ability to produce high-quality prints directly on the envelopes.
On the other hand, Offset Envelopes undergo a different production journey. Initially, they are printed on large sheets through offset printing techniques, known as gang runs. Following the printing process, these sheets are then meticulously die-cut and shaped into envelopes. Offset printing is celebrated for its efficiency in large-scale productions and its capability to deliver consistent quality.
Despite their differences in production techniques, both Digital and Offset Envelopes are crafted from the same high-quality material – 70LB Premium Opaque stock, ensuring a premium feel and durability regardless of the chosen method.
Absolutely! For printing exclusively on the back flaps, please select the 0/4 option. If you wish to have printing on both the front and the back flaps, opt for the 4/4 configuration. It's important to note that designs with ink coverage exceeding 40% should be submitted for offset printing to ensure quality.
Definitions for clarity:
- 4/0 signifies Full Color Printing on the Front only.
- 4/4 denotes Full Color Printing on both the Front and Back Flaps.
- 0/4 indicates Full Color Printing on the Back Flaps alone.
To ensure your Digital Envelope design is perfectly aligned and compliant with our printing standards, please follow these essential steps:
1. Use Certified Templates: Start by downloading and using our 4over certified templates. These templates are specifically designed to guide you on the correct placement of the window, ensuring your final product looks professional and meets our quality standards.
2. Avoid Artwork on the Window: The window area of your Digital Envelope is pre-converted with a clear plastic overlay adhered before printing. It's crucial that this area remains entirely blank in your design. Any artwork, colors, or text placed over the window area will interfere with the visibility and presentation of the envelope's contents.
3. Maintain Safe Margins: Keep all images, text, and essential design elements at least 1/8" inch away from the edge of the window. This margin is necessary to prevent any crucial parts of your design from being obscured or cut off during the printing process.
4. Remember the Pre-converted Nature of Digital Envelopes: Our Digital Envelopes are pre-converted, meaning they are fully assembled with the plastic window in place prior to printing. This unique feature requires careful attention to the window area during the design phase to ensure the final product meets your expectations.
By following these guidelines, you'll create a professional-looking Digital Envelope that effectively showcases your message while adhering to our printing standards. If you have any further questions or need additional guidance, please don't hesitate to contact our support team for assistance.
Yes. Landscape booklets are available by choosing Short Edge Binding from the drop-down menu Binding Edge.
At Cardi Printing, we offer our customers the flexibility to personalize their gift card holders with two distinct types of gift card slits: Slide Slits and Moon Slits. These slits are designed to securely hold your gift cards in place, ensuring they are presented beautifully and professionally.
Types of Gift Card Slits:
- 1. Slide Slits: These are straight slits that allow the gift card to slide in easily, holding it securely in place.
- 2. Moon Slits: Named for their crescent shape, Moon Slits offer a snug fit for your gift cards, adding an elegant touch to the presentation.
Placement Options for Gift Card Slits:
You have the option to position the slits in one of two locations within the gift card holder:
- 1. Inside Bottom Panel: This placement allows the gift card to rest at the bottom of the holder when opened, providing immediate visibility.
- 2. Inside Right Panel: Choosing this option positions the gift card on the right side, offering a surprise element as the recipient opens the holder.
For a clear understanding of how these slits look and where they are placed, please refer to the illustration provided. We highly recommend using our templates to ensure that your gift card slits are accurately positioned and your gift cards fit perfectly.

1. File Requirements for Calendars
When setting up your calendar, please ensure that your files meet the following criteria:
- Resolution: Minimum of 300 dpi (dots per inch) for clear and sharp printing.
- Colour Mode: CMYK is preferred for accurate colour printing.
- File Format: Acceptable file formats include PDF, JPEG, TIFF, or EPS.
- Size: Ensure that the dimensions of your files match the size of the calendar you are ordering. Include bleed as specified in our guidelines.
2. Proof Preview Before Production
Yes, before your calendar goes into production, you will receive a digital proof for your review. This allows you to check the layout, colours, and text of your calendar. It's essential to review this proof carefully, as it is your opportunity to make any necessary changes before the final printing. Approval of the proof is required to proceed with the production.
3. Calendar Drill Hole Position
The drill hole for hanging the calendar is positioned approximately half an inch from the top edge of the calendar. This placement ensures a balanced hang on the wall, allowing easy flipping of pages without obstruction.
4. Type of Coil Used for Spiral Bound Calendars
Our spiral-bound calendars use a durable plastic coil binding. This type of coil provides flexibility and resilience, ensuring that your calendar can be easily turned and used throughout the year without wear and tear.
5. Diameter of the Coil for Spiral Bound Calendars
The coil used for our spiral-bound calendars typically has a diameter of 1 inch. This size is chosen to accommodate the thickness of the calendar, allowing for smooth page turning and a sturdy binding that maintains its shape throughout the year.
These FAQs are designed to assist you in preparing your calendar for production, ensuring a smooth process and a high-quality final product. If you have any further questions or need assistance, please do not hesitate to contact our support team.
When preparing your files for calendar printing, it's essential to follow these guidelines to ensure the best quality for your finished product:
Safety Margin: Ensure that all critical elements (including text and images) that are not meant to extend to the edge of the page are positioned at least 0.25 inches away from the cut line. This safety margin prevents important details from being trimmed off during the cutting process.
Bleed Requirements: To facilitate precise cutting and to avoid any unprinted edges on the final product, please provide an additional 0.25 inches of bleed around every edge of your artwork. This means your design should extend past the final cut size on all sides.
File Format and Submission: For the most efficient processing of your calendar artwork, we recommend compiling your design into a single multi-page PDF document. Alternatively, you may submit your artwork as separate files for each page. Ensure that all files are properly organized and labelled for clarity.
Custom Orders: For those requiring bespoke solutions, such as custom sizes or finishes for Catalogs, Booklets, and Calendars, we invite you to obtain a personalized estimate. Please navigate to the 'Estimates' section and complete the custom order form with your project details. Our team will review your request and provide a tailored quote to meet your specific needs.
By adhering to these specifications, you can help us ensure that your calendar printing project is executed flawlessly, with high-quality results that meet your expectations. If you have any questions or require further assistance, please don't hesitate to reach out to our support team.
Absolutely! Within 24 hours of submitting your order, we'll send you a complimentary digital proof. This allows you to carefully inspect and approve each page of your Calendar, ensuring it meets your expectations before we proceed with production.
The binding of spiral-bound calendars is achieved using a sturdy metal coil, which is exclusively offered in a sleek black colour to ensure both durability and a professional appearance.
1. Proof of Addresses on Artwork
Q: Can I preview the addresses on my artwork before the order is finalized?
A: Yes, you will receive a digital sample showcasing the addresses as they will appear on your artwork. This allows you to review and approve the layout before we proceed with printing.
2. Addressing Font, Size, and Color
Q: What are the specifications for the font, size, and colour used in the Variable Addressing?
A: Variable Addressing uses a standard, legible font in a size that ensures clear readability. The colour is typically black for maximum contrast, but options can vary. Specific preferences can often be accommodated upon request.
3. Available Envelope Types
Q: What envelope options are offered for Variable Addressing?
A: A variety of envelopes are available to suit different needs, including business, invitation, and speciality envelopes. Each type is compatible with our Variable Addressing service.
4. Inkjet Printing Capability
Q: Is inkjet printing an option for envelopes with Variable Addressing?
A: Yes, we can use inkjet printing to apply Variable Addressing on envelopes, providing a durable and high-quality finish.
5. Accepted File Types for Artwork
Q: Which file formats are accepted for Envelopes with Variable Addressing artwork?
A: We accept several file types, including PDF, AI, and EPS. Ensure your artwork is in a high-resolution format for the best print quality.
6. Address Positioning
Q: Where will the variable addresses be positioned on the envelope?
A: Variable addresses are typically positioned on the front side of the envelope, in the centre or the lower right corner, depending on the design and postal requirements.
7. Data File Modification
Q: Does 4over edit my CSV data file for errors or typos?
A: We perform a basic check to ensure the format is correct but do not modify the content of your CSV data file. Please ensure your data is accurate before submission.
8. Orders with Fewer Data Records Than Ordered
Q: What happens if my CSV file has fewer addresses than my ordered quantity?
A: If your data file contains fewer addresses than your ordered run size (e.g., 450 addresses for a 500 envelope order), we will print the number of envelopes matching your data file and include the remaining envelopes printed without addresses.
9. Excess Data Records
Q: What if my data file contains more addresses than the quantity I ordered?
A: If your data file exceeds your ordered quantity, we will print up to the number of envelopes ordered. Please ensure your data file matches the desired order quantity to avoid any discrepancies.
These modifications aim to clarify the process and options available for Envelopes with Variable Addressing, ensuring a smooth and satisfactory experience for customers.
For the Variable Addressing portion, the default settings are as follows:
- Font: Arial
- Size: 12pt
- Colour: Black
Adaptive Font Sizing: In cases where your CSV data file includes names or addresses that are exceptionally lengthy, our system is designed to dynamically adjust the font size to ensure a proper fit within the addressing area. Please note:
- The font size will be scaled down automatically to accommodate longer text.
- The minimum font size to which it will adjust is 9pt, ensuring readability while accommodating the text.

This adaptive resizing feature ensures that even with long names or addresses, the formatting remains consistent and legible.
Our variable addressing service accommodates a variety of envelope sizes, ensuring versatility and customization to meet your mailing needs. All our envelopes are printed on high-quality paper to ensure your mailings stand out. You have the option to choose between:
- 70lb White Premium Uncoated Text: This option offers a sleek, professional look with a smooth finish that is perfect for both business and personal correspondence.
- 70lb Natural White: For a more organic feel, our Natural White envelopes provide a warm and inviting touch to your mailings, suitable for any occasion.
Each option is designed to enhance the visual appeal of your mail, with a focus on durability and print quality to make a lasting impression.
Artwork File Formats: For optimal results, we recommend using PDF files for your artwork. However, we also accept JPG files if that's more convenient for you.
Data File Formats: To ensure accurate processing of your mailing list, we only accept CSV files in a comma-delimited format. This format is crucial for correctly importing your data into our system.
Downloading a CSV Template:For your convenience, we provide a CSV template which you can download by clicking [here]. This template is designed to help you format your mailing list correctly.
Formatting Your CSV File: Your CSV file must have the header columns labelled exactly as follows to ensure proper processing:
- Column A: FULL NAME
- Column B: COMPANY
- Column C: ADDRESS
- Column D: SUITE/APT
- Column E: CITY, STATE, ZIP CODE
Sample Mailing List Format: To give you a clear idea of how your mailing list should be formatted, here’s an example of what your Excel sheet should look like:
(Note: Here, you would include a sample format or a visual representation of how the CSV file should be organized, with columns A-E labelled as described and filled with sample data.)
By following these guidelines, you can ensure that your envelopes with variable addressing are processed efficiently and accurately. If you have any further questions or need assistance, please don't hesitate to contact our support team.

If your CSV data file exceeds the number of records for the run size you've selected, we'll alert you to this discrepancy. You will then have two options to proceed:
Adjust Your Data File: You can modify your CSV file to ensure it contains a number of records that match or are less than your selected run size. This may involve removing excess records to fit the ordered run size.
Update Your Order: If you prefer not to alter your data file, you have the option to cancel your current order and place a new one for a run size that accommodates the total number of records in your CSV file. This ensures your entire data set is processed without the need to exclude any records.
Please choose the option that best suits your needs to proceed with the process.
To designate the specific sections of your ticket for numbering, refer to the diagram provided below which illustrates 9 numerable areas. You have the flexibility to select any number of these areas, from one to all nine, according to your needs. To specify your choices, simply name the column headers in your CSV Data File using the exact Area Names corresponding to your selected sections.

For a CSV Data File template, please click here.
Note: Each entry in your CSV Data File can include up to 5 digits or characters. For an illustrative example, see the diagram below:
No, Catdi Printing does not engage in proofreading, flagging, or correcting errors within your CSV Data File. It remains your responsibility to meticulously review and confirm the accuracy of your data before submission.
When preparing a Plastic Card job, it’s essential to understand the unique characteristics of the material and how they influence the design and printing process. Here are the key points to consider:
- Understanding Material Transparency:
- Opaque White Plastic Cards: These cards are completely opaque, offering a solid white background for your designs. They do not allow light to pass through, ensuring that colors and text appear vivid and clear.
- Frosted Plastic Cards: These cards offer a semi-transparent look, providing a unique aesthetic that is not completely see-through. This semi-transparency can affect the visibility of the design elements, making them appear slightly subdued.
- Clear Plastic Cards: As the name suggests, these cards are fully transparent, allowing light to pass through. Designs on these cards may interact with the light and the environment they are in, affecting how colors and details are perceived.

- Design Considerations for Printing:
- Color Vibrancy: Designs printed on frosted and clear plastic cards may appear slightly lighter than those printed on opaque materials. This characteristic is inherent to the plastic material and is not considered a defect.
- Rich Black Values: For deep, rich blacks, use a color formula of C 60 M 40 Y 40 K 100. Avoid using 100% for all CMYK values, as it does not enhance darkness and may lead to printing issues on plastic.
- Transparency Effects: Without white ink in the CMYK process, the clear and frosted sections of your design will reveal the material's transparency. It's important to plan your design with this in mind, especially for areas intended to be white or light-colored, as they will show the card material instead.
- Material Specifics and Handling:
- Surface Imperfections: Clear plastic cards may have minor scratches due to the material's nature and handling during manufacturing. We account for this by providing extra cards to ensure you receive the quantity ordered.
- Protective Layer: Clear plastic cards include a thin protective film on one side to guard against scratches during packaging and shipping. This layer should be removed before use.

- Round Corners: All plastic cards come with round corners as a standard feature, enhancing their tactile feel and durability without additional cost.
By considering these factors, you can effectively design your plastic cards to leverage their unique properties, ensuring the final product meets your expectations and captures your design vision.
To ensure your offset envelopes have the perfect finish and meet our quality standards, please follow these essential guidelines:
- Overbleed Requirements: To accommodate the natural movement during the bindery process, your design must include an overbleed of 1/16” that wraps color onto the back of the envelope. This ensures a consistent appearance without any unprinted edges.
- Template Use for Artwork with Bleed or Flap Printing: If your envelope design includes bleed on the face or printing on any flaps, it's crucial to use our 4over certified envelope templates. These templates are designed to guide you in placing your artwork correctly, ensuring it meets production requirements.
- Recommendations for Solid, Full Color Envelopes: For a seamless look that eliminates the issue of overbleed, we recommend opting for solid, full-color envelopes. This approach ensures a uniform color distribution across your envelope, enhancing its visual appeal.
- Flap Color Extension: To create a cohesive design, extending the flap color intentionally onto the envelope face is recommended. This design choice can add a unique touch to your envelopes, making them stand out.
- Gradient Use for Smooth Color Transitions: Incorporating gradients into your envelope design is recommended for achieving smoother color transitions. Gradients can add depth and dimension to your envelopes, enhancing their overall aesthetic.
- Access Important Artwork Guidelines: To ensure your envelope artwork aligns with our specifications and to avoid common design pitfalls, we encourage you to view our important envelope artwork guidelines. Click Here to access detailed instructions and tips for creating your envelope designs.
By adhering to these guidelines, you can create high-quality, visually appealing offset envelopes that reflect your brand's professionalism and attention to detail.
To ensure your CSV data file retains leading zeros (for instance, numbers like 0002, 0010), follow these steps to format your cells as text before inputting your numbers:
Format Cells as Text: Before entering your numbers, format the relevant cells as text. This can be done by right-clicking (or control-clicking for Mac users) on the cells where you plan to enter numbers with leading zeros. Select 'Format Cells', and then choose 'Text' or 'Plain Text' from the options provided.
Enter Your Numbers: After formatting the cells, you can proceed to enter your numbers into these cells. By formatting as text, Excel or your spreadsheet software treats the numbers as strings, preserving any leading zeros.
Verify Before Saving: Ensure that the numbers appear correctly—with leading zeros intact—before saving your document. It's important to check this because it confirms that the formatting was applied successfully.
Saving and Reopening: When you save and later reopen your document, or if you preview the document, it might seem as if the leading zeros have been removed. This appearance can be misleading. Rest assured, if the leading zeros were visible when you last saved the document, they remain part of your data. The formatting ensures that these zeros are not lost, even if they are not immediately visible upon reopening or previewing the file.
Uploading Your CSV: When it's time to upload your CSV file, you can do so knowing that the leading zeros will be preserved as intended. The initial formatting step guarantees that these zeros are retained, ensuring your data is uploaded accurately.
By following these steps, you'll effectively maintain any leading zeros in your CSV data file, crucial for precise data management and presentation.
For optimal printing quality, we require a bleed of 0.5 inches on each side of your Counter Cards. This means if you're ordering a Counter Card with the dimensions of 8.5 inches by 11 inches, the file you submit should have total dimensions of 9.5 inches by 12 inches, including the bleed. This extra space ensures that no important design elements are cut off during the trimming process, providing you with a seamless, professional finish.
Counter Cards are equipped with 5-inch double-wing easel backs featuring an adhesive strip for easy mounting. These easel backs are pre-attached but shipped flat for convenience. Some assembly by the recipient is necessary to prepare them for display.
We advise against designing specifically on the spine of Perfect Bound Catalogs. For best results, opt for designs that extend across the entire cover, including backgrounds or images that seamlessly wrap around to the back. This approach helps avoid the potential issue of designs appearing uneven due to the binding process. Particularly, designs that feature text, borders, or distinct colors focused solely on the spine are prone to misalignment and uneven presentation.
For the covers of Perfect Bound Catalogs, we offer tailored templates that correspond to the catalog's total page count. For the interior pages, you can utilize our standard templates designed for 8.5x11 and 8.5x5.5 flat Flyers. These templates ensure consistency and ease of design throughout your catalog. To access and download these templates, please click here.
Yes, both Postcards and Announcement Cards can be mailed with round corners, subject to the following conditions:
Postcards: May be mailed with round corners having a radius of 1/8" (0.125 inches) only. This option is available through our 4over Mailing services for an additional fee.
Announcement Cards: Like Postcards, these can also have round corners with a 1/8" (0.125 inches) radius. However, 4over Mailing services are not provided for Announcement Cards.
For cards featuring round corners with a radius of 1/4" (0.25 inches), they must be mailed within an envelope.
For further details, please refer to the USPS regulations, which can be found at: USPS Domestic Mail Manual, Section 201.
NCR Forms can be printed either in full CMYK color on each sheet or exclusively in black (1/0, where "1" represents the ink color and "0" indicates no additional color). We require a single artwork file for printing across all parts of the NCR Form. The designation "1/0" signifies printing in black ink only. Please note, artwork not submitted in grayscale (for black ink printing) will be converted to grayscale, which could potentially affect the final print quality.
NCR forms are designed for a variety of applications, including order forms, packing lists, invoices, applications, and receipts. They offer a practical solution for instances requiring handwritten information, ensuring an accurate duplication of documents without the need for electronic devices.
For optimal results with NCR Forms, please adhere to the following guidelines:
Bleed Availability: Full bleed printing is not available for NCR Forms. This ensures the integrity and usability of the forms.
Glued Edge Margin: Ensure a minimum clear margin of 0.25 inches on the glued edge (short edge) of the form. This area should be free of any ink to maintain the form's structure and functionality.
Colour Recommendations: While full-colour and solid-colour backgrounds can be used, they are not recommended. High-density colour backgrounds can impair the readability of text and hinder the writing experience on the form.
Ink Coverage: To ensure the best legibility and usability of your NCR Forms, light ink coverage is highly recommended. This approach helps in maintaining clarity for both text reading and writing on the form.
Following these guidelines will help in creating effective and functional NCR Forms.
For the Variable Numbering portion, we adhere to the following specifications:
- Font: Calibri
- Size: 14pt
- Colour: Black ink
It's important to ensure that the black ink used for numbering is clearly visible against your artwork's background. For designs with dark backgrounds, you might need to create a 'knock out' (KO) effect around the numbering areas. This adjustment ensures that the numbers stand out and remain legible.
Additionally, please be aware that the CSV data file for the variable data can accommodate up to five digits or characters for each record.
Artwork File Formats:
For the best results, we highly recommend using PDF format for your artwork files. However, we also accept JPG files if that is your preference.
Data File Format:
For variable numbering on NCR forms, please provide your data in CSV (comma-delimited) format. This ensures seamless processing of your information.
CSV Data File Sample:
To assist you in formatting your data correctly, we offer a sample CSV Data File for download. Please use this as a guide to prepare your file.
Important Note:
The CSV data file should contain up to 5 digits or characters for each record to ensure accurate variable numbering.
No, Catdi Printing does not offer proofreading, flagging, or correction services for errors. It is the responsibility of the client to thoroughly review and confirm the accuracy of their data prior to submission.
When setting up your artwork for Digital Envelopes, please follow these guidelines to ensure the best quality print:
- Bleed Requirements: Include a bleed of 0.125 inches (0.0625 inches on each side) to ensure no unprinted edges occur in the final product.
- Margins for Text and Images: Keep all critical text and images at least 0.25 inches away from the edge of the envelope to avoid any risk of them being trimmed off or looking too close to the edge.
- Ink Coverage: Artwork that features more than 40% ink coverage is not suitable for standard digital printing and must be submitted for offset printing to ensure quality.
- Backgrounds: To achieve the best results, use a white background with low ink coverage. Design should ideally include minimal elements like a logo and text only. Full color backgrounds are discouraged as they can impact the quality and durability of the print.
- Design Elements: Avoid or limit the use of transparencies and gradients in your design. These elements can lead to unexpected results in the final print.
- Window Envelopes: If your design includes a window, ensure that the window area is completely free of ink to maintain visibility.
- Digital Envelope Printing Options:
- 4/0: Full Color on the Front side only.
- 4/4: Full Color on both the Front and the Back Flaps.
- 0/4: Full Color on the Back Flaps only.
By adhering to these guidelines, you can create a Digital Envelope design that is both attractive and print-ready. If you have any questions or need further assistance, please don't hesitate to contact us.
Our Security Tint Envelopes are designed with your privacy in mind. Each envelope features an internal blue crisscross pattern that effectively obscures and distorts any text or images on the documents inside, ensuring that the contents cannot be read or deciphered through the envelope. To enhance user convenience, these envelopes are equipped with a self-adhesive strip, allowing for secure sealing without the need for additional adhesives.
See example below:
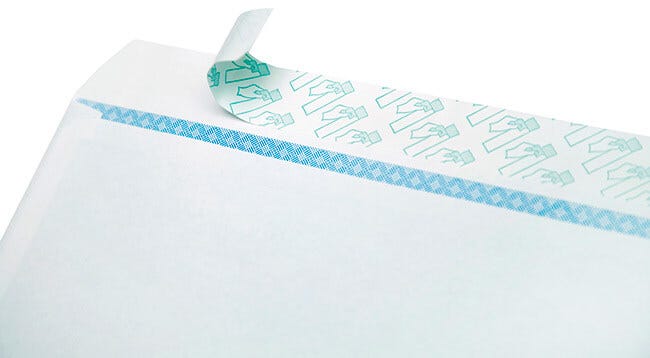
Our Gift Card Holders are designed with versatile slits that perfectly accommodate Plastic Cards and Business Cards measuring 2.125 inches by 3.375 inches. If you're considering using cards of different sizes or types, we strongly recommend conducting a trial fit to confirm compatibility with the holder's slits, ensuring they meet your needs.
The drill hole for the calendar, regardless of its size, is positioned 0.1875 inches away from the page's edge. Importantly, the location of the drill hole alternates based on the page number: it is located at the bottom of the sheet for odd-numbered pages, and at the top for even-numbered pages. To avoid any text or important content being obscured by the drill hole, we strongly advise using our specially designed templates. These templates are crafted to ensure that your content remains clear and unaffected by the drilling process. For access to our templates and to ensure your calendar's design is perfectly aligned.
A wrap-around cover is designed to be placed beneath the top set in a stack of copies. Its primary function is to safeguard the documents below from any potential transfer of ink or other substances, ensuring they remain clean and unblemished. This protective measure helps maintain the integrity and professionalism of your documents.
How to Prepare Your File for Correct Pocket Rotation
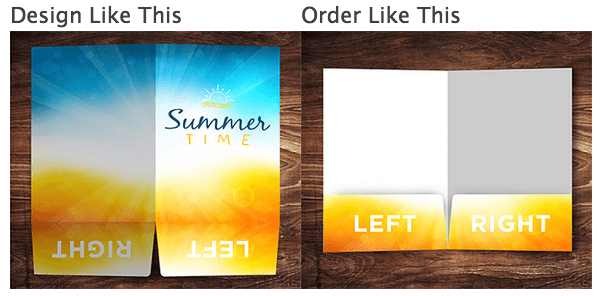
When preparing your file for pocket printing, it's essential to correctly set up the orientation to ensure the final product meets your expectations. Please consider the following guidelines:
Pocket Designation: The layout for pocket placement is determined based on the orientation of flat images. It's crucial to select pockets with this consideration in mind. Refer to the provided image for a clear example.
Important Note on Slit Placement: To maintain the integrity of your design, ensure that any text, logos, or design elements are positioned away from the areas where slits will be made. The side of the pocket you choose for the slits should adhere to the orientation guidelines specified above.
By following these instructions, you can achieve optimal results for your pocketed items. If you have any questions or need further assistance, please do not hesitate to contact us.
Envelopes can be selected as an additional option with your order.
For optimal readability and effect in Raised Foil Artwork, we advise against using fonts smaller than 10 points. For fonts featuring thicker strokes or bold styles, a minimum size of 12 points is recommended to ensure the best quality and visibility.
A: The coil diameter varies based on the paper type and the number of pages:
- For calendars printed on 100lb Book paper, regardless of whether they have 26 or 38 pages, a 1/4" coil is used.
- For those printed on 100lb Cover paper, with either 26 or 38 pages, a 5/16" coil is used.
Absolutely. A PDF Proof will be dispatched to the email associated with your trade account. This proof will display a representation of how one address will look on your final artwork. To proceed with printing, simply respond to the email confirming 'Okay to Print As Is'. If adjustments are needed, request an FTP code in your reply to submit revised files. Upon receiving your revised files, we'll process them and forward a new proof for your final approval.
Due to the unique nature of inkjet printing and the variability in envelope materials, we are unable to guarantee the quality of inkjet prints on Envelopes with Variable Addressing. As such, we do not recommend this method for these types of envelopes to ensure the highest quality and consistency in your printing projects.
For accurately positioning variable addresses on an envelope, we recommend referring to our templates page for detailed layout guidelines. Generally, the recipient's address is positioned in the centre of the envelope, while the sender's address is placed in the top left corner. Our templates provide clear examples and instructions to ensure your mailings meet postal standards and are efficiently processed. For specific envelope sizes or unique design layouts, please consult the templates for the most accurate guidance.
No, Catdi does not provide proofreading, error correction, or modification services for your CSV data files. It is the customer's responsibility to review and confirm the accuracy of their data. Catdi Printing will not be responsible for any errors such as invalid addresses, typos, misspellings, inaccurate zip codes, etc. Please ensure the validity of your data before submission.
When you place an order specifying a certain quantity, for instance, if you request a run size of 100 but your CSV data file contains only 80 addresses, Catdi will proceed to print your specified artwork across the entire batch you ordered. This means all 100 envelopes will feature your artwork. For the first 80 envelopes, we will use the addresses from your CSV file to print variable addresses. The remaining 20 envelopes will be printed without addresses. The complete order, including both addressed and non-addressed envelopes, will be securely packaged in cartons. You'll then receive your order through your selected shipping option, whether that's UPS Shipping, complimentary Local Delivery, or in-person Pick-up.
How to Create a Multi-Page PDF File
Creating a multi-page PDF document can be done easily on both Mac and PC platforms. Follow the steps below tailored to your operating system:
For Mac Users:
- Open the Initial PDF: Launch Preview and open the PDF file you wish to have as the first page of your multi-page PDF document.
- Display Thumbnails: Navigate to
View > Thumbnailsto show page thumbnails in the sidebar. - Select Insertion Point: Click on a page thumbnail where you want to insert another PDF. This indicates the insertion point for the next document.
- Insert PDF: Go to
Edit > Insert > Page from File, then select the PDF file you want to add and clickOpen. - Save as PDF: To finalize, go to
File > Export as PDFand save your new multi-page PDF document.
For PC Users (Using Adobe Acrobat):
- Launch Adobe Acrobat: Open the Adobe Acrobat program.
- Combine Files: Select
Tools > Combine Files. - Add Files: Click on
Combine Files > Add Filesto choose the documents you want to merge. - Organize: Click, drag, and drop to reorder the files and pages as needed. You can double-click on a file to view and rearrange individual pages. Use the Delete key to remove any unwanted content.
- Combine: Once your documents are in order, click
Combine Files. - Save Document: Save your newly compiled multi-page PDF document.
By following these steps, you can efficiently create a multi-page PDF file on your chosen platform.
- Post Hardware Box Weight: 16 pounds
- Box Dimensions: 81 inches x 5 inches x 5 inches
Please Note: The Sign and Real Estate Clips are packaged together, while the Real Estate Post hardware is shipped separately.
Feel free to use this revised FAQ as needed. If you have any further requests or modifications, please let me know!
Absolutely! We'll send a PDF proof directly to the email linked with your trade account. This proof will display a sample event ticket featuring your artwork. To proceed with printing, simply respond to our email confirming 'Okay to Print As Is'. If you'd like to make any adjustments, request an FTP code within your reply to submit revised files. We'll then process these files and provide you with a new proof for your final approval.
For the Variable Numbering section, we utilize a standard 14pt Calibri font in black ink. It's important to consider the use of black ink for numbering during the design phase of your artwork file. Specifically, if your design incorporates dark background images, adjustments may be necessary to ensure the numbering remains visible. This might include knocking out (removing) the background image within the areas designated for numbering to maintain readability.
Additionally, it's worth noting that the accompanying CSV data file can support up to five digits or characters for each individual record.
When the number of records in your CSV data file is less than the ordered run size, Catdi Printing will still print the entire quantity you ordered. We will apply variable numbering to each record from your CSV file. The completed order, including both numbered and non-numbered tickets, will be securely packaged. Your order will then be dispatched through your selected delivery method, whether that's UPS Shipping, Free Local Delivery, or Pick-up.
When you place an order with Catdi Printing, we commit to printing the exact quantity specified in your order. If the CSV Data File you submit includes more records than the ordered run size, please be aware that Catdi Printing will only print up to the number of records corresponding to the ordered quantity. Any records in your CSV file that exceed the quantity you've ordered will not be printed. To ensure all desired records are printed, please adjust the CSV file to match your ordered run size or modify your order quantity accordingly.
Yes, Offset Letterheads are designed to be compatible with both inkjet and laser printers, allowing for easy customization and imprinting directly onto the letterhead.
NCR Forms represent a contemporary substitute for traditional carbon paper, offering a streamlined method to produce multiple colour-coded copies of a document containing handwritten or mechanically entered information. These forms are ideal for a variety of uses, including order forms, packing lists, invoices, and receipts.
They come in either 2 Part (White, Canary) or 3 Part (White, Canary, Pink) configurations, with sheets pre-collated and adhered together along their shorter edge for ease of use. NCR Forms are crafted from high-quality 20LB paper stock and are printed using advanced digital printing technology, ensuring clarity and durability for each copy produced.
Yes, our NCR forms are conveniently collated and come in sets, ensuring ease of use and organization. We offer them in both 2 Part and 3 Part sets, designed to cater to diverse needs. The 2 Part sets consist of White and Canary sheets, while the 3 Part sets include White, Canary, and Pink sheets. To enhance functionality and maintain the set's integrity, all sets are glued along the short edge. This configuration facilitates seamless handling and storage, providing a streamlined solution for your documentation needs.
Yes, our NCR forms are designed to be compatible with a wide range of printing equipment. However, due to the diversity in printer technologies and settings, we strongly advise conducting a test print with your specific setup to ensure optimal results. This step helps in confirming that the quality and functionality of the imprint meet your expectations.
When designing your ticket, you have the option to number specific areas. Refer to the provided example to view the four designated areas available for numbering. You are free to select any combination of these areas, ranging from just one to all four. To indicate your choices, simply name the column headers in your CSV Data File according to the corresponding area names.

To download a CSV Data File sample click here.
Note: The CSV data file may contain up to 5 digits or characters for each record. See example below.
We currently do not provide the option to print on the NCR wrap-around cover.
Absolutely! We are committed to ensuring your satisfaction with every order. Once you place your order, we will send a PDF proof directly to the email address associated with your trade account. This PDF proof will display a sample of one NCR Form, complete with numbering, so you can see exactly how your final product will look.
To proceed with printing, simply reply to our email with an 'Okay to Print As Is' if everything meets your expectations. Should you require any changes, let us know in your reply, and request an FTP code to upload your revised files. We will then process your revisions and send you a new proof for approval, ensuring your final product is exactly as you envisioned.
To ensure a proper fit for the wrap-around cover, a minimum clearance of 0.75 inches at the top is necessary. Please be aware that any design elements placed within this area may be obscured by the cover. We strongly recommend using our specially designed template to ensure that your print elements are correctly aligned and displayed as intended.
Cracking on presentation folders is a common occurrence, especially when coated materials are scored and folded. This is because the coating on the paper can fracture during the folding process. While opting for a job without UV coating may reduce the likelihood of cracking, it does not entirely eliminate the possibility. The nature of the material means that as the folder is repeatedly used and folded, cracking may inevitably occur. Additionally, folders featuring black ink or darker designs with higher ink density are more prone to cracking.
- A wrap-around cover is a type of protective cover specifically designed for NCR (No Carbon Required) forms. It is affixed at the top back of the NCR form and extends around the edges, covering the form completely by wrapping to the front and reaching back to the top. This design ensures that the NCR form is fully protected on all sides, enhancing its durability and maintaining its integrity during use.
Absolutely! When you opt for the 4/4 printing option, you will be prompted to upload two files. In this setup, the "Front" file corresponds to the front and back covers of your folder, while the "Back" file is designated for the inside of the folder. This ensures your final product is printed exactly as you envision, with artwork both outside and inside.
We kindly request that you utilize our provided template for designing your artwork. However, it is important to ensure that all guides for slits or any other marks are removed prior to submission. If a template is included as a layer within your artwork, please note that it will be printed as part of the final product. For optimal results, please submit artwork without these guides.
- For 2-part forms, the maximum quantity per book is 50 sets.
- For 3-part forms, the maximum quantity per book is 35 sets.
We offer a selection of premium envelopes in sizes A2, A6, A7, A9, and 6.5" square. These envelopes are made from 70# Natural White Text paper, providing a perfect match for our Natural Greeting Cards and Announcement Cards.
Shipping
When an order meets the size or weight criteria for freight shipping, this option will be displayed among the available Shipping Methods directly on the product's page.
Freight Shipping - No Liftgate
- This option is suitable when your order qualifies for freight shipping. The delivery truck will arrive at your business or residence, but you must handle unloading the pallet from the truck yourself. Businesses are equipped with a forklift or a standard 48" high dock with a pallet jack.
Freight Shipping - With Liftgate
- In this option, the delivery truck comes to your location and uses a lift gate to lower the pallet to the ground. You are responsible for moving the pallet from there.
Freight Shipping - Inside Delivery
- This comprehensive option includes the delivery truck bringing your order to your location, lowering the pallet to the ground with a lift gate, and then moving the pallet inside your building to the ground level.
Unfortunately, we are unable to split a single order to multiple shipping destinations. Each distinct order, such as Job ID J55555-001 and J55555-002, can be assigned its own unique shipping address. However, an individual job number, like B55555-001, must be shipped to a single location only.
Absolutely! We offer a drop shipping service for your convenience. To use this service, please follow these steps:
- 1. Choose the 'Drop Ship' option when placing your order.
- 2. Select a delivery address from your Address Book.
- 3. The package will be billed to you but shipped directly to the chosen address. If you need to change the 'ship from' address, simply click 'Edit' to update it.
This streamlined process ensures that your package reaches your customer efficiently and directly.
At Catdi, we currently do not offer a pre-published guide for shipping costs or weight limits. However, you can conveniently obtain an immediate and accurate shipping price estimate directly on our website while you're in the process of placing your order.
Absolutely! For orders being shipped within Canada, Catdi provides the option of using Purolator's shipping services.
Catdi generally does not combine individual orders for shipping. However, we do offer the option of group shipping for select products. Please carefully review the shipping terms when opting for group shipping, as it may affect the turnaround times and delivery schedules.
How to Place a Group Order:
- Select Your Product: Currently, this option is available for business cards only.
- Specify Details: Choose your run size, colour options, and desired turnaround time.
- Delivery Method: Select your preferred delivery shipping method.
- Job Name/PO: Enter the name for your job order.
- Shipping Address: Choose either a default address or a drop-ship option.
- Shipping Method: Select the appropriate shipping method for your needs.
- Add Job: Click on the "Add Job" button to include this job in your order.
- Repeat for Group Orders: If placing multiple jobs for group shipping, repeat the process for each job. Make sure to select 'Common Carrier' under DELIVERY and choose the appropriate group for grouping your shipment.
Currently, Catdi does not offer shrink-wrapping services.
When you place an order with Catdi from Canada, the entire process, including production and shipping, is managed from a facility in the United States. Here's what you need to know regarding fees and taxes:
Shipping Time: After your order is dispatched from our U.S. plant, please expect a delivery time of 4-7 business days.
Inclusive Charges: The total cost of your order will include all necessary duties, fees, and Canadian taxes. This means there are no hidden or additional charges upon delivery.
Orders Under CAD 20.01: For orders with a value less than or equal to 20.01 Canadian Dollars, there are no applicable fees or taxes.
This comprehensive approach ensures a smooth and transparent process for our Canadian customers.
Our website uses an address verification system to ensure accurate deliveries based on the carrier. This may result in an Address Validation fee if discrepancies are found. Please ensure your address details (spelling, abbreviations, suite/unit, street number, city, and zip/postal code) are correct. This helps avoid delivery issues and additional charges.
For Economy Shipping options, specific day delivery cannot be guaranteed. We strive to estimate delivery dates as accurately as possible, but unforeseen factors can sometimes cause delays.
In the case of drop-ship orders, should a package be considered undeliverable and thus returned by the USPS, it will be redirected back to you, the sender, rather than to Catdi. Please note, a return-delivery charge will be incurred in such instances.
Generally, the shipping carriers we work with do not deliver to PO Box addresses. However, if economy shipping is an option, it can be used to ship to a P.O. Box.
At Catdi, we are committed to providing a variety of shipping options to cater to your needs. Our primary shipping method is through Common Carrier, offering multiple service options to suit your timeline and budget. These include Ground shipping for those who prefer a cost-effective solution, Next Day Air for urgent deliveries, and several other methods designed to ensure flexibility and convenience.
For our customers in the United States and Canada, we also offer Purolator shipping. This service is specifically available for orders that are both produced and shipped within Canada, providing a reliable and efficient option for our North American clients.
We appreciate your interest in utilizing your personal shipping account for your orders. However, currently, we are unable to accommodate this request. For all orders, we exclusively use our dedicated Catdi shipping account to ensure consistent and reliable delivery services. We continually strive to provide the best shipping solutions and thank you for your understanding.
As of now, Catdi does not provide specialized boxing services upon request. We are continuously exploring ways to expand our offerings and hope to include this option in the future.
Yes, customers located outside the United States and Canada are required to cover any applicable customs fees, such as taxes and duties, when they receive their order. Please note that Catdi Printing only charges for the shipping fees, and any additional customs charges must be paid directly by the customer upon delivery of the order.
Our website incorporates an address verification system designed to ensure the accuracy of addresses based on the selected delivery carrier. This system is critical in guaranteeing that packages are delivered to the correct destination. To facilitate a smooth verification process, please verify that the address is correctly spelt, appropriately abbreviated, and includes accurate details such as suite or unit number, street number, town or city, and the zip or postal code.
Economy Shipping combines the efficiency of common carrier transport with USPS delivery to residential addresses, ensuring a cost-effective solution. This service covers all 50 US states and US Territories, delivering packages to the nearest USPS facility for final delivery. It offers a reliable and comprehensive delivery network, making it an ideal choice for affordable shipping.
Economy Shipping provides a more budget-friendly solution for sending your parcels. Compared to Ground Shipping, the expected delivery time for Economy Shipping can be extended by up to two additional days. However, it includes the convenience of Saturday delivery through USPS, making it an attractive option for those who prioritize cost savings Catdi speed.
Economy Shipping is exclusively offered for deliveries to residential addresses. In instances where the destination address is recognized as a commercial property, this option becomes unavailable. Consequently, you won't find the Economy Shipping choice displayed on our platform under such circumstances.
To track your package, use the provided tracking number at usps.com once it's in the USPS delivery phase. Tracking updates become available after the package enters a USPS facility. You can also find this information on our website for easy access. Stay informed about your shipment's status and estimated arrival.
Economy Shipping is offered for products packaged in a single parcel, adhering to certain weight and size criteria. Please note that the majority of our Grand4Mat items do not qualify for Economy Shipping.
Our Economy Shipping option is currently not available for orders in Canada.
Majestic Products
At PrintCo, we are committed to delivering high-quality Foil Worx jobs that make your designs shine. To ensure a smooth process and outstanding results, please follow these guidelines for setting up your Foil Worx job:
1. Choose a Single Foil Type:
- Each Foil Worx order can utilize only one type of foil. For instance, you cannot mix Gold foil on the front and Silver foil on the back in the same order.
2. Prepare Foil Mask File:
- Your Foil Worx job files should be structured similarly to our Spot UV job files.
- You must provide a separate Foil mask file, where areas you desire to have foil should be represented in black, and areas without foil should be in white.
- Ensure that all black areas are solid 100% K (Key) with no additional colours.
3. Combining Foil and Spot UV:
- If you wish to combine Foil Worx with Spot UV on your project, you'll need to provide separate mask files for both.
- This means you may be required to submit up to six files in total.
- To avoid issues, make sure that the Foil and UV coating do not overlap; they should be at least 1/16" apart to prevent the foil from peeling off.
4. Avoid Fine Details for Foil Objects:
- Steer clear of using small or fine text, as well as intricate lines for foil elements. This will help achieve the best results in the final print.
5. Limit Foil Coverage:
- For optimal results, keep in mind that foil coverage should be less than 50% of the entire print side.
6. Consider Foil Placement Shift:
- Please be aware that there may be up to a 1/16" shift in the placement of the foil. Take this into account if you are aligning foil with other printed artwork on the card.
7. Use Vector-Based Programs:
- For superior quality, we recommend creating mask files in vector-based design programs such as Illustrator or CorelDRAW.
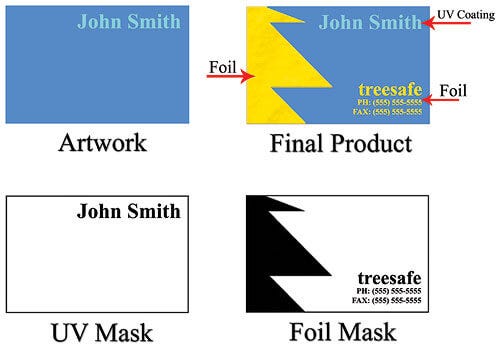
By adhering to these guidelines, you can ensure that your Foil Worx job is set up correctly, resulting in a stunning and professionally finished product. If you have any further questions or require assistance, please don't hesitate to contact our support team. We are here to help you bring your creative vision to life.
Akuafoil is a remarkable printing technique that transforms a wide range of CMYK colours into vibrant, multi-coloured foils. This unique process adds a touch of elegance to your prints, making them truly stand out.
Setting Up Your Akuafoil Job:
To get started with an Akuafoil project, you'll need to include an Akuafoil mask file along with your CMYK artwork. The mask file specifies where the Akuafoil will be applied, similar to the setup for Spot UV. Use 100% K (black) to indicate where Akuafoil should be applied and white where it shouldn't.
Here's an example: The left file represents your normal CMYK print, while the right file shows how your Akuafoil mask should look. White areas indicate no Akuafoil, while black (100% K) areas signify where Akuafoil will be applied. Make sure to upload these files separately.
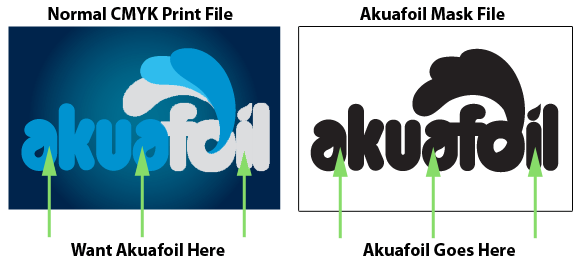
Tips for Creating Akuafoil Artwork:
- Ensure precise alignment between the mask and CMYK print files in terms of size and position.
- Akuafoil works best on lighter colours, with darker CMYK colours yielding a less vibrant effect.
- Avoid using very thin or small text and artwork with Akuafoil. Opt for Sans Serif fonts above 12 points for optimal results.
- If Akuafoil is applied to a white area, it will have a plain silver appearance.
- For superior quality, it's recommended to create mask files in vector-based programs like Illustrator or CorelDRAW.
- If you want plain silver Akuafoil, ensure that the CMYK print file has at least 15% K in the Akuafoil area for the best silver effect.

Dealing with Knockouts:
When creating knockouts in the Akuafoil mask or CMYK print file, be aware of the potential "Halo" effect around the knockout area. To mitigate this, consider these options:
- Grow/stroke the Akuafoil area in the mask by 1 point to allow it to bleed into the CMYK area, reducing the white "Halo" effect.
- Fill in the knockout with a colour to further reduce the "Halo" effect.

These are the printed results:
By following these guidelines, you can achieve stunning Akuafoil prints with precision and visual appeal.
EDGE Cards are designed to have a long lifespan, typically lasting for several years under normal conditions. However, it's important to note that exposure to extreme temperatures can impact the durability of the cards. For instance, placing EDGE Cards in a hot car's windshield for extended periods can compromise their longevity.
To ensure the longevity of EDGE Cards, it is advisable to avoid exposing them to:
Excessive Heat: Prolonged exposure to high temperatures, such as inside a hot car, can be detrimental to the cards.
Extreme Cold: Extremely cold environments should also be avoided, as they can affect the card's performance.
Excessively Dry or Humid Conditions: Cards should not be stored in extremely dry or humid environments, as this can impact their quality.
To maximize the lifespan of your EDGE Cards, it is best to store them in a moderate, controlled environment that is neither too hot nor too cold. This will help ensure the continued functionality and durability of your cards.
When working with Brown Kraft cards and considering the addition of white ink as an overprint, it's important to follow specific guidelines to achieve the desired results. White ink serves as a base for the CMYK colours, creating a bright white surface that allows for vibrant and crisp colors. Any areas without white ink will appear darker due to the colour of the Kraft stock.
To effectively set up your artwork for Brown Kraft cards with white ink, consider the following steps:
Separate White Mask Files: Similar to Spot UV masks, White Mask files should be created separately from your artwork files. In the White Mask file, use black to indicate where the white ink will be printed.
Ensure Matching Sizes: Make sure that your mask file is the same size as your artwork file. This alignment ensures that there are no issues during the printing process.
File Format: White Masks must be created in vector format and saved as EPS or PDF files. It's essential to maintain vector quality for precision. Keep in mind that any areas in the White Mask with less than 100% black will be transparent, allowing the brown stock to show through.
Use Vector Paths/Shapes: Create black colour areas in your White Mask using vector paths or shapes. These areas will indicate where the white ink base will be applied. The rest of the areas will reveal the natural Brown Kraft stock.
Consider Artwork Layer: Keep in mind that the white ink base will be printed behind any colour present in your Artwork Layer. This ensures that colours remain vibrant and distinct.
Colour and White Mask Interaction: Areas with colour but without a White Mask will be printed with colour directly on the material, providing a unique visual effect. Areas with colour and a White Mask will be printed as an opaque or solid colour, offering a bold appearance. Areas with a White Mask and no colour will be printed as white, creating a striking contrast.
By following these steps and considering these factors, you can successfully set up your artwork for Brown Kraft cards with white ink, resulting in visually appealing and professionally printed materials.


We offer appropriately sized envelopes with our Brown Kraft Greeting Cards and Announcement Cards. These envelopes come in three sizes: A2, A6, and A7. They are made of high-quality 80lb Brown Kraft paper, ensuring a perfect match for your cards.
Setting up a Raised Spot UV job is similar to setting up a Spot UV job. Here's a step-by-step guide:
1. Prepare Your Files: When creating a Raised Spot UV job, you need two files - the regular print file and a Raised Spot UV mask file.
2. Use Vector Art: Ensure that your Raised Spot UV mask file is created using vector-based programs such as Adobe Illustrator. Vector art provides the precision needed for accurate UV coating application.
3. Design Guidelines: Follow these guidelines for the Raised Spot UV mask file:
- 100% K (C 0%, M 0%, Y 0%, K 100%): Use solid 100% black to indicate where you want the UV coating. Avoid using shades, glows, or grayscale images.
- White Areas: White areas on the mask file indicate where no UV coating will be applied.
By following these steps and guidelines, you can set up your Raised Spot UV job effectively. If you have any further questions or need assistance, please don't hesitate to reach out to our support team.
To ensure the highest quality outcome for your Raised Spot UV Cards, it's essential to follow these guidelines:
Keep UV Coverage Below 30%: It's crucial to limit the UV coverage to less than 30%. Excessive coverage can lead to the cards sticking together and forming a solid block. To maintain clarity and separation, be mindful of this percentage.
Utilize Vector Art: The mask file used for the raised foil effect should be created in a vector-based program, such as Adobe Illustrator. Vector art ensures sharp and precise edges on your artwork, resulting in a polished finish.
70% Coverage with Patterns, Thin Strokes, or Small Shapes: While the general rule is to stay below 30% coverage, exceptions can be made for patterns, thin strokes, or small shapes. In such cases, a coverage of up to 70% is acceptable. However, be cautious not to exceed this limit.
Optimal Size: Ideally, the size of the area, shape, or image covered with raised foil should not exceed 1 inch by 1 inch. This dimension ensures that the raised effect remains visually appealing and well-defined.
For a visual reference, please view the images below.
These guidelines will help you achieve the best possible outcome when creating Raised Spot UV Cards. If you have any further questions or require assistance, please don't hesitate to reach out.
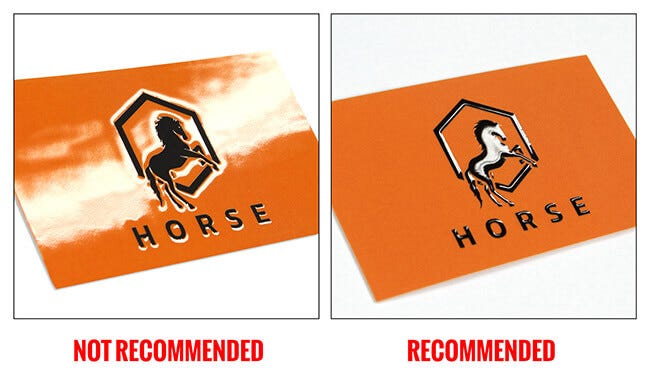
Painted Edge Cards are high-quality 32pt uncoated business cards that feature a unique and eye-catching design element. These cards are distinguished by the vibrant paint applied to the edges, enhancing their visual appeal and making a memorable impression.
How to Set Up Painted Edge Cards
Setting up your Painted Edge Cards is a straightforward process, similar to configuring standard 4/0 or 4/4 cards. Follow these steps:
Choose Your Edge Color: Start by selecting the edge colour that best complements your design and branding. This colour will be applied to the sides of your cards, adding a striking and distinctive touch.
Design Your Cards: Create your card design using the same specifications as for traditional business cards. You can opt for single-sided (4/0) or double-sided (4/4) printing, depending on your needs.
Include Edge Color in Your Design: Ensure that the chosen edge colour is incorporated into your card design appropriately. Coordinate it with your artwork and branding elements for a cohesive look.
Upload Your Files: Prepare your design files in the preferred format specified by your printing service provider. Typically, this involves submitting high-resolution PDF files with the edge colour included in the design.
Review and Confirm: Before finalizing your order, carefully review your design and files to ensure accuracy and quality. Check that the edge colour aligns with your vision.
Place Your Order: Once you are satisfied with your setup, proceed to place your order for Painted Edge Cards. Your chosen printing service will take care of the rest, ensuring that your cards are expertly crafted with precision.
By following these steps, you can create stunning Painted Edge Cards that leave a lasting impression on your contacts and clients.
If you have any specific questions or need further assistance, don't hesitate to reach out to your printing service provider for guidance and support. They will be happy to assist you in achieving the desired look for your business cards.
Raised Foil cards are a premium print product crafted with meticulous attention to detail. These cards are printed on high-quality 16pt card stock and are laminated on both sides with a durable 1.5mil scuff-resistant soft velvet laminate, resulting in a substantial thickness of 19pt.
Setting up a Raised Foil job requires careful consideration. Here's a step-by-step guide:
1. Prepare Your Files:
- Raised Foil jobs necessitate the use of a mask file in addition to the regular print file. The mask file is crucial in indicating where the foil embellishment should be applied.
2. File Format:
- Ensure that your mask file is in vector format. Vector-based programs like Adobe Illustrator are ideal for creating this file.
3. Color Selection:
- Use a solid 100% black colour (C 0%, M 0%, Y 0%, K 100%) to specify the areas where you want the foil effect. Avoid using shadows, glows, or grayscale images in the mask file.
4. White Areas:
- Any areas left white in the mask file will indicate that no foil should be applied to those parts of the design.
5. Caution with Knockouts:
- It's advisable to refrain from using knockout designs, as there may be a slight shift (up to 1/16”) when the foil is applied. To maintain precision, stick to the solid black colour for foil placement.
By following these guidelines, you can ensure a seamless setup for your Raised Foil cards, resulting in stunning and eye-catching printed materials. If you have any further questions or need assistance, feel free to reach out to our support team.
We hope this information helps you create remarkable Raised Foil cards for your projects.
We highly recommend using a solid color as the background behind the foil mask. It is not recommended to include any artwork or text under the foil mask, as it may become visible through the foil. Additionally, we advise against using knockouts, as there might be a slight shift (up to 1/16 inch) when the foil is applied.
When it comes to creating stunning raised foil cards, it's important to follow some key guidelines for optimal results:
Foil Coverage Percentage: To ensure a visually appealing outcome, it's recommended that the foil coverage on your artwork does not exceed 30%. Excessive foil coverage can lead to a wavy appearance that may not meet your expectations.
Exceptions for 50% Coverage: While 30% coverage is the general rule, there are exceptions. A 50% coverage is acceptable in specific cases such as patterns, thin strokes, or small shapes. In these situations, a higher foil coverage can still produce excellent results.
Size Limitations: For the best outcome, it's advisable to limit the size of the area, shape, or image covered with raised foil to no more than 1 inch by 1 inch. This size restriction helps maintain the quality and clarity of the foil detailing.
By adhering to these guidelines, you can ensure that your raised foil cards showcase a premium and visually pleasing appearance.
Foil Worx and Raised Foil Cards offer distinct foil finishes:
- Foil Worx: This option provides a smooth, flat finish with foil embellishments.
- Raised Foil: In contrast, Raised Foil Cards feature a foil finish that is raised, creating a tactile sensation when you run your fingers over the card. The height of the foil in Raised Foil Cards is approximately 60 microns.
These options cater to different aesthetic preferences and tactile experiences, allowing you to choose the one that best suits your needs.
Setting up a Raised Spot UV job is a straightforward process, similar to that of a Spot UV job. When preparing your Raised Spot UV project, it's essential to include a Raised Spot UV mask file in addition to your regular print file.
Key Points to Remember:
Use Vector Art: The mask file must be created as vector art within vector-based design software like Adobe Illustrator. This ensures precise control and high-quality results.
Indicate UV Coating Areas: The purpose of the Raised Spot UV mask file is to define precisely where the UV coating should be applied. To do this effectively, follow these guidelines:
Use Solid 100% K: To indicate the areas where you want the UV coating, utilize solid 100% K (C 0%, M 0%, Y 0%, K 100%). This ensures a clear and consistent representation of the UV-coated regions.
Avoid Complex Effects: Avoid using shadows, glows, or grayscale images in the mask file. Simplicity is key to achieving the desired Raised Spot UV effect.
White for No UV: Keep in mind that white in the mask file indicates areas where no UV coating will be applied.
By following these steps and guidelines, you can effectively set up your Raised Spot UV job, resulting in a visually appealing and professional finished product.
We offer appropriately sized envelopes for our Pearl Greeting Cards and Announcement Cards, including A2, A6, A7, A9, and 6.5" square envelopes. These envelopes are made from 80# Pearl Text paper and can be selected as an option when ordering our cards.
We provide a selection of appropriately sized envelopes to complement our Natural Greeting Cards and Announcement Cards. These envelopes are available in the following sizes: A2, A6, A7, A9, and 6.5" square. Each envelope is crafted from 70# Natural White Text, ensuring a high-quality and elegant presentation for your cards. Choose from these envelope options to enhance your card sending experience.
Lustre cards are printed on high-quality 16pt card stock and feature a 3mil gloss lamination, adding to their thickness. In total, Luster Cards with Gloss Lamination are 22pt thick.
This modification presents the information clearly and concisely, making it easy to understand while maintaining a professional tone. If you need any further adjustments or have additional requests, please let me know.
We offer a selection of appropriately sized envelopes to accompany our Natural Greeting Cards and Announcement Cards, all made from high-quality 14pt Natural Paper. These envelopes come in various sizes, including A2, A6, A7, A9, and 6.5" square, to suit your specific needs. They are crafted from 70# Natural White Text stock, ensuring a premium and complementary envelope for your cards.
At our company, we craft Suede Cards with precision and quality in mind. These unique cards begin with a sturdy 16pt stock as their foundation. To enhance their luxurious feel and durability, we apply a 1.5mil soft velvet, scuff-resistant laminate to both sides of the sheet. This meticulous process results in a final thickness of 19pt.
The soft velvet lamination not only adds a delightful supple texture but also imparts a touch of elegance to the cards. It gently softens colours, reduces contrast, and gives the overall appearance a lighter, muted sophistication.
Our Suede Cards are designed to leave a lasting impression and are a testament to our commitment to quality craftsmanship.
Brown Kraft paper boasts a natural, light brown hue characterized by its organic appearance, complete with subtle, visible flecks. It offers an uncoated smooth finish that enhances print quality, and when used for printing, it imparts a warm, rustic charm to images. For added versatility, you have the option of applying white ink selectively or across the entire surface, allowing for striking contrasts and vibrant images.
One of the remarkable features of Brown Kraft paper is its eco-friendliness. It is proudly crafted from 100% recycled materials, including a minimum of 30% post-consumer waste content.
It's important to note that due to the nature of recycled and coloured stocks, there may be slight variations in color, and the flecks in the paper can vary from sheet to sheet and from one press run to another.
We hope this information helps you understand the composition and sustainability of Brown Kraft's paper. If you have any further questions, please don't hesitate to reach out to us.
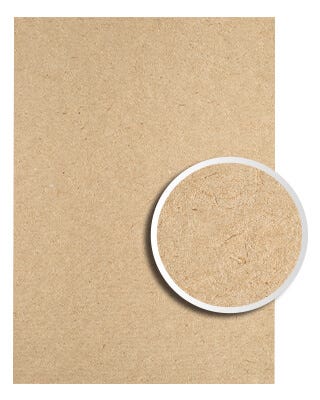
Spot UV: Spot UV is a flat finish featuring a glossy layer applied precisely to the designated area of your printed piece. This creates a high-gloss coating in that specific spot.
Raised Spot UV: On the other hand, Raised Spot UV follows the same process but with a unique twist. In this case, the UV coating applied protrudes from the product's surface. When you touch the printed piece, you can physically feel the raised UV texture. The depth of the Raised Spot UV is approximately 50 microns.
Feel free to use this revised version for your FAQs.
It is advisable to avoid using a font size smaller than 6pt in your Raised Spot UV Artwork. However, if you opt for fonts with thicker strokes, it is recommended not to use a font size smaller than 9pt.
Feel free to let me know if you'd like any further adjustments or if you have any other requests.
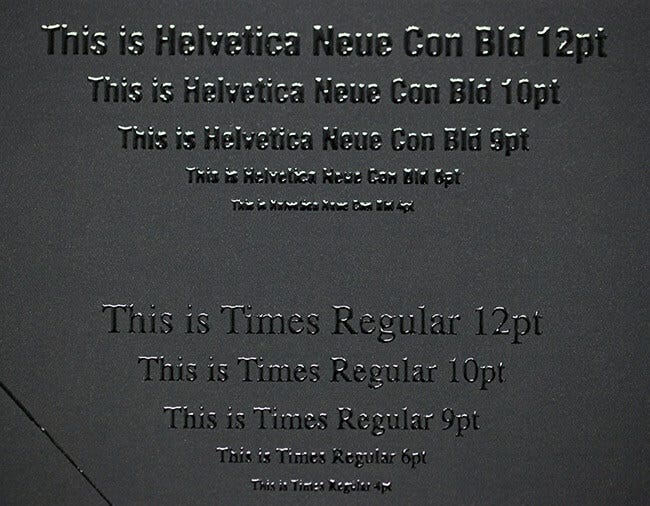
The choice of your design and background colour may have a slight impact on how the edge colour of the cards turns out. This effect is more pronounced when using dark or light background colours. We recommend using a solid background colour to achieve the desired results. The variation in edge colour may become more noticeable when the cards are stacked together, but it becomes less prominent when you hold up an individual card on its own.
Spot UV is a specialized finishing technique that creates a glossy layer on specific areas of your printed material. It provides a sleek and eye-catching contrast by adding a high gloss coating to selected areas.
Raised Spot UV employs the same process as Spot UV but with an intriguing twist. In Raised Spot UV, the applied UV coating is elevated from the surface, resulting in a tactile effect. When you touch the printed piece, you can feel the raised UV coating, adding a unique dimension to your design. The depth of the Raised Spot UV is precisely 50 microns.
We hope this clarifies the distinction between Spot UV and Raised Spot UV, allowing you to choose the right finish for your printed materials. If you have any further questions, please don't hesitate to reach out to us.
When creating Raised Foil artwork, it's essential to consider legibility. We advise against using fonts smaller than 10pt in your design. If you opt for fonts with thicker strokes or bold variations, we recommend a minimum font size of 12pt for optimal visibility.
For a visual reference, please refer to the image below:
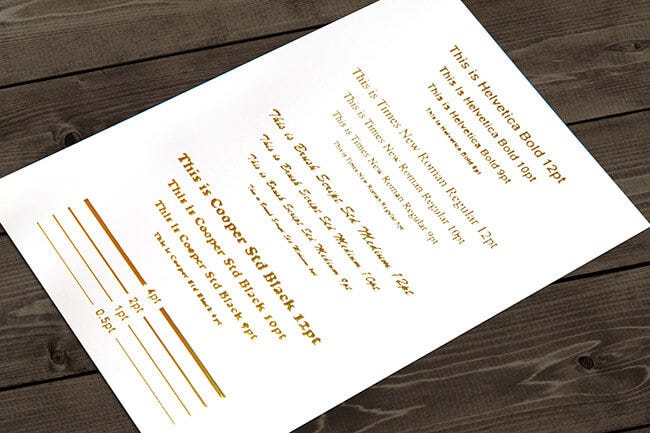
We hope this information helps you create stunning Raised Foil artwork with clarity and impact. If you have any further questions, please don't hesitate to contact us.
For optimal results in your Raised Spot UV artwork, we advise against using fonts smaller than 6pt. However, if you opt for fonts with thicker strokes, we recommend not using fonts smaller than 9pt. This ensures the best quality and visibility of your design.
Boxes & Packaging
Assembly is required for all our Paper Board Boxes. Please refer to our Assembly Guides below for detailed instructions on how to construct your boxes.
All our standard Paper Board Boxes are die-cut, scored, and shipped flat.
However, our Wine Bottle Boxes and Pillow Boxes (with Glue) are an exception. These two products come with one edge pre-glued and are folded in half before packing.
We hope this information helps. If you have any further questions, please don't hesitate to contact us.
You have a convenient options for assembling the Business Card Box:
We hope these resources make the assembly process a breeze. If you have any further questions or need assistance, please don't hesitate to contact us.
A link to the assembly instructions as a PDF is available: PDF
A link to the assembly instructions as a PDF or video is available: PDF
A link to the assembly instructions as a PDF or video is available: PDF
A link to the assembly instructions as a PDF or video is available: PDF
A link to the assembly instructions as a PDF or video is available: PDF
Yes, there is an exception for the use of UV Coating, Front Only. This option is not available for boxes that require glue during assembly. This limitation applies to boxes such as the Wine Box and Sales Presentation Box.
We hope this information helps you in choosing the right stock and coating options for your Paper Board Boxes. If you have any further questions, please feel free to reach out to us.
Yes, they can be glued.
If you plan to glue your packaging either by yourself or through a bindery, please keep in mind that glue may not adhere properly to areas with UV coating or ink. To ensure successful adhesion, we recommend the following steps:
Spot UV Option: When placing your order, opt for the "Spot UV" option. This allows for precise application of UV coating in specific areas, leaving others uncoated for gluing purposes.
No UV Indication: Clearly indicate "No UV" in the areas where you intend to apply glue. This will ensure that those sections are free from any coating that might hinder adhesion.
For additional durability and the opportunity to promote your brand, consider exploring our fully customizable 4over Roll Label stickers.
We hope this information helps you achieve the best results when gluing your packages. If you have any further questions or require assistance, please don't hesitate to contact us.
The bleed requirement for all Paper Board Boxes is .125" (1/8") on each side, totalling .25" (1/4"). For comprehensive instructions on setting up your artwork, please refer to our catdi packaging templates.
This revised version provides a clear and concise response to the question in a professional tone.
Yes, we offer Custom Boxes in durable, bright white stocks with a variety of finishing options. Custom Boxes come with Custom die-cutting and glueing options. Here are the file requirements you need to know:
Die Cut Files: Die Cut files should be submitted in vector format only.
Artwork Files: Artwork files should have at least 0.25" bleed on each side, and the colour should extend beyond the die-cut line. Elements that are not intended to bleed off should be at least 0.25" away from the cut line for safety.
Die Cutting Requirement: If you do not require die cutting, you can go to our Print and Trim category. This category allows you to order high-quality printed sheets trimmed to your flat size, ready to be sent to your bindery house.
To ensure the quality of your Custom Boxes, please adhere to the following file setup requirements:
Glue Areas: Areas that require glue must be free of UV coating, Foil, and Ink.
File Format: Custom die-cut files must be in Vector format.
Line Paths: Custom Die Cut files must have single-line paths to represent the cut and score lines.
Indication of Lines: Cut lines should be indicated with red lines, score/fold lines with green lines, and perforation lines with green dotted or dashed lines.
Panel Measurements: Panel measurements are not required on the die file.
Responsibility: Catdi is not responsible for ensuring that Custom Die Cut files will create a box that fits your needs.
Expert Recommendation: Catdi strongly recommends that Custom Die Cut files be created by a packaging and bindery expert.
Mock-Up Samples: It is also strongly recommended that mock-up samples be created to vet out and ensure the die lines will produce the end results you are looking for.
Note: When choosing your Flat Size, remember to choose a size that is 1 to 2 inches larger than your flat size.
For options that are not available in our Custom Boxes category, please request a Packaging Estimate from our Services tab or click here.
We hope this information helps you in preparing your Custom Boxes order. If you have any further questions or require assistance, please feel free to contact us.
Our packaging products can be used for food products, but it's important to follow proper guidelines. To ensure food safety, it is essential to use an intervening layer of FDA-approved food contact material when using our Paper Board Boxes for food packaging. It is the responsibility of the customer or end user to ensure that the use of our products complies with the relevant FDA regulations.
If you have any further questions or need more information, please feel free to contact us.
A link to the assembly instructions as a PDF or video is available: PDF
Paperboard boxes may not be the ideal choice for USPS shipping due to the possibility of rough handling during transit. For a successful shipping experience with Paper Board Boxes, we recommend considering additional protection measures. To learn more about shipping Paper Board Boxes effectively, we encourage you to visit your local Post Office or explore the official USPS website at www.usps.com."
This revised version maintains professionalism and provides a clearer message about the suitability of Paper Board Boxes for USPS shipping while offering guidance on where to find more information.
Roll Labels & Stickers
We offer a variety of Roll Label stocks to meet your specific needs. Here's a breakdown of our available options:
Bright Silver Metallic - 2mil
- Thickness: 2mil
- Description: Bright Silver Metallic labels have a mirror-like finish and come in a 2mil thickness. They offer exceptional tear strength and opacity, making them suitable for various surfaces. These labels are heat and chemical resistant, recommended for indoor use, and can even include white ink as a 5th color. For instructions on setting up artwork with white ink, please refer to FAQ #9.
Clear BOPP - 2.3mil
- Thickness: 2.3mil
- Description: Clear BOPP labels are made from Glossy Clear Biaxially Oriented Polypropylene and feature a permanent adhesive for reliable adhesion to different surfaces. While they are oil and water-resistant, we suggest using them indoors. Similar to Bright Silver Metallic, white ink can be added as a 5th color. Refer to FAQ #9 for artwork setup details.
Eggshell Felt - 70lb, 6.3mil
- Thickness: 6.3mil
- Weight: 70lb
- Description: Eggshell Felt labels have a unique texture, high opacity, and excellent ink holdout. These labels contain 30% post-consumer waste content, making them an eco-friendly choice. They are also designed with wet strength properties for improved performance in moist environments. Please note that these labels are not recommended for outdoor use, and we recommend testing them for your specific application.
Semi-Gloss Paper - 55lb, 3.2mil
- Thickness: 3.2mil
- Weight: 55lb
- Description: Semi-Gloss Paper labels offer a cost-effective solution without compromising quality. They come with a permanent adhesive suitable for various surfaces. However, they are not resistant to oil or water and should be used indoors.
White BOPP - 2.3mil
- Thickness: 2.3mil
- Description: White BOPP labels are made from Glossy White Biaxially Oriented Polypropylene and feature a permanent adhesive. These labels are oil and water-resistant but are recommended for indoor use.
If you have any further questions or need assistance with your label selection, please don't hesitate to contact us. We're here to help you find the perfect label stock for your needs.
Core Size and Outer Diameter
- Core Size: Our Roll Labels feature a standard 3-inch core.
- Outer Diameter: The maximum outer diameter of our Roll Labels is 6 inches.
Feel free to use this updated FAQ for your needs.
Our Roll Labels come in a variety of standard shapes and sizes to suit your needs:
Standard Shapes: You can choose from the following standard shapes:
- Oval
- Circle
- Square (with Round Corners)
- Rectangle (with Round Corners)
Custom Shapes: We also offer the option of custom shapes for the following sizes:
- 1" x 1"
- 2" x 2"
- 3" x 3"
- 4" x 4"
- 5" x 5"
- 6" x 6"
Feel free to select the shape and size that best fits your requirements. If you have any further questions or specific customization needs, please don't hesitate to reach out to our team. We're here to assist you in creating the perfect Roll Labels for your business or project.
Our Roll Labels are designed to be compatible with most hand-applied dispensers. They feature a 3" core and an outer diameter of up to 6". However, we recommend checking the specifications of your dispenser before purchasing our Roll Labels if you intend to use them with any other dispenser. This ensures a seamless and efficient labelling experience.
Our Roll Labels are known for their exceptional quality; however, it's important to note that the print results may differ slightly from Offset printing. In particular, the sharpness of images might be slightly reduced. To ensure the best possible outcome, we recommend maintaining a minimum image resolution of 300 dpi.
If you choose our 5/0 option, you will need a white mask file. Please refer to the previous question titled "How to Set Up and Create a Bright Silver Metallic or Clear Roll Label with White Ink?" for detailed instructions on creating your white ink file.
To ensure a smooth registration process, follow these guidelines:
Overlap CMYK Colors and White Mask Areas: When working with CMYK colours that overlap with white mask areas in your design, consider the following:
Add a Stroke: We recommend adding a stroke around the CMYK elements that are between 1 and 2 pixels larger than the underlying white elements.
By adhering to these recommendations, you can optimize your file setup and minimize registration issues during the printing process.
We provide two lamination options for Roll Labels:
1.0 mil Clear Silk Overlaminate: This option offers a smooth and satin-like finish, enhancing the appearance of your labels while providing protection.
1.0 mil Clear Gloss Overlaminate: For a glossy and vibrant look, choose this overlaminate to make your Roll Labels shine and stand out.
These lamination choices allow you to customize your Roll Labels to suit your desired finish and style.
Lamination for roll labels offers a range of advantages, including:
Enhanced Protection: Lamination maximizes label protection by providing extreme resistance to temperature variations, abrasion, and exposure to chemicals.
Aesthetic Enhancement: In addition to protection, lamination offers aesthetic enhancements with both Silk and Gloss finish options.
These benefits make lamination a valuable choice for ensuring the durability and visual appeal of your roll labels.
Yes, Roll Labels can be written on under certain conditions:
Semi-Gloss without lamination and Eggshell Felt: These surfaces are compatible with ballpoint pens, making it easy to write on them.
Permanent Markers: Permanent markers can be used on all substrates, including laminated roll labels, as long as you allow the ink to fully dry.
Please note that certain writing tools may not be suitable for roll labels, including gel pens, ink pens, and pencils. We recommend conducting a test on your specific application to ensure compatibility.
Feel free to reach out if you have any more questions or need further assistance.
To ensure clear quality, we recommend the following guidelines for designing Barcode and QR code images:
Use 100% Black (K) Font: It's essential to utilize 100% black (K) only for the font colour. This ensures optimal readability and scanability.
Prefer Vector Files: Whenever possible, use vector files for your Barcode and QR code designs. Vector files maintain sharpness and scalability, making them ideal for high-quality output.
By adhering to these guidelines, you can create Barcode and QR code images that are not only visually appealing but also function effectively.
Yes, Cadti Printing Bumper Stickers are specifically designed for outdoor applications, including use on car bumpers. They are engineered to withstand even the most challenging weather conditions without incurring any damage to the product. Your outdoor decals will remain resilient and vibrant, ensuring long-lasting quality.
Cadti Printing Bumper Stickers are designed with a strong permanent adhesive, making them different from our Low Tac Wall Graphics. It is not advisable to attempt removal once they have been applied.
Yes, Custom Shaped Roll Labels are available in various sizes to suit your needs. The available sizes include 1" x 1", 2" x 2", 3" x 3", 4" x 4", 5" x 5", and 6" x 6".
To set up custom shapes for Roll Labels, follow these steps:
Choose the size that best fits your requirements from the available options.
Select the Shape Option: Custom Roll Label when placing your order.
On the upload page, you will be prompted to upload two files:
Front Artwork File: This file contains the design or artwork for the front of your custom Roll Labels.
Custom Shape File: This file represents the custom shape or cut line for your labels.
When preparing your Custom Roll Label Shape File, please adhere to the following guidelines:
Create the custom shape file as a vector graphic.
Save the custom shape file in either EPS (Encapsulated PostScript) or PDF (Portable Document Format) format.
The custom shape file should clearly represent the intended cut line for your labels.
Ensure that the custom shape is depicted as a black line with a thickness between 0.5pt to 1pt.
Avoid using thin lines and small shapes, as they may not yield optimal results.
Shapes smaller than 1/8" are not recommended, as they may lead to unexpected outcomes.
For Roll Labels, it's important to include a bleed of 0.125" from the cut line on all sides. This bleed ensures that your labels are printed accurately and that there are no unintended white borders.
We hope these FAQs help you in understanding and setting up custom shapes for your Roll Labels. If you have any further questions or need assistance, please don't hesitate to reach out to our customer support team.
Example of Custom Roll Label:

The Unwind Direction refers to the direction in which a label unwinds from a roll.
This revised version provides a concise and clear explanation of the topic while maintaining a professional tone.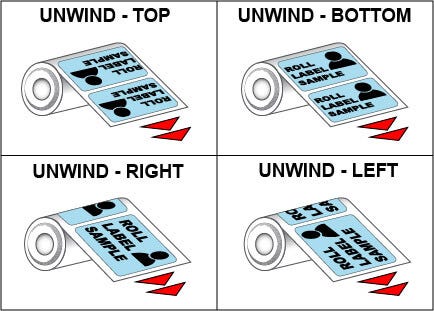
To ensure a successful print job for your Roll Labels, please follow these steps:
Download Our Roll Label Templates: We highly recommend using our Roll Label Templates, as they are specifically designed for this product.
Bleed and Safety Line Measurements: Roll Labels have unique bleed and safety line measurements. It's crucial to understand and apply them correctly.
Total Bleed: Ensure that your artwork extends 0.125 inches beyond the cut line. This means your design should cover an area slightly larger than the final label size.
Total Safety: Leave a margin of 0.125 inches inside the cut line to ensure that no essential elements of your design are trimmed during printing.
Artwork Size: Make sure that the size of your artwork matches the dimensions of the Roll Label you are ordering. It should align perfectly with the label size.
Correct Bleed Amount: Check that your artwork includes the recommended 0.125 inches of bleed. If your uploaded artwork is smaller than the required size, it may not print correctly.
By following these guidelines, you'll ensure that your Roll Labels are set up correctly and will be printed to your satisfaction. If you have any further questions or need assistance, feel free to reach out to our customer support team.
In this guide, we'll explain how to set up and create roll labels with white ink for both Clear and Bright Metallic Silver label options. White ink can be used strategically to achieve opaque or transparent effects in your prints.
Creating a White Mask File
When working with Clear Labels or Bright Metallic Silver, it's essential to create a separate White Mask file to indicate where the white ink will be printed. This is similar to Spot UV masks, and it's crucial for achieving the desired printing results.
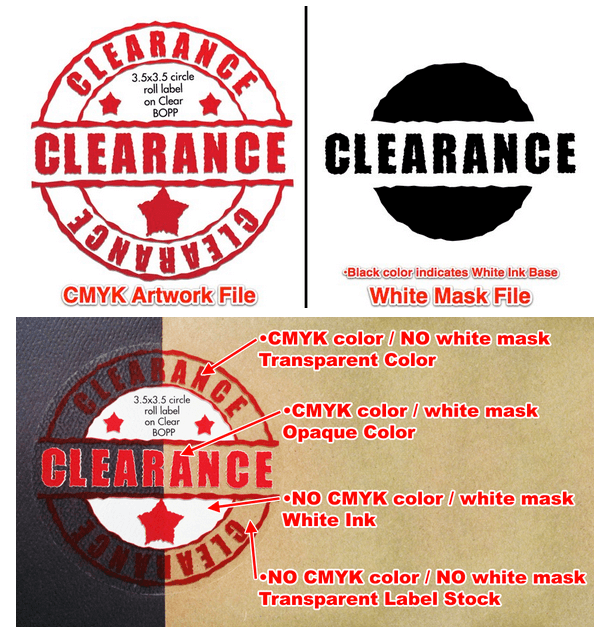
File Format:
Ensure that your White Mask files are in vector format, created as shapes.
Save the White Mask files as either EPS or PDF.
Sizing Matters:
Make sure that your White Mask file is the same size as your color artwork file. This ensures proper alignment during printing and prevents any issues.
Using Vector Paths and Shapes:

Utilize vector paths and shapes to define the areas in your White Mask file where white ink will be applied. These areas will be printed as opaque or solid color.
The rest of the area in your color artwork represents the Metallic or Transparent label stock.
Important Considerations:
White Ink Base Placement:
The white ink base will be printed behind any color that's present in your Artwork Layer. This allows for vibrant and opaque colors.
Areas with Color and White Mask:
In areas where you have both color and a White Mask, the print will appear as an opaque or solid color. This is perfect for achieving specific design effects.
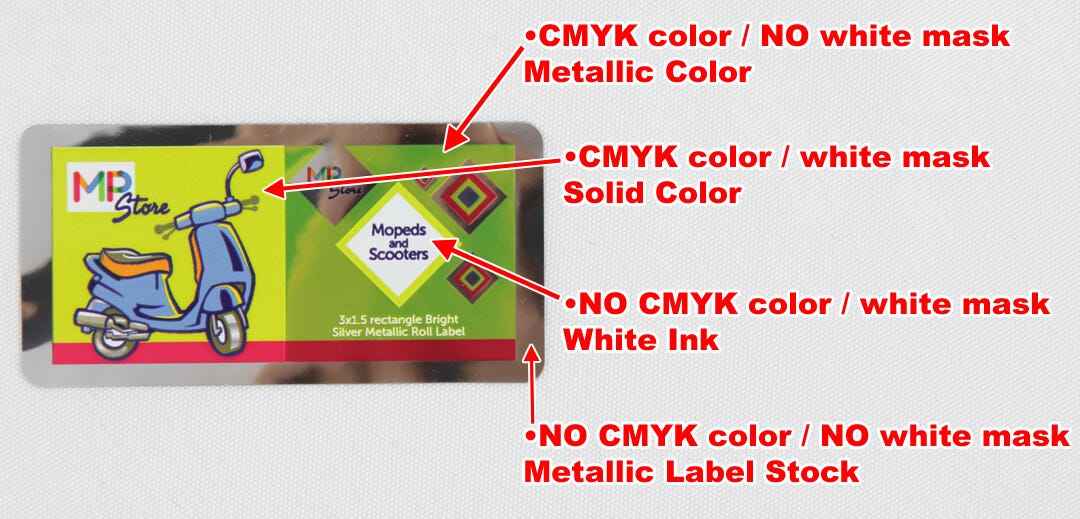
Areas with Color but No White Mask:
If an area has color in your artwork but lacks a White Mask, it will be printed with color directly on the label material. This results in transparent color for Clear stock and Metallic color for Metallic stock.
Areas with White Mask and No Color:
In areas where you have a White Mask but no color in your artwork, white ink will be printed, creating a white appearance.
Sample Labels:
Below are samples of labels created using white ink. You can see how the artwork and white mask files look, followed by a printed piece from these files:
Clear Label with White Ink:
Artwork and White Mask files.
Printed label with transparent and opaque areas.
Bright Metallic Silver Label with White Ink:
Artwork and White Mask files.
Printed label with solid color effects.
These guidelines will help you achieve the desired effects when creating roll labels with white ink. If you have any further questions or need assistance, please feel free to reach out.
Roll Labels are safe to use with food products and items that may come into contact with moisture, humidity, water, or condensation, provided that an intervening layer of FDA approved food-contact material is used. This additional layer enhances the label's adhesion, reducing the likelihood of any issues arising. It is essential for our customers or the end-users to ensure that the products' usage complies with the relevant FDA regulations.
We hope this clarifies any concerns you may have regarding the safety of Roll Labels for food packaging. If you have any further questions or require additional information, please don't hesitate to reach out to us. Your satisfaction and safety are our top priorities.
Our Roll Labels come in various materials, each designed for specific use cases. Here are our recommendations:
Bright Silver Metallic (2mil stock):* This material is durable and features a chemical-resistant topcoat. However, it is not oil and water-resistant, making it ideal for indoor use.
Clear BOPP (2.3mil stock): Clear BOPP labels are oil and water-resistant, but we recommend them for indoor use to ensure longevity.
70lb Eggshell Felt: Manufactured with wet strength properties, these labels perform well in moist environments. They are primarily recommended for indoor use.
Semi-Gloss (55lb stock): Semi-Gloss labels are not oil and water-resistant and are best suited for indoor applications.
White BOPP (2.3mil stock): Similar to Clear BOPP, White BOPP labels are oil and water-resistant but are advised for indoor use.
We hope this information helps you choose the right Roll Labels for your specific needs. If you have any further questions, please don't hesitate to reach out to our team for assistance.
Square and rectangle labels are designed with a practical consideration in mind. They feature industry-standard 1/8-inch rounded corners. This design choice serves a specific purpose - easy removal from the liner.
These rounded corners ensure a smooth and effortless peeling process, making it convenient for you to use the labels as needed. This attention to detail in the label's design enhances the overall user experience, ensuring that you can apply the labels with ease and precision.
If you have any further questions or need assistance with anything else, please feel free to reach out.
We recommend using an 8-point font or larger on all Bright Metallic Roll Labels. This recommendation ensures the best printing results and prevents issues such as thin lines that could lead to poor ink adhesion or registration.
Feel free to use this revised FAQ for a more professional and easy-to-read presentation.
Designing Artwork with Black Font
1. What is the recommended font colour for my artwork?
For optimal results, use a 100% black font colour (designated as 100% K).
2. Are there specific requirements for small text?
Yes, for a text that is 9pt or lower, it must be in 100% K (black) only.
3. What should be the image resolution for my artwork?
Ensure that your image resolution is 300 DPI (dots per inch) or higher.
4. What file types are recommended for design?
Design your artwork in vector files.
Recommended file types include EPS (Encapsulated PostScript) or PDF with a vector base.
By following these guidelines, you can create professional and visually appealing artwork with black font.
To design vector files, follow these steps:
Select Vector-Based Software: Start by using a vector-based software program like Adobe Illustrator, InDesign, or Corel DRAW. These tools provide the flexibility and precision needed for vector design.
File Format: Save or export your artwork as EPS (Encapsulated PostScript) or PDF (Portable Document Format). These formats are ideal for preserving vector graphics.
Font Handling: To avoid font substitution issues, make sure to outline or embed your fonts within your vector files. This ensures that the intended fonts are used when viewing or printing your design.
Print-Ready PDF: For print-ready PDF files, we offer a convenient "Save As PDF Preset" tool that you can download. This tool simplifies the process of creating PDF files optimized for printing.
By following these guidelines, you can create high-quality vector files that are suitable for a wide range of design projects. If you have any further questions or need assistance, please feel free to contact our support team.
We hope this information helps streamline your vector file design process.
Bumper Stickers are an excellent choice for outdoor advertising. These stickers are crafted with precision using 4mil premium white flexible vinyl film, enhanced with a durable acrylic adhesive, and protected by a laminated 90# layflat liner. Here's why they stand out:
Premium Materials: Our Bumper Stickers are made from top-quality 4mil white flexible vinyl film, ensuring they are robust and weather-resistant.
Acrylic Adhesive: Each sticker is coated with a high-quality acrylic adhesive, guaranteeing strong adhesion.
Laminated Liner: The stickers are backed by a 90# layflat liner, offering exceptional layflat properties. This liner ensures that the stickers adhere seamlessly to most bumpers, even in challenging environmental conditions.
Ink Compatibility: The vinyl film is designed to work with a wide range of solvent-based and curable inks, allowing for vibrant and long-lasting prints.
So, whether you want to promote your brand or make a statement, our Bumper Stickers are the perfect choice to hit the streets with your message, full speed ahead!
We hope this revised FAQ provides a clearer and more professional understanding of our Bumper Stickers. If you have any further questions or need assistance, please feel free to reach out to us.
Promo Products
1. What types of T-Shirts do you offer?
We provide a diverse range of T-Shirts crafted from premium 100% cotton material by the renowned brand Alstyle.
2. What color options are available for your T-Shirts?
Our T-Shirt collection boasts a vibrant array of colors to suit your preferences. Currently, we offer the following colors: White, Black, Red, Blue, and Gray.
3. What sizes are available for your T-Shirts?
We cater to a wide range of sizes to accommodate our customers. For adults, our sizes range from Small (S) to Extra Extra Large (XXL). Additionally, we offer kids' sizes ranging from Extra Small (XS) to Extra Large (XL).
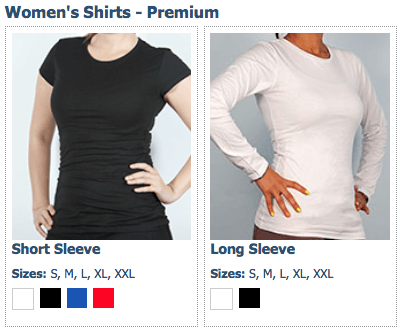

Note: Ladies' Short and Long Sleeve T-Shirts are Slim Fit
We offer two different size Mugs, 11oz and 15oz. Our Mugs are made from a high quality ceramic and are microwave and dishwasher safe.

Locking-Pin Buttons are high-quality, visually striking buttons with a robust metal locking-pin backer. These buttons are designed to impress with near-photo quality prints.
What sizes are available for Locking-Pin Buttons? We offer Locking-Pin Buttons in various sizes to suit your needs:
- Round: 1x1, 1.25x1.25, 2.25x2.25, 3x3, 3.5x3.5
- Rectangle: 2x3, 2.5x3.5
- Square: 2x2
- Diamond: 2x2

Our Magnet Buttons feature high-quality printing with near-photo quality and come equipped with a magnetic backing.

We provide a diverse range of T-Shirts crafted from 100% cotton. Our current collection boasts a selection of the following colors:
- White
- Black
- Red
- Blue
- Gray
For your convenience, we offer T-Shirts in a variety of sizes to cater to different preferences:
- Adult sizes range from Small (S) to Extra Extra Large (XXL).
- Kids sizes are available in a range from Extra Small (XS) to Extra Large (XL).
Please take note that our Ladies Short and Long Sleeve T-Shirts are designed with a Slim Fit for a tailored look and feel.


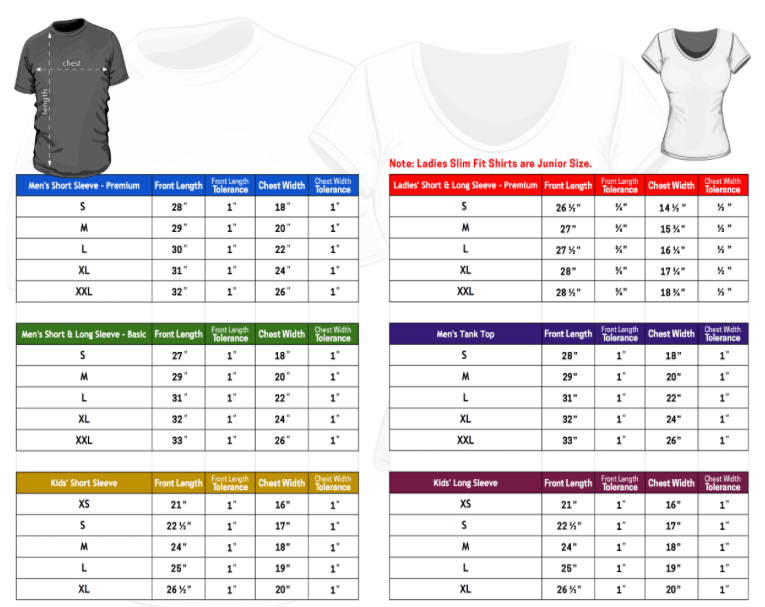
At our facility, we employ a state-of-the-art CMYK+W digital printing process to create high-quality custom T-Shirts. This advanced technology allows us to print vibrant designs on both the front and back of the T-Shirt, ensuring a stunning and durable result.
Yes, you can. To order printing exclusively on the back of the T-Shirt, please select the "0/4" option under the color selection.
We accept the following file formats for T-Shirt designs:
- PDF (.pdf)
- JPEG (.jpg)
- Encapsulated PostScript (.eps)
To obtain a sample of our T-Shirt, you can make a purchase through our official trade website. Unfortunately, we do not provide complimentary samples at this moment.
No, T-Shirt art files do not require bleed. Please submit your files at the precise dimensions of either 11"x8.5" or 8.5"x11".
No, it is not necessary to send your artwork with crop marks or any other printer marks, including crop marks, registration marks, or color bars.
No, you may set up your artwork just like you would for normal men's T-Shirts. There's no need for any special adjustments when preparing your design for Tank Top T-Shirts.
We offer a variety of T-Shirt materials to suit your comfort and style preferences:
Men's - Basic, Tank Tops, and Kids' Shirts:
- Material: Our Men's Basic, Tank Tops, and Kids' shirts are made from 6.0 oz (10.0 oz in Canada) 100% Cotton Tubular Jersey.
- Feel: These shirts have a classic fit, providing a comfortable and relaxed feel. They feature double-needle bottom hem and sleeves for durability, and shoulder-to-shoulder tape for added strength. Plus, they are pre-shrunk to minimize shrinkage.
- References:
- Men's Basic Short Sleeve: Alstyle #1301
- Men's Long Sleeve: Alstyle #1304
- Men's Tank Top: Alstyle #1307
- Kid's Short Sleeve: Alstyle #3381
- Kid's Long Sleeve: Alstyle #3384
Men's - Premium Shirts:
- Material: Our Men's Premium shirts are crafted from 4.3 oz (7.15 oz in Canada) 100% Combed Ring-spun Cotton Jersey.
- Feel: These premium shirts offer a soft and luxurious feel against your skin. They feature a set-in rib collar with shoulder-to-shoulder taping for a comfortable fit. The double-needle sleeve and bottom hems ensure durability, and they are pre-shrunk to minimize shrinkage.
- References:
- Men's Premium Short Sleeve: Alstyle #5301
Ladies' - Premium Shirts:
- Material: Our Ladies' Premium shirts are also made from 4.3 oz (7.15 oz in Canada) 100% Combed Ring-spun Cotton Jersey.
- Feel: These premium shirts are designed to provide a comfortable and flattering fit. They feature a set-in rib collar with shoulder-to-shoulder taping for added comfort. The double-needle sleeve and bottom hems ensure durability, and they are pre-shrunk to minimize shrinkage.
- References:
- Ladies' Premium Short Sleeve: Alstyle #5562
- Ladies' Premium Long Sleeve: Alstyle #5564
We strive to offer high-quality materials that cater to your preferences, whether you prefer the classic feel of cotton or the luxurious softness of premium combed cotton.
We currently accept the following file types for Mugs:
- 1. PDF Files: You can upload your Mug design in PDF format.
- 2. JPEG Files (JPG): We accept JPEG files for Mug customization.
- 3. EPS Files: If you have your design in EPS format, you can use it for your Mug.
Please ensure that your design is in one of these formats to proceed with your Mug customization. If you have any questions or need further assistance, feel free to contact our support team.
The total print area for our Mugs depends on the mug size. For the 11oz. Mug, the print area measures 8.5 inches in width and 3 inches in height. For the 15oz. Mug, the print area is slightly larger, measuring 9 inches in width and 4 inches in height.

It's important to note that the print area is centered and wrapped around the mug's surface, ensuring that your design covers the entire designated area for printing. Anything outside of this designated print area will not be printed on the mug.
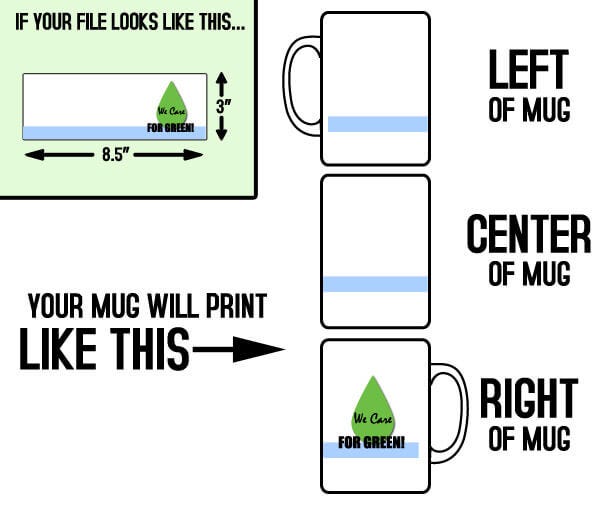
For customization, you have the flexibility to achieve different printing positions, such as left, center, or right alignment, by positioning your logo or artwork accordingly within the 8.5x3 (for 11oz. Mug) or 9x4 (for 15oz. Mug) document size.
If you require samples for your customers, you can purchase a single Mug through our trade site. Please note that we do not provide free samples at this time.
The print area for our mugs varies depending on the mug size you choose:
1. For the 11oz. Mug: The print area is 8.5 inches in width and 3 inches in height. Your design should be created within these dimensions.
2. For the 15oz. Mug: The print area is 9 inches in width and 4 inches in height. Ensure that your design fits within these dimensions.
Additionally, please keep in mind that the design will be centered and wrapped around the mug for the best printing results. So, make sure your important elements are within the specified print area to ensure they appear correctly on the mug.
If you have any further questions or need assistance with your mug design, please don't hesitate to reach out to our support team.
No, you should not include any printer marks, including crop marks, registration marks, or color bars, in your artwork files for Mugs. Please send your artwork without these marks.
We offer two different types of Buttons: Locking-Pin Buttons and Magnet Buttons. Both types are printed and produced in the same way but have different backers.
Locking-Pin Buttons: These buttons come with a traditional locking-pin back, making them ideal for attaching to clothing, bags, or other fabric surfaces.
Magnet Buttons: Our magnet backing buttons are designed for use on metal surfaces, such as refrigerators and metal cabinets. They have a magnetic back that securely adheres to metal, making them perfect for displaying on magnetic surfaces. However, please note that Magnet Buttons are not meant for apparel and should not be attached to clothing.
Feel free to reach out if you have any more questions or need further assistance!
We currently accept the following file types for buttons:
- PDF (.pdf): You can upload PDF files to customize your buttons. This format is versatile and maintains high-quality images and text.
- JPEG (.jpg): JPEG files are widely supported and provide good image quality. They are suitable for simple graphics and photographs.
- EPS (.eps): Encapsulated PostScript (EPS) files are a vector graphics format that is ideal for complex designs and illustrations. They allow for scalability without loss of quality.
Please ensure that your files adhere to our guidelines to ensure the best results when creating your buttons. If you have any questions about file compatibility or need assistance with your files, please don't hesitate to reach out to our support team.
You can easily request a sample of our Button product by following these steps:
1. Visit our website and navigate to the "Samples" section.
2. Select the "Catdi Printing Unbranded Loose Sample Pack" option, which includes a sample of our Button product.
3. Click on the "Order Sample Pack" button to add it to your cart.
4. Proceed to the checkout and complete the Sample Request Form.
5. Provide your shipping information and any specific details you'd like to include with your sample request.
6. Confirm your order and your Button sample will be on its way to you.
Feel free to reach out to our customer support if you have any questions or need assistance with the sample request process. We're here to help you explore the quality and features of our Button product.
All of our Button products adhere to the same guidelines as standard print-ready artwork. However, the key distinction lies in the safety areas specific to each type of Button product. To ensure your artwork meets the required specifications, we strongly recommend utilizing our certified templates.
To access our templates, please follow these steps:
- Visit our website and navigate to the 'Templates' section.
- Select the Button product you intend to customize.
- Download the corresponding certified template for that product.
Using our templates will guarantee that your artwork aligns perfectly with the safety areas unique to each Button product, ensuring the best results for your final printed buttons. If you have any further questions or need assistance with your artwork, please don't hesitate to reach out to our support team. We're here to help you create the perfect Button product!
We offer Tote Bags in a variety of colors to suit your preferences. Our current color options include:
- 1. Natural (off-white)
- 2. Blue (royal)
- 3. Red
Please feel free to choose your favorite color when selecting a Tote Bag from our collection. If you have any further questions or need assistance with your order, don't hesitate to reach out to our customer support team.
Our Tote Bags come in the following size specifications:
Product Size: Each Tote Bag measures 14.5 inches in width (W) and 16 inches in height (H), with a thickness of 1 inch.
Printable Area: You can customize your Tote Bag with your preferred design, and the printable area available for your design is 9 inches in width (W) and 13 inches in height (H) on both sides of the bag.
These size dimensions ensure that you have ample space to create your personalized Tote Bag with your unique designs and artwork. Whether you want to showcase your creativity or promote your brand, our Tote Bags provide the perfect canvas for your ideas.
Our Tote Bags are printed using a CMYK+W digital print process.
We currently accept the following file types for Tote Bags:
.pdf: Portable Document Format files are widely used and can preserve the formatting and layout of your design.
.jpg: JPEG files are a common format for images and photos, making them suitable for colorful and detailed designs.
.eps: Encapsulated PostScript files are preferred for vector graphics and logos, as they offer high-quality scalability without loss of quality.
These file types ensure that your Tote Bag design can be accurately reproduced with the best possible results. If you have any questions or need further assistance with file formats, please don't hesitate to contact us.
No, Tote Bag art files do not need bleed. Please submit your files at exactly 9 inches in width and 13 inches in height (9"W x 13"H).
No, you should not include crop marks or any other printer marks, such as registration marks or color bars, in your artwork files when submitting them for your Tote Bag order. Crop marks are unnecessary for Tote Bag printing and can be omitted from your files.
There are two available print areas, 11"x8.5" and 8.5"x11". Both are centered 2" down from the bottom of the collar for the front, and 5.5" down from the top of the collar for the back.
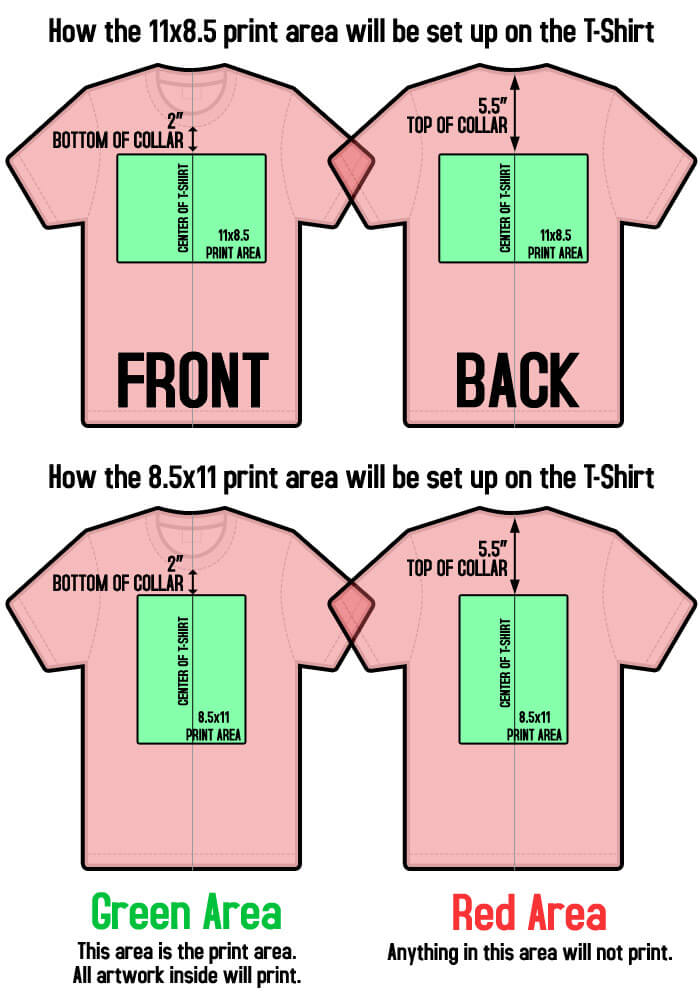
As you can see, the print area (GREEN) will be printed on the shirt. Anything outside that area (RED) will not be printed.

Above is an example of offset position for T-Shirts. As you can see you can achieve a left or right side chest print by positioning the logo or artwork accordingly on the 11"x8.5" document size.
No, the process for preparing your artwork remains consistent for all T-Shirts. To ensure that the color of the garment is visible, it's essential to have a transparent background in your artwork. The recommended file formats for this purpose are transparent PDF or TIF files. Alternatively, you can provide EPS files with no background.

For instance, if you intend to print a logo on a garment and your artwork includes the logo with a white or any other background color, the printing will replicate the file's appearance. To achieve a precise logo print, it's crucial to have the logo on a transparent background.
To make it easier for you to set up your T-Shirt designs and understand bleed rules, we provide T-Shirt templates that you can access here. These templates are designed to streamline the setup process and ensure professional results for your T-Shirt printing needs.
We offer a selection of high-quality T-Shirts, and one of the prominent brands we carry is Alstyle Apparel. Alstyle Apparel is known for its comfortable and stylish T-Shirts, making it a popular choice among our customers. In addition to Alstyle, we also offer a variety of other trusted brands to cater to your preferences. Feel free to explore our collection to find the perfect T-Shirt that suits your style and comfort preferences.
Mugs are printed using a CMYK digital print process. This process ensures vibrant and high-quality printing on each mug, allowing for a wide range of colors and intricate designs to be reproduced with precision. CMYK, which stands for Cyan, Magenta, Yellow, and Key (black), is a color model used in the printing industry to achieve full-color printing. It combines these four ink colors in varying proportions to create a spectrum of colors and achieve the desired image or design on the mug's surface. This digital printing method offers exceptional clarity, detail, and durability, making your custom mugs a perfect canvas for personalized messages or artwork.
For White Mugs: The background color must be C-0 M-0 Y-0 K-0. It's important to note that using white as the background color for White Mugs will be ignored. Please ensure that you specify the color in the format C-0 M-0 Y-0 K-0 for accurate printing on White Mugs.
Yes, you should adjust your artwork for women's and youth size T-Shirts. These sizes are smaller, so your artwork should be set up vertically with specific dimensions:
- Width: 8.5 inches
- Height: 11 inches
Please note that horizontal files are not accepted for these sizes.
Yes, we provide Mug templates to help you visualize the setup and understand bleed rules. You can access our Mug templates by clicking here.
We cannot guarantee that the locking pin will align precisely with the orientation of the design. If it is slightly off, you can easily correct the orientation when pinning it to the fabric.
We provide a robust and eco-friendly Tote Bag crafted from 100% cotton. Our Tote Bag is versatile and suitable for a wide range of uses, whether it's for grocery shopping or heading to the gym. It's made from durable 6-oz cotton canvas material that can be easily washed and reused. For added convenience, it features dual self-fabric straps, allowing for comfortable over-the-shoulder carrying and leaving your hands free for various shopping needs.
Buttons are printed using a state-of-the-art CMYK digital print process. This advanced printing technology ensures that the buttons achieve near-photo quality results, making them vibrant and visually appealing.
Please let me know if you'd like any further adjustments or if there's anything else I can assist you with!
Yes, we offer 4/4 printing on both sides of our Tote Bags, allowing you to customize and design both the front and back of the bag to your liking. This provides you with the opportunity to create a unique and personalized Tote Bag that suits your style and needs. Whether you want to showcase your artwork, logo, or any other design, our double-sided printing option ensures that your Tote Bag stands out from the crowd.
Yes, we do! To help you visualize setup and bleed rules, you can use our Tote Bag templates, which are available for download here. These templates are designed to make the setup process easier and ensure that your Tote Bag design meets all the necessary specifications.
Website
To view the status of your orders, please follow these steps:
- Log in to your account.
- Navigate to your Dashboard, where you'll find an overview of your most recent orders.
- For a complete history of your orders, click on "My Orders" located in the "Order Information" section of the Dashboard.
- You can access the Dashboard at any time by selecting "My Account" from the top of the page.
This process ensures you can easily and efficiently manage and review all your order details.
Absolutely! For your convenience, you have two options for saving addresses:
Through Your Dashboard: Navigate to the "Address Book" located under the "Your Account" section, where you can add and manage addresses.
During an Order Process: When placing an order, you can add a new address by selecting "Add Address" within the shipping section.
This feature ensures that your future orders are streamlined and efficient, saving you valuable time.
Our customer service team is readily available to assist you through multiple channels:
- Phone: For immediate assistance, please call us at 713 882 4629.
- Email: For inquiries via email, reach out to us at [email protected]
- Additional Contact Options: For more ways to connect with our customer service team, please click here.
We're committed to providing prompt and efficient support to address your needs.
Yes. For assistance with preparing your files for submission, please visit our General FAQ where you can find detailed guidance on artwork setup.
Absolutely. We invite you to explore our Template page for a comprehensive collection of templates designed to support your artwork creation process. For your convenience, these templates are also available for download on individual product pages, ensuring you find the perfect match for your specific needs.
For optimal performance and the most seamless experience on our website, we recommend utilizing the latest versions of the following browsers: Firefox, Chrome, Safari, or Microsoft Edge. Our website is also fully accessible and optimized for use on mobile devices. Ensuring your browser is up-to-date will enhance your browsing experience.
.PSD and .AI files are proprietary formats used primarily as working files within their respective applications. These formats may lead to unpredictable outcomes when used for printing due to their complex structures and layering systems. To ensure the highest quality and compatibility for your prints, we recommend converting these files to .PDF format. Detailed instructions for this conversion process can be found in our General FAQ section. Additionally, we accept jpg files as another alternative for your convenience.
Preliminaries
When designing a Raised Spot UV greeting card file, please follow these guidelines:
- Position the Mask File: Ensure that the mask file is positioned at least 0.25 inches away from the scoring line. This precaution helps prevent varnish breakage and facilitates smooth folding.
By adhering to these design specifications, you can create stunning Raised Spot UV Greeting Cards with ease. If you have any further questions or require assistance, feel free to reach out to our support team for expert guidance.
Online Printing System is a prepress process that bridges the gap between online digital content and commercial print production. The process allows a print house, a client or a graphic designer to create, edit, and approve computer-based online templates during the prepress phase. This process increasingly calls for a Portable Document Format (PDF) workflow environment with output provided by digital printing.
This solution will make your company run more efficiently and profitably by streamlining your business processes, maximizing your resources and eliminating redundant operations.
Products
The site currently supports eight major and popular print products as listed. We are shortly going to introduce more products like logos/mailing labels, vinyl stickers, catalogs, banners, calendars, door hangers and raised ink cards.
There are three options for designing and customizing a product. Click a product on the left-hand panel and choose one of the options.
1. Custom Design: lets you customize the products. Click it to open the design studio and use multiple tools to create your own design.
2. Upload Design: using this option, you can upload your own JPG, JPEG, GIF, PNG, EPS, AI, PDF and PSD images.
3. Browse Design: use this to select hundreds of pre-loaded templates. Work on them or customize them through our design studio.
The type of paper used for difference purposes is expressed in weight. In the countries following the European system, it is grammes per square metre (gsm or g/m2 or simply g) and in the US system it is Pound (lb).
The paper used for writing/printing (letterheads and such stationery) is generally between 60 to 120 gsm (20 to 70 lb) and is called the paper or text stock. Anything heavier than this is considered the card stock, i.e. the paper used for business cards, postcards, greeting cards, etc.
Coated papers are available in two finishes – glossy (shiny and smooth) and matt (flat and lusterless). Coated glossy papers reflect the light evenly so they are suitable for almost all types of printing jobs. Glossy papers have a good ink holdout, which is important for creating sharp, bright images.
Printing
Our system supports RGB (red, green, blue) for producing digital prints. We have accurately mapped color pallet to match RGB to CMYK (cyan, magenta, yellow, key) to ensure proper 4-color printing.
300 dpi (dots per inch) is the resolution of the output PDF file.
We use offset printing, which provides the highest quality of print material for both text and images.
Pricing
No, the price list indicates basic prices of products against the speculative quantities. The prices are calculated with regard to the most basic paper/card types, sizes and single side printing. As you know, the final printing cost depends on many parameters: paper/card weights or thickness (GSM/Pt), glossy or matt finish, 2 or 4 colors, square or rounded corners, single or double side printing, quantity, destination shipping charges and the mode of transport. Please use the indicative prices for calculating the basic cost. Once you place the order using the above parameters, we will quickly mail you the final, exact cost.